DIY K-Pop Demon Hunters Shrinky Dink Ornaments
By using this site, you agree to our Terms of Use. This post may contain affiliate links. Read our disclosure policy.
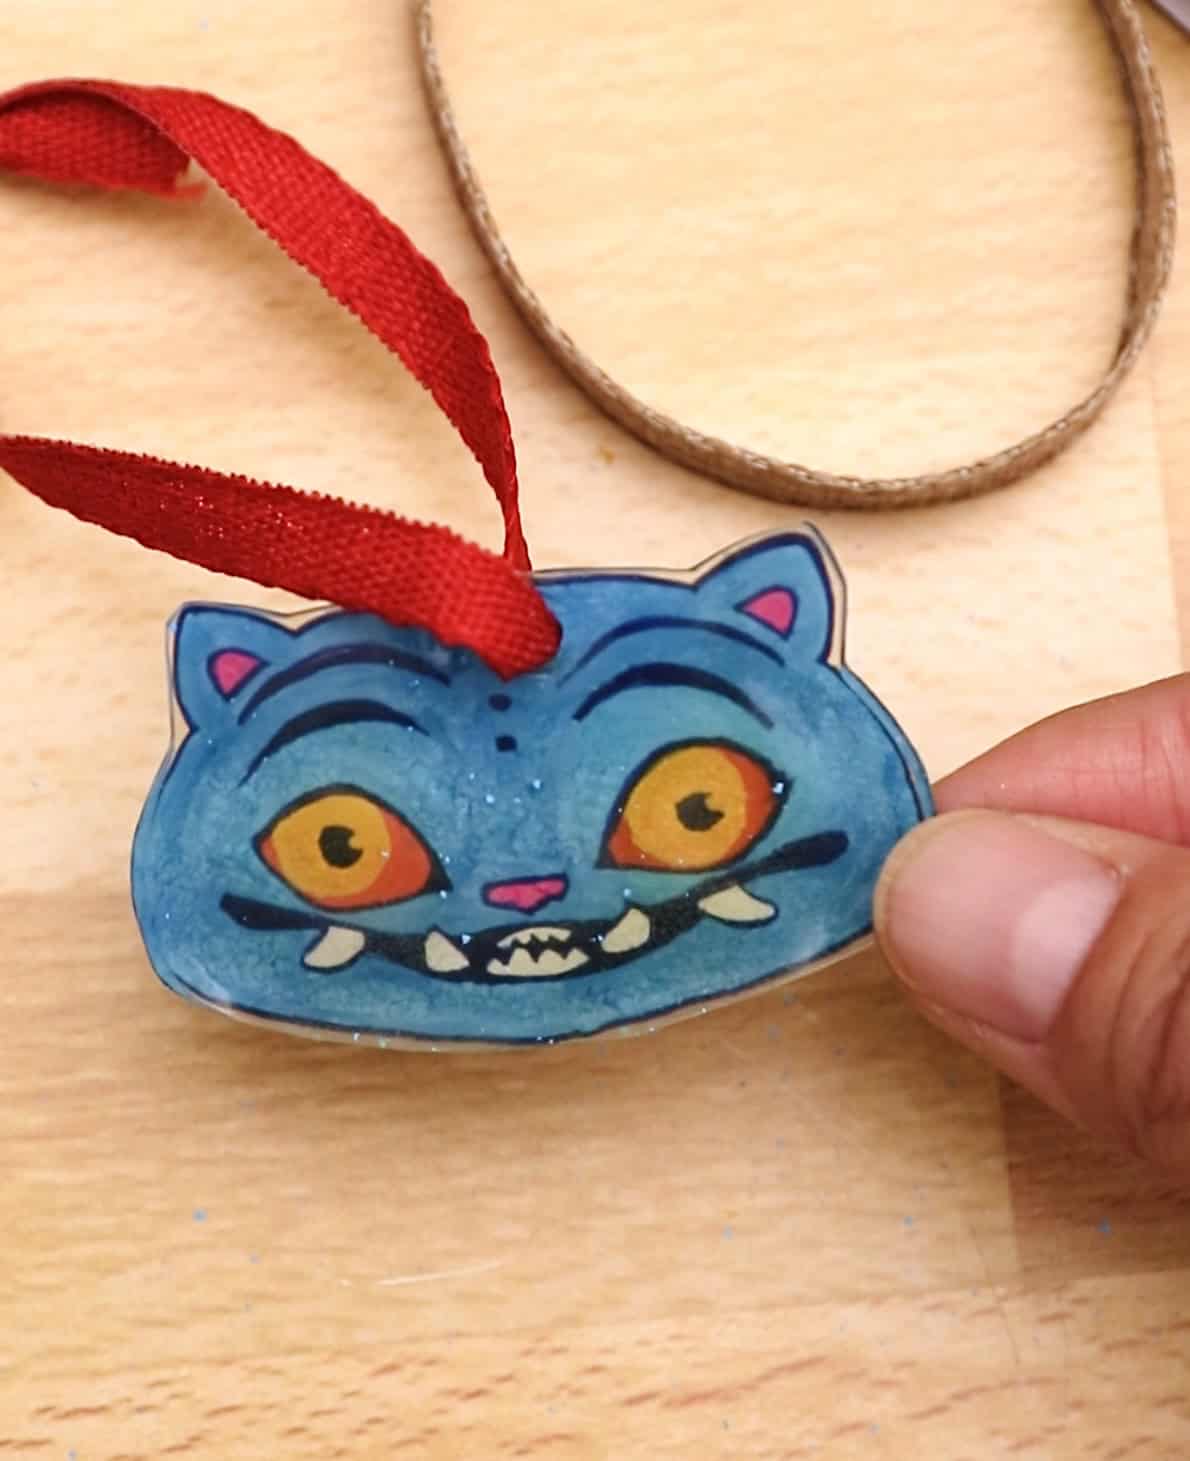
Create DIY K-Pop Demon Hunter ornaments using recycled plastic clamshell containers for bold shrink art based on Derpy Tiger.
Follow us on Instagram for more fun ideas for kids!
If your kids can’t get enough of the hit Netflix show, KPop Demon Hunters, these DIY Shrinky Dink Demon Hunter ornaments are the perfect craft! With Christmas coming up, these fun DIY ornament blend pop culture and holiday crafting into one.
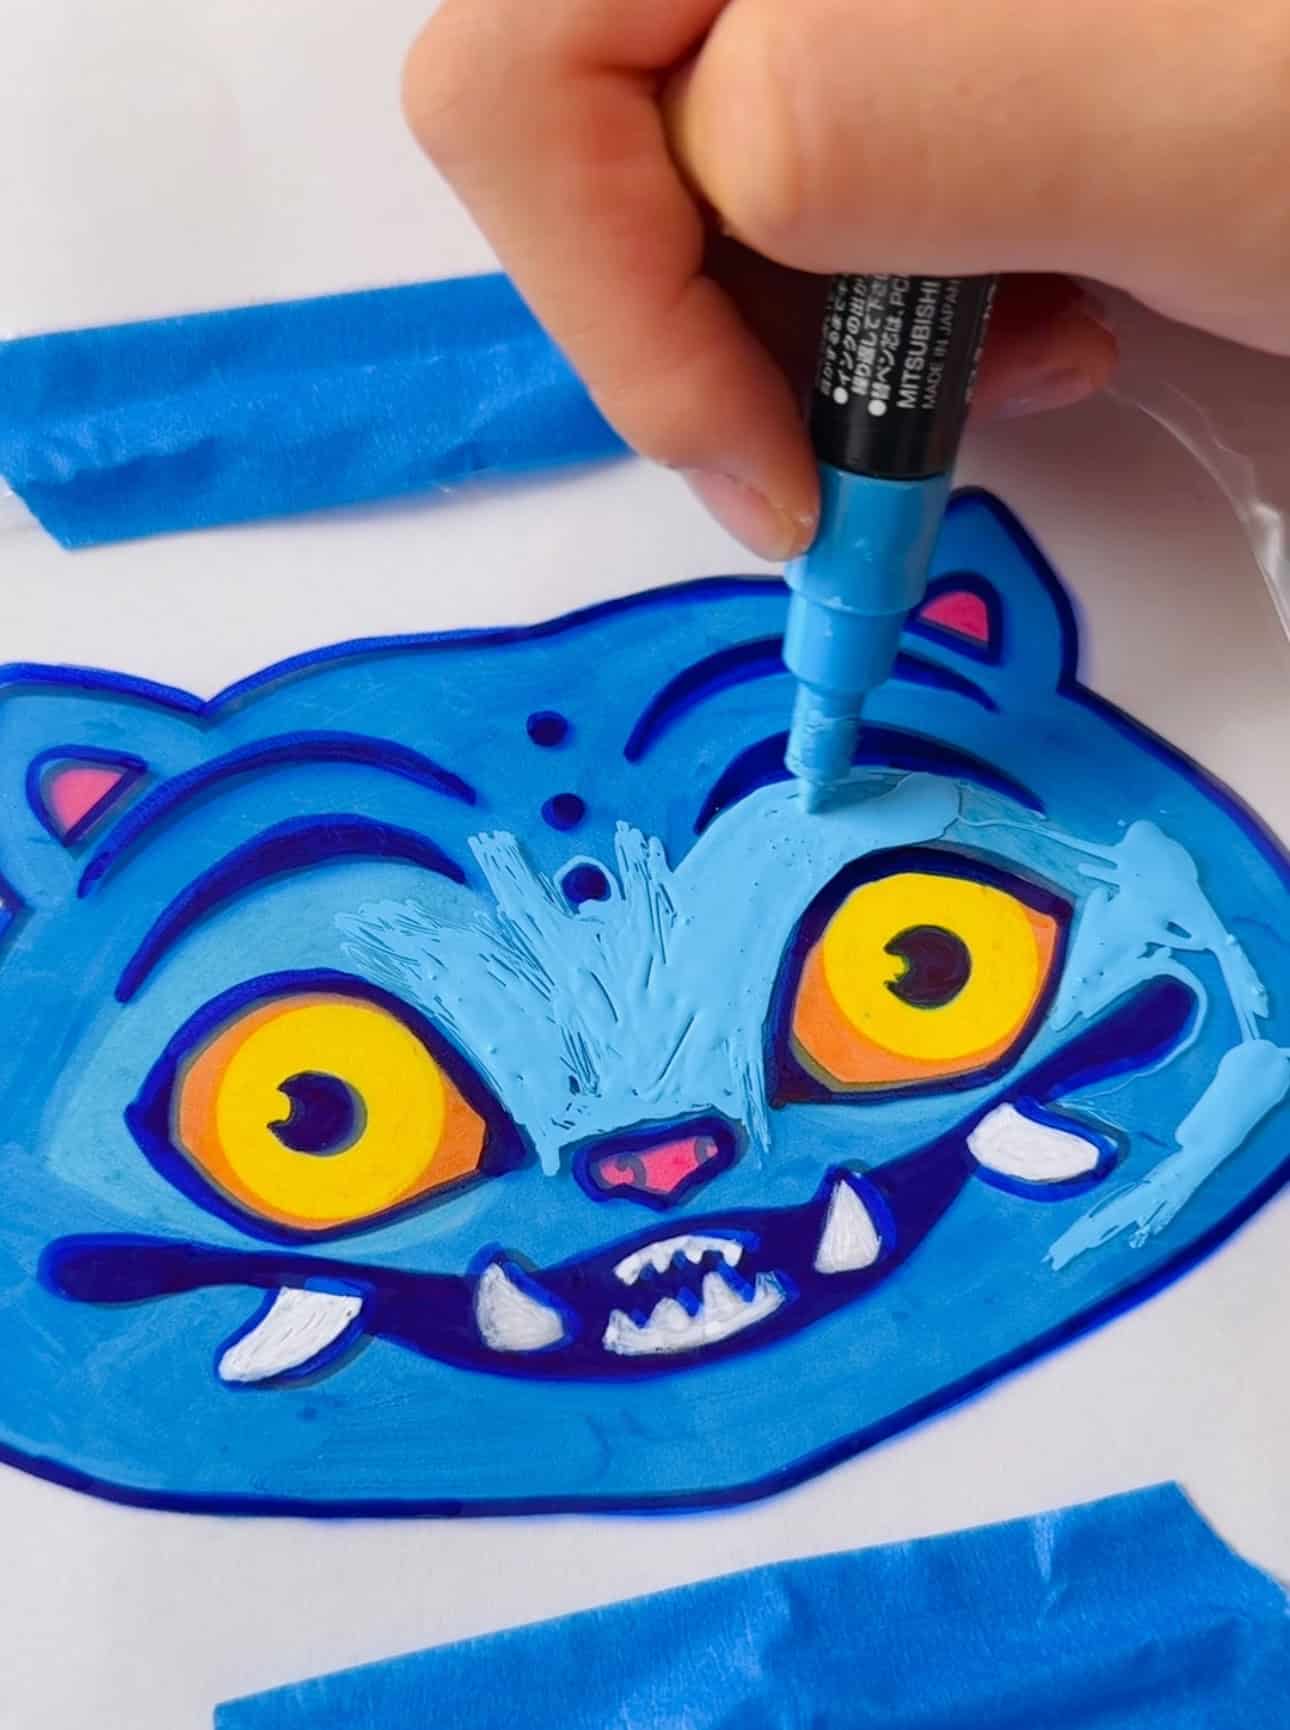
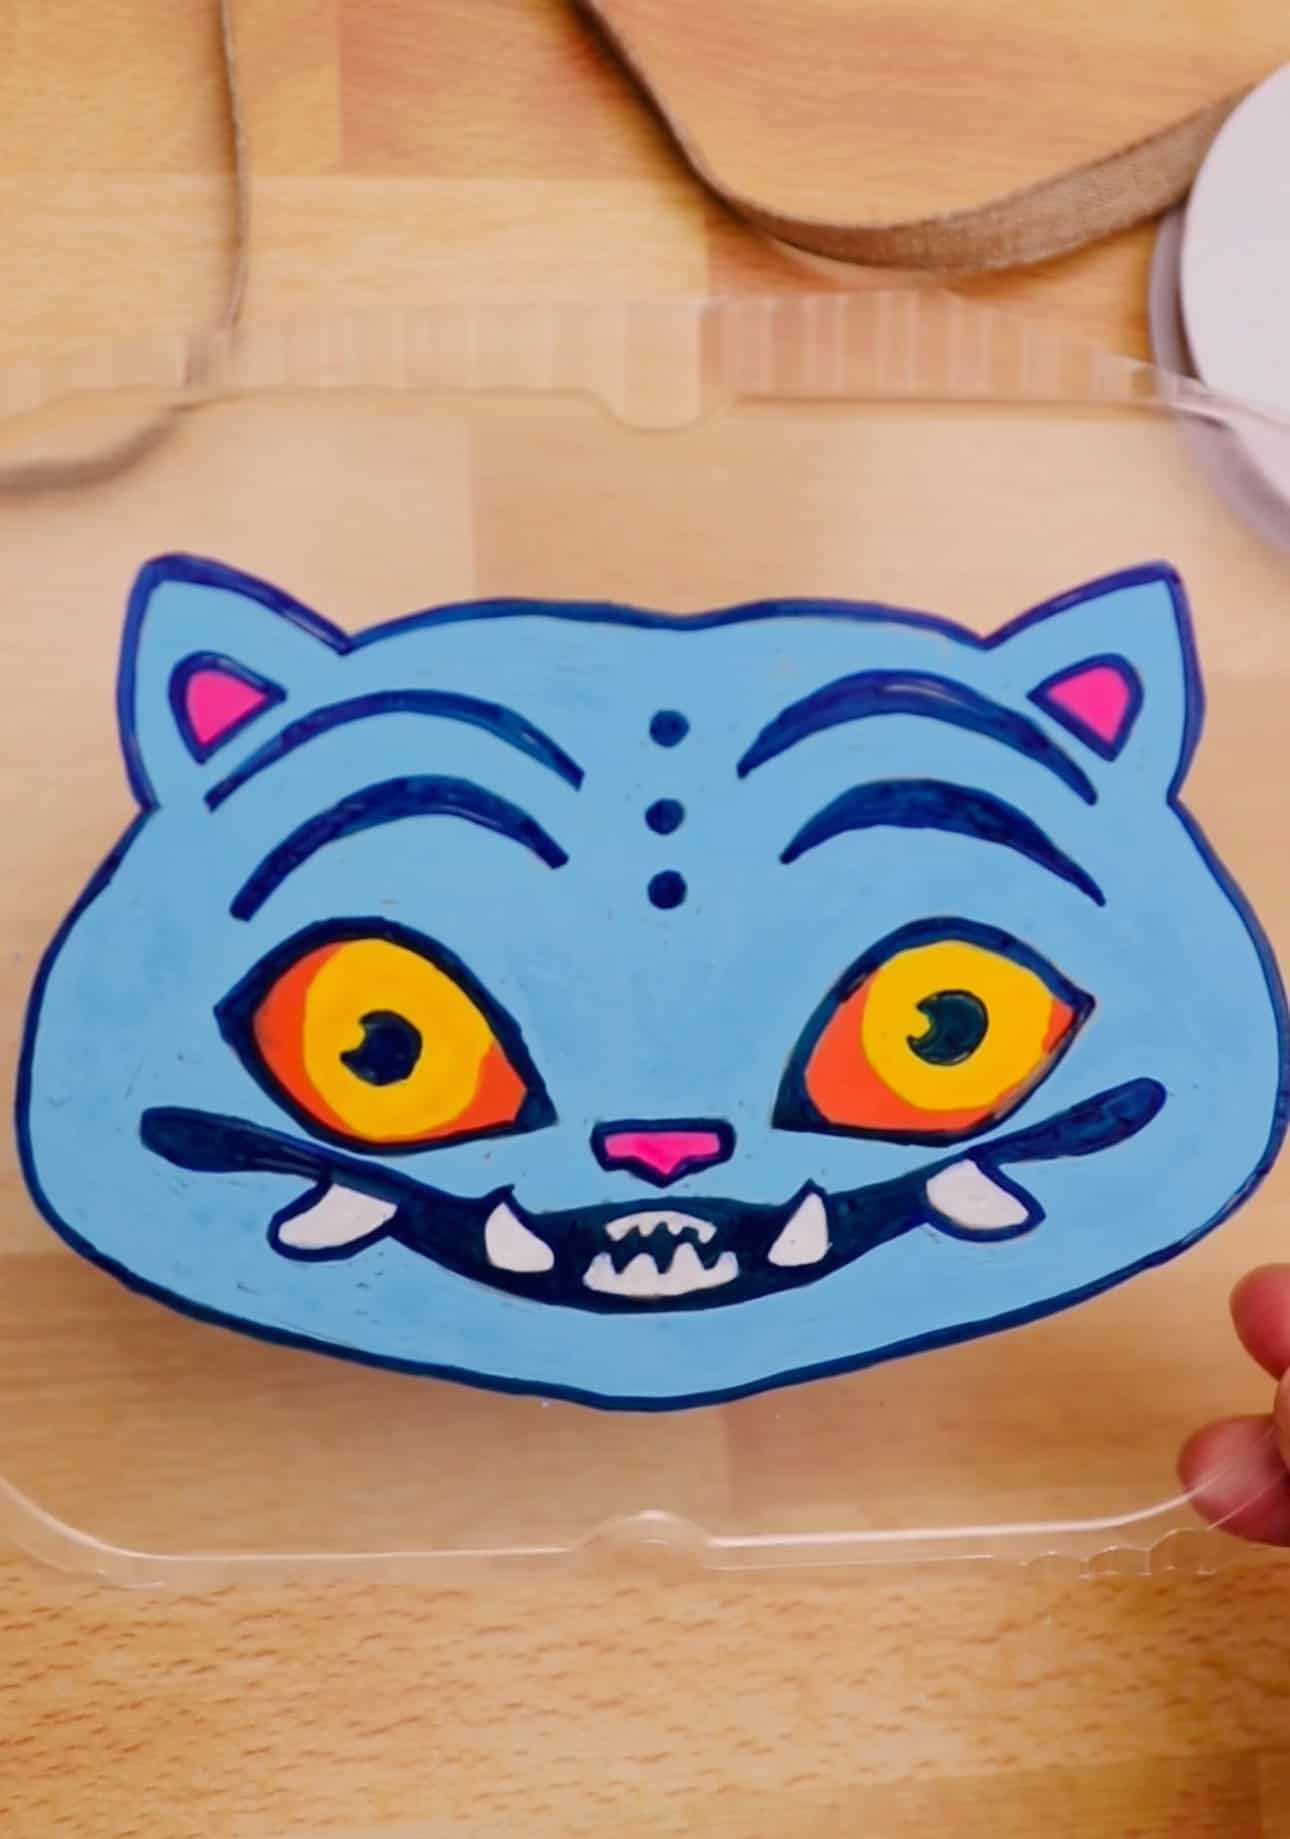
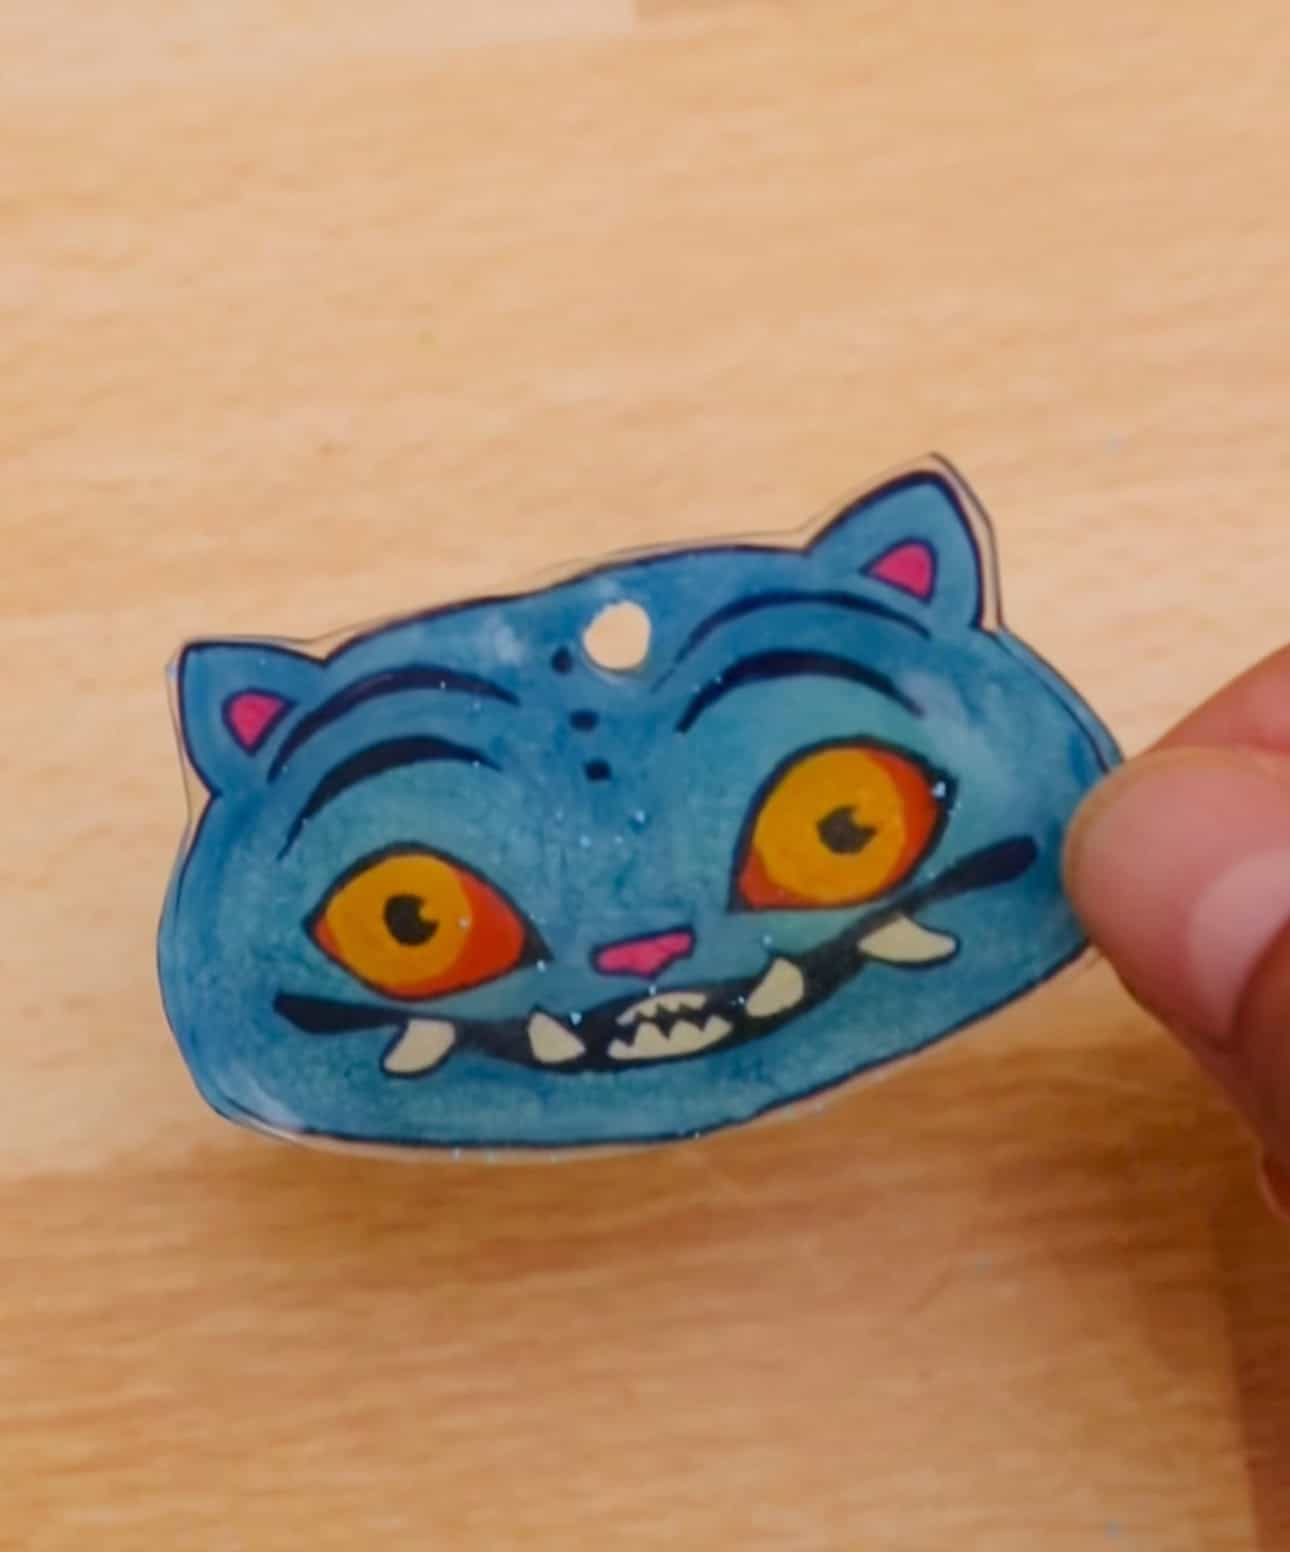
These KPop shrinky dinks turn into sturdy, glossy charms that look great on a tree, backpack, or keychain. We created the KPop Demon Hunter version using this Derpy Tiger illustration as inspiration using paint markers.
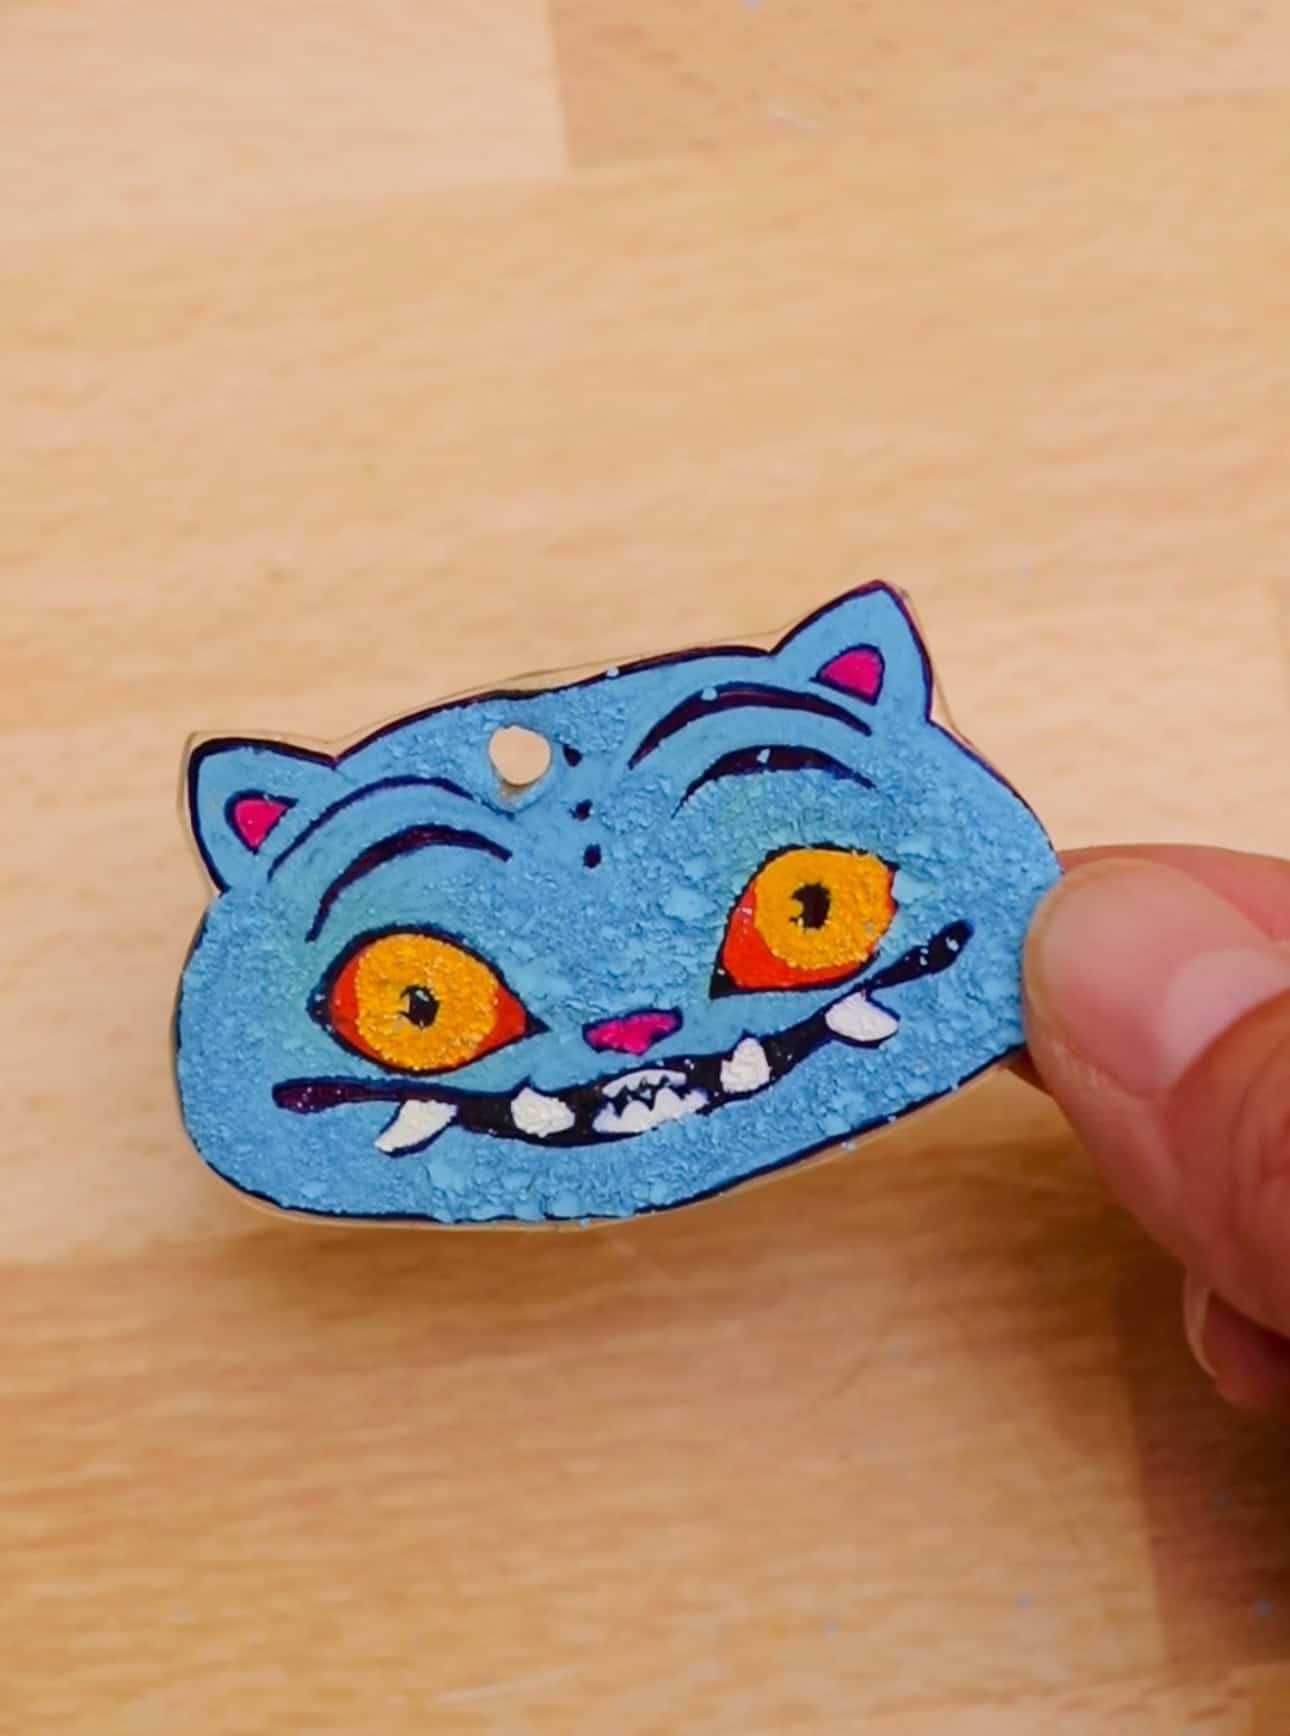
These ornaments shrink down to durable plastic pieces with bright colors and a slightly distressed look which happened by surprise. Because I used paint markers, the artwork cracked slightly during shrinking, giving the front a rugged Demon Hunter texture, while the back stayed smooth and polished. Since the character was a tiger it actually looked okay and like “fur!”
If you want your shrinky dink to look smooth on both ends, use ONLY markers and NOT paint markers like we did in our Valentine shrinky dinks.
What Plastic Is Used for Shrinky Dinks?
Shrinky Dinks are made from shrinky dink sheets online or in craft stores. What I prefer to do is recycle clear food clamshell containers from the grocery store. Look for the #6 symbol on the bottom. These are often used for bakery items. Make sure the container is clean and free of crumbs or oils before using. Once prepped, this recycled plastic works just like purchased sheets.
Materials
-
Recycled #6 plastic clamshell containers or store bought shrinky dink sheets
-
Alcohol based markers or paint markers (if you use paint markers, the paint side will bubble and crack a bit). Use plain markers for a smooth look; however the colors won’t be as vibrant)
-
Printed or traced illustration (I used an image of Derpy the Tiger)
-
Scissors
-
Hole punch
-
Heat gun
-
Chopsticks or wooden dowels
-
Ribbon or cord
How do you melt shrink dinks?
Most people melt shrink plastic in an oven or toaster oven, but I have found that using a heat gun is much easier. A basic heat gun is affordable and comes in handy for many household tasks like softening adhesives, loosening hardware, stripping paint, or thawing pipes. I even use mine to speed up the drying time on my clay projects.
Why use a heat gun for melting shrinky dinks?
A heat gun lets you watch the plastic melt and shrink right in front of you. In an oven, you miss that moment because the door stays closed. Seeing the plastic curl, warm, and settle into its final shape is fascinating for kids, though an adult should always be the one handling the heat gun. It also saves time since there is no need to preheat anything. You can shrink a single piece or several pieces at once with no extra steps. While an oven can do the same job, it feels like a much bigger process when you only need to shrink one small charm or keychain.
How to Melt Shrinky Dinks in a Toaster Oven
A toaster oven works well for shrinking plastic if you do not have a heat gun. Preheat the toaster oven to 325 -350 degrees Fahrenheit. Place your plastic piece on a parchment lined baking sheet and slide it into the oven. Within a few seconds the plastic will begin to curl, shrink, and then flatten again. Once it has settled into its final shape, leave it in for a few more seconds to finish setting. Carefully remove the sheet and press the piece flat with a spatula or wooden tool while it is still warm. Let it cool before handling.
How to Make KPop Demon Hunter Ornaments
Watch the video in this post
1. Trace or Draw Your Demon Hunter Character
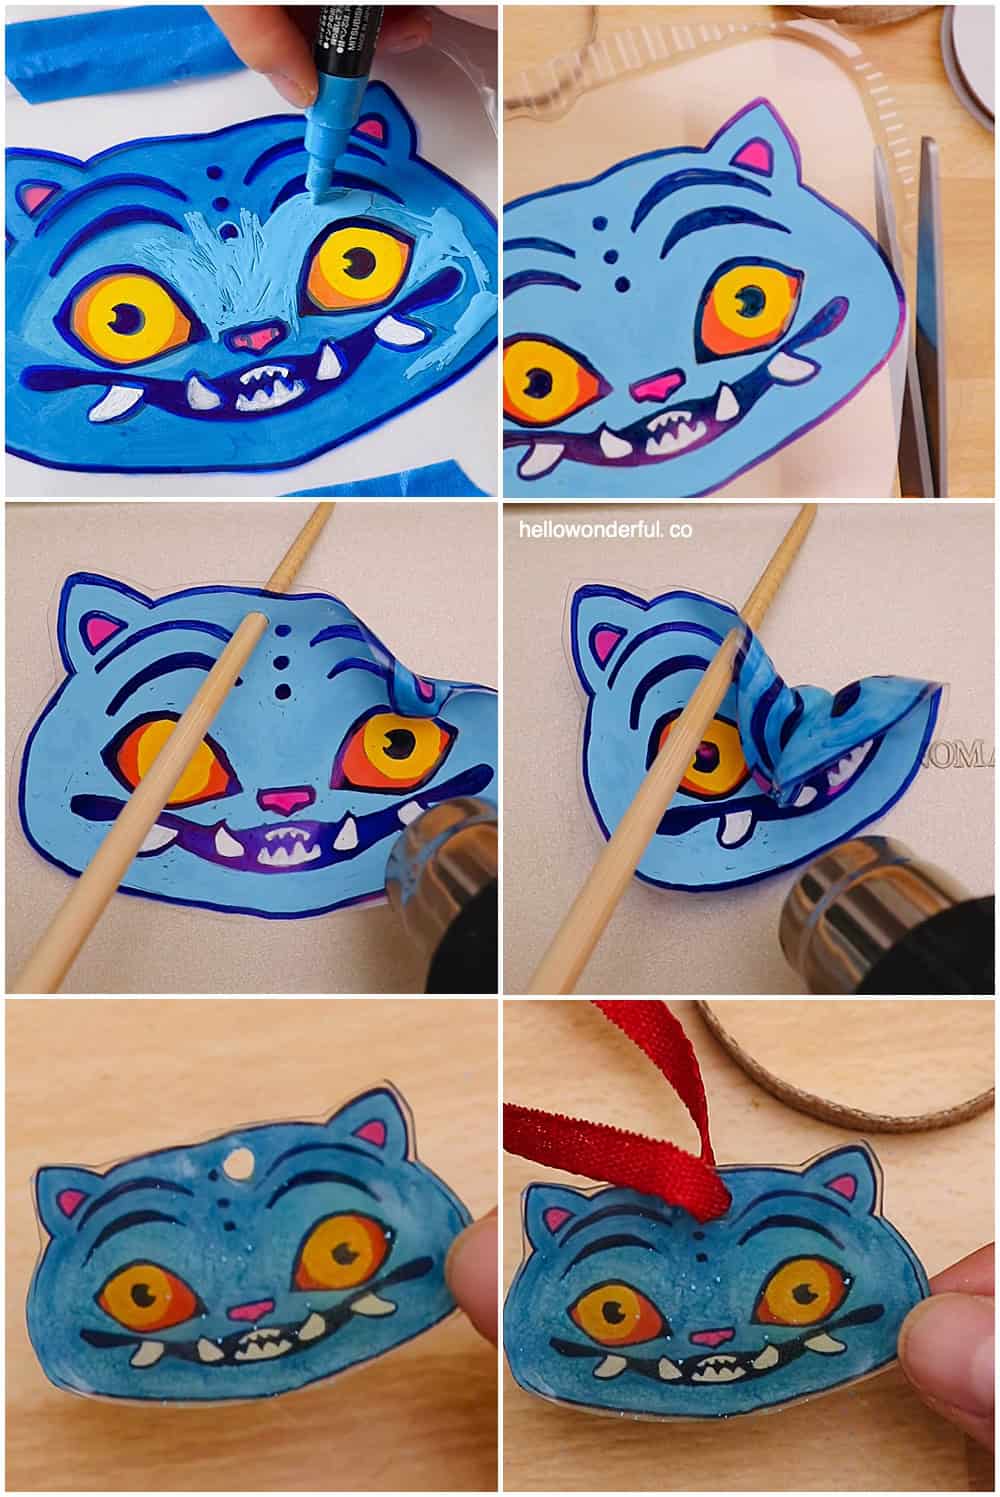
Cut a flat piece from your recycled #6 plastic and place your drawing underneath. I used this illustration of Derpy the Tiger as my guide. Color your design with paint markers. The colors become bold and saturated once the plastic shrinks.
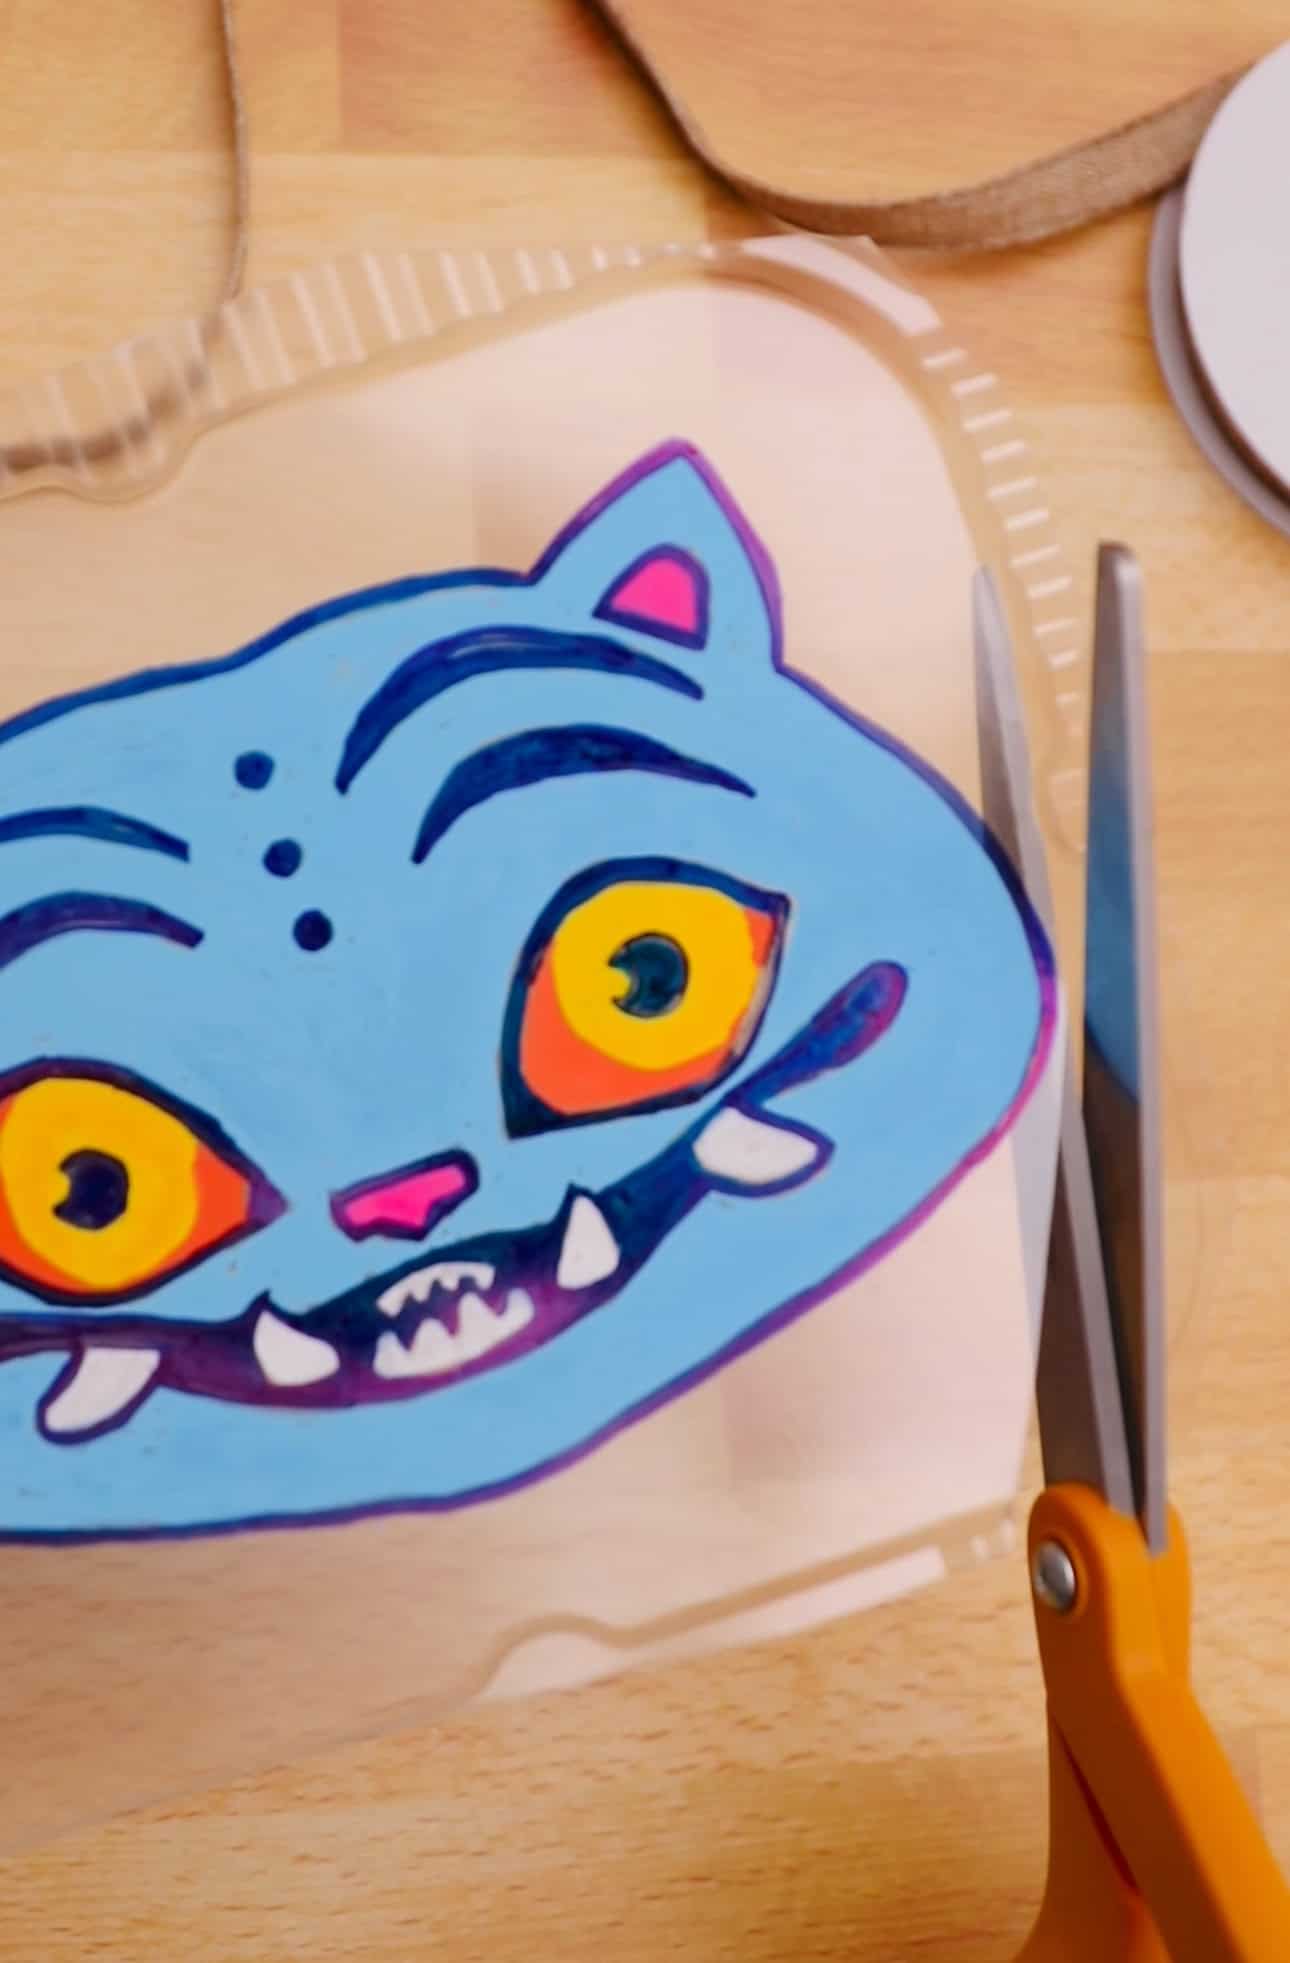
2. Cut Out the Shape and Punch a Hole
Cut around the edges, leaving a small border. Punch a hole at the top if you plan to hang it.
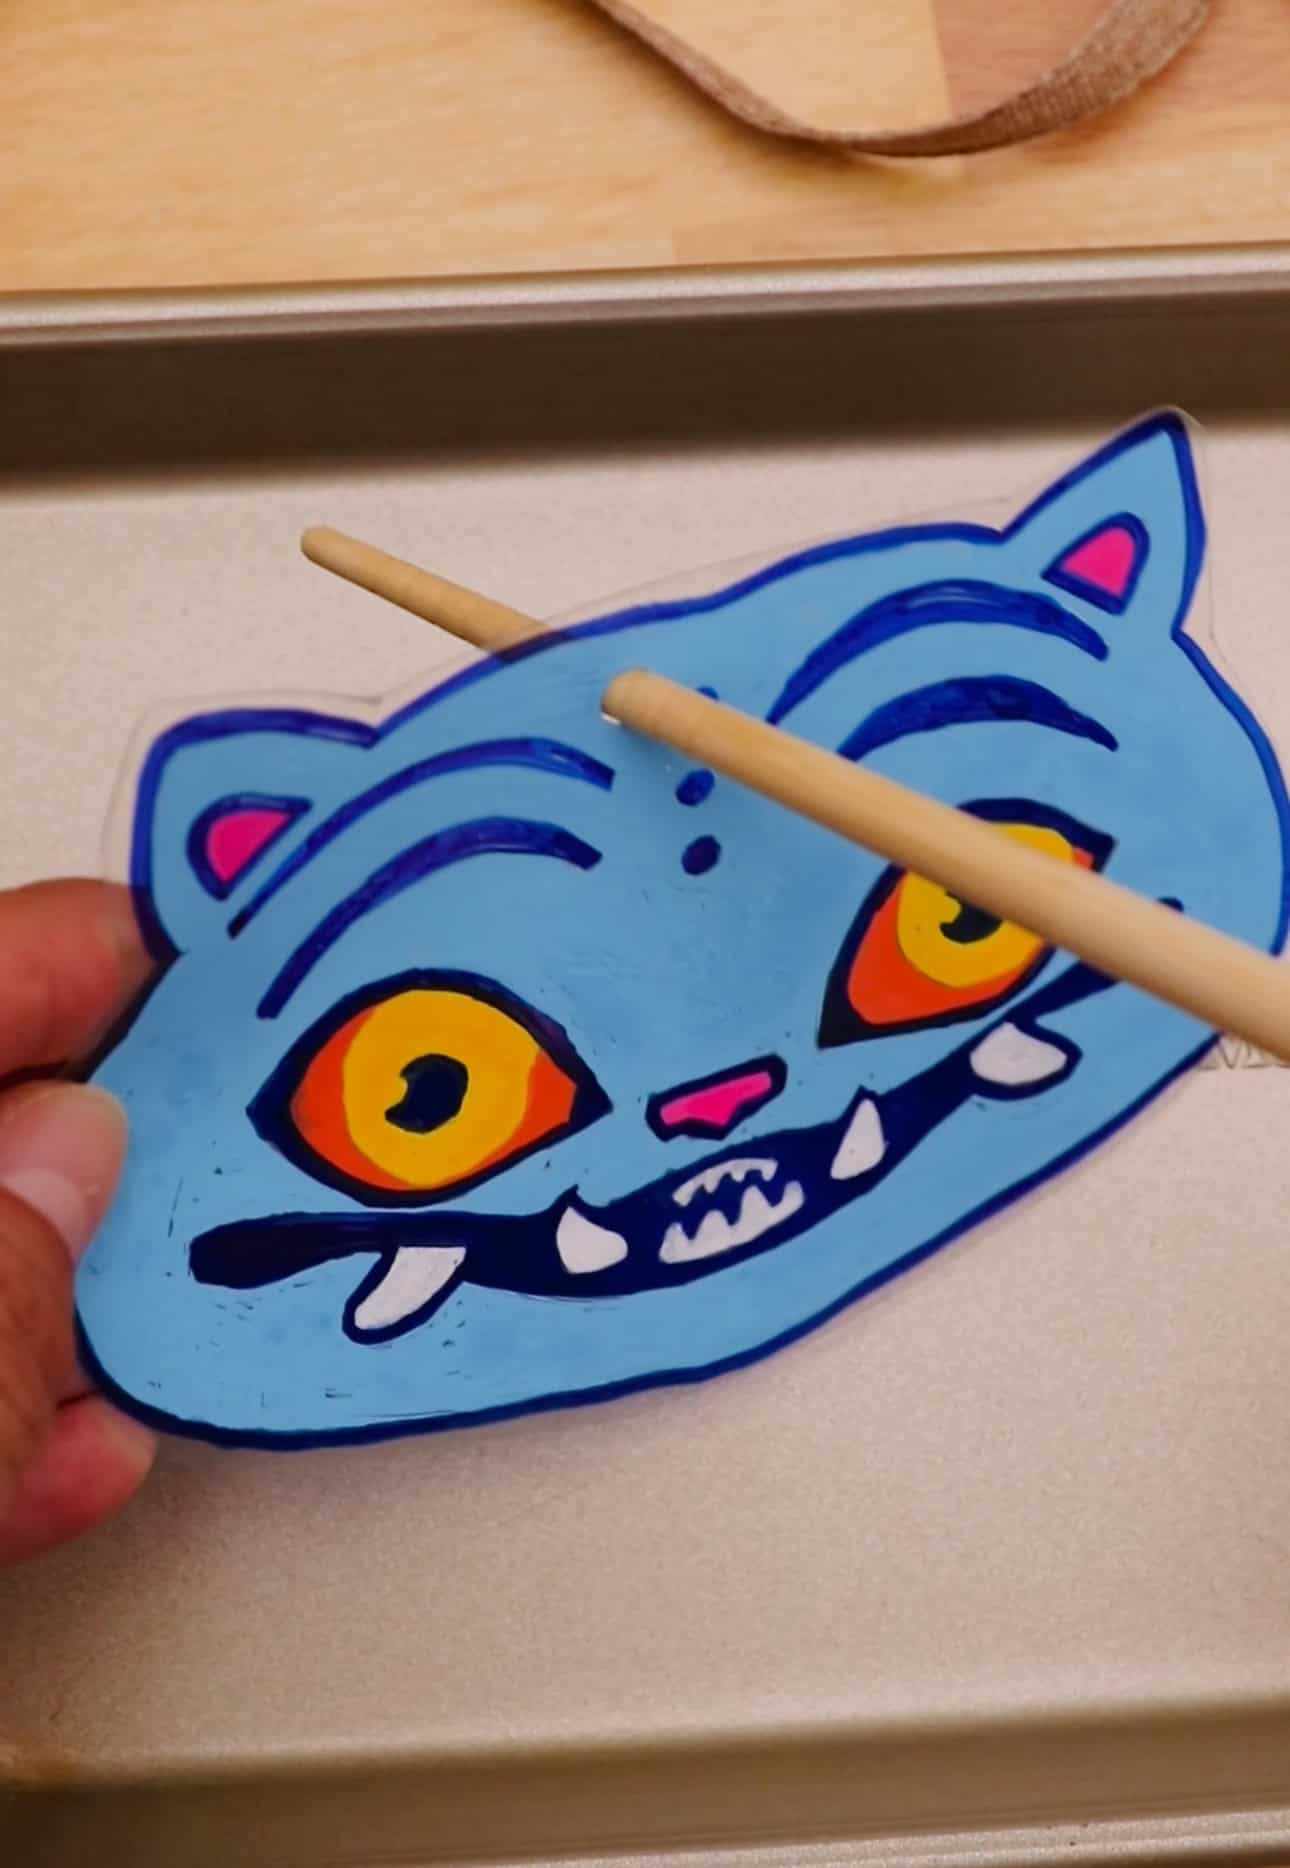
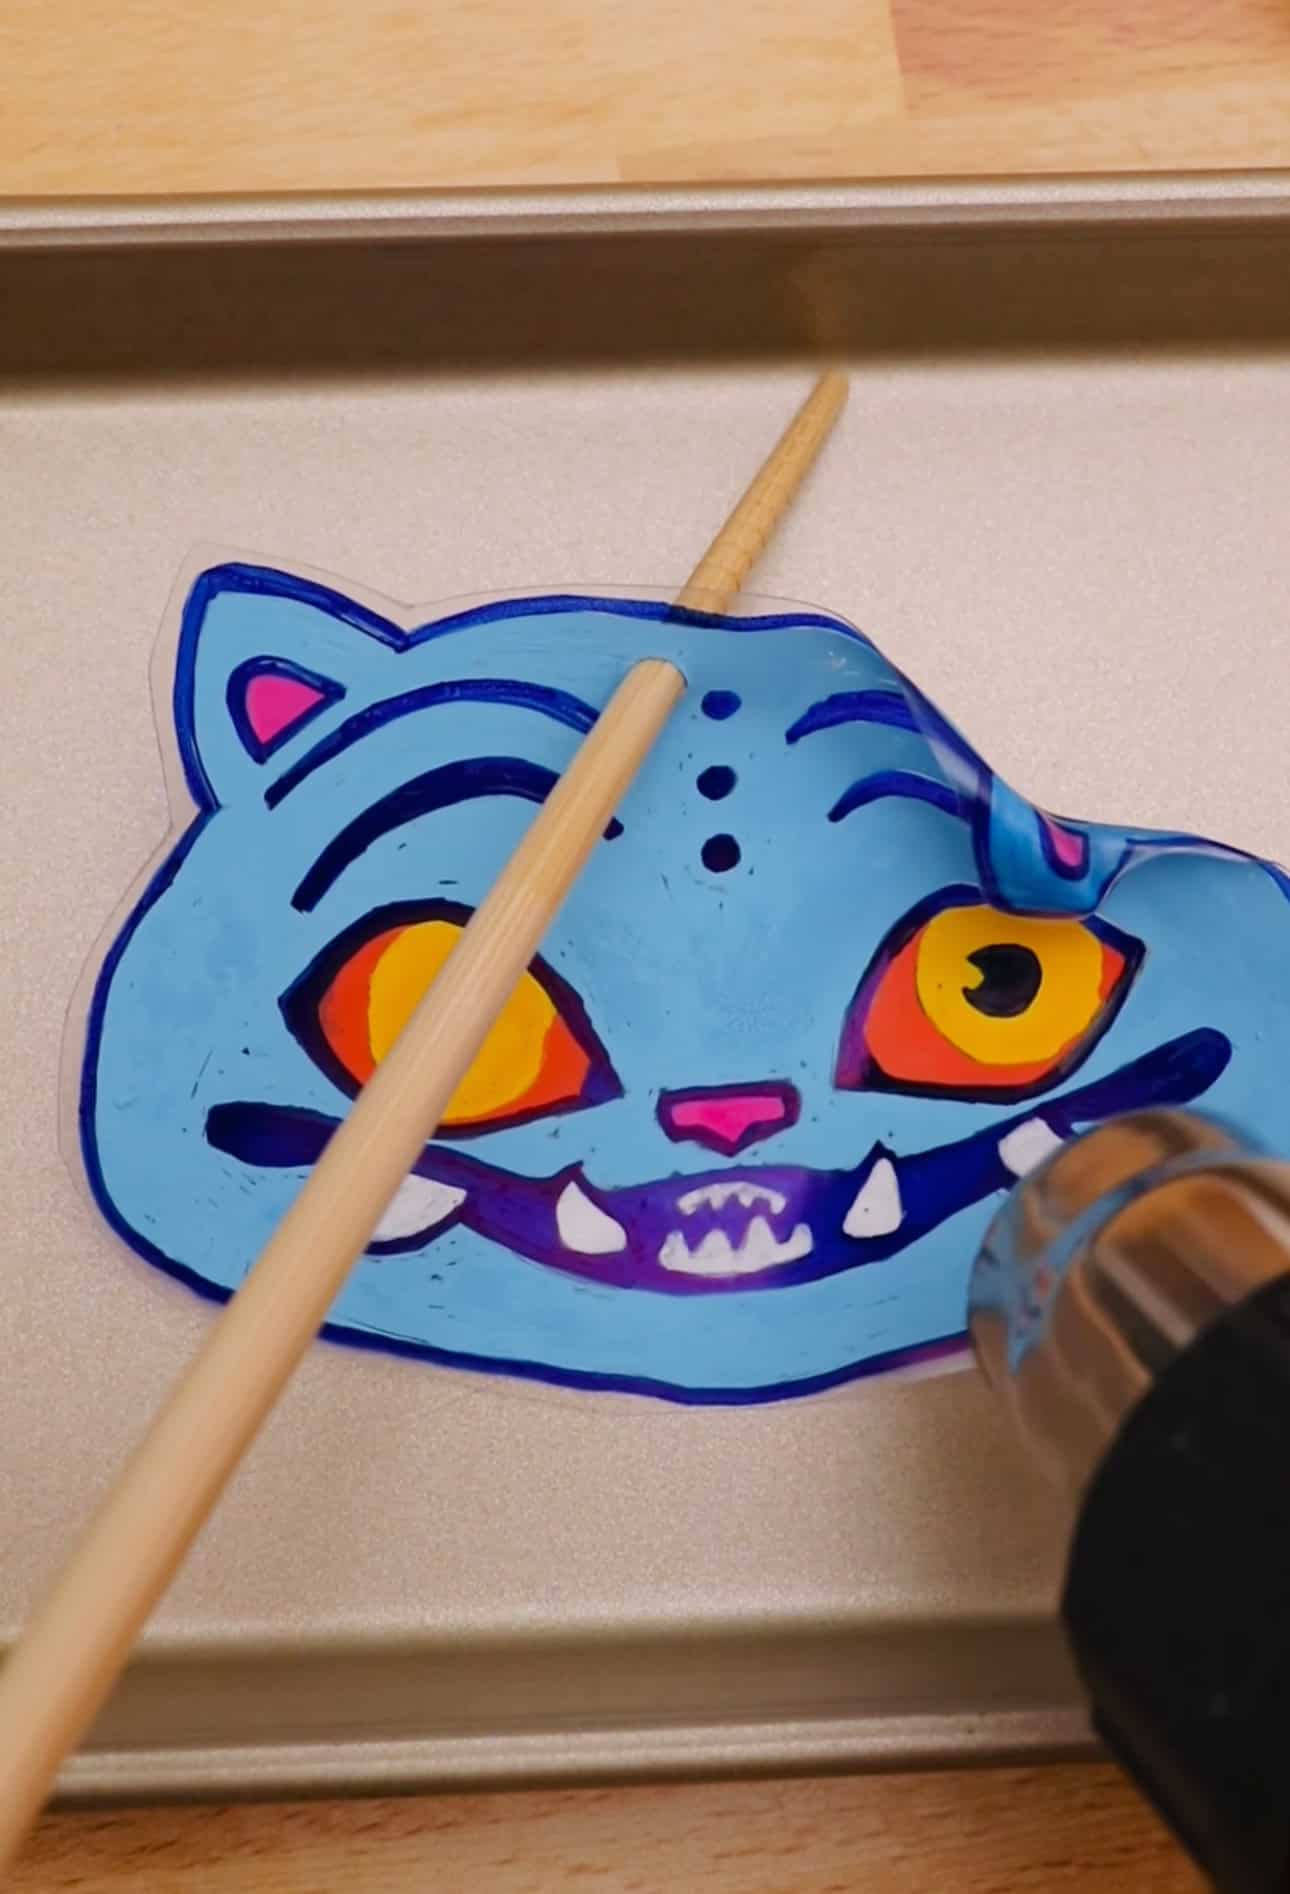
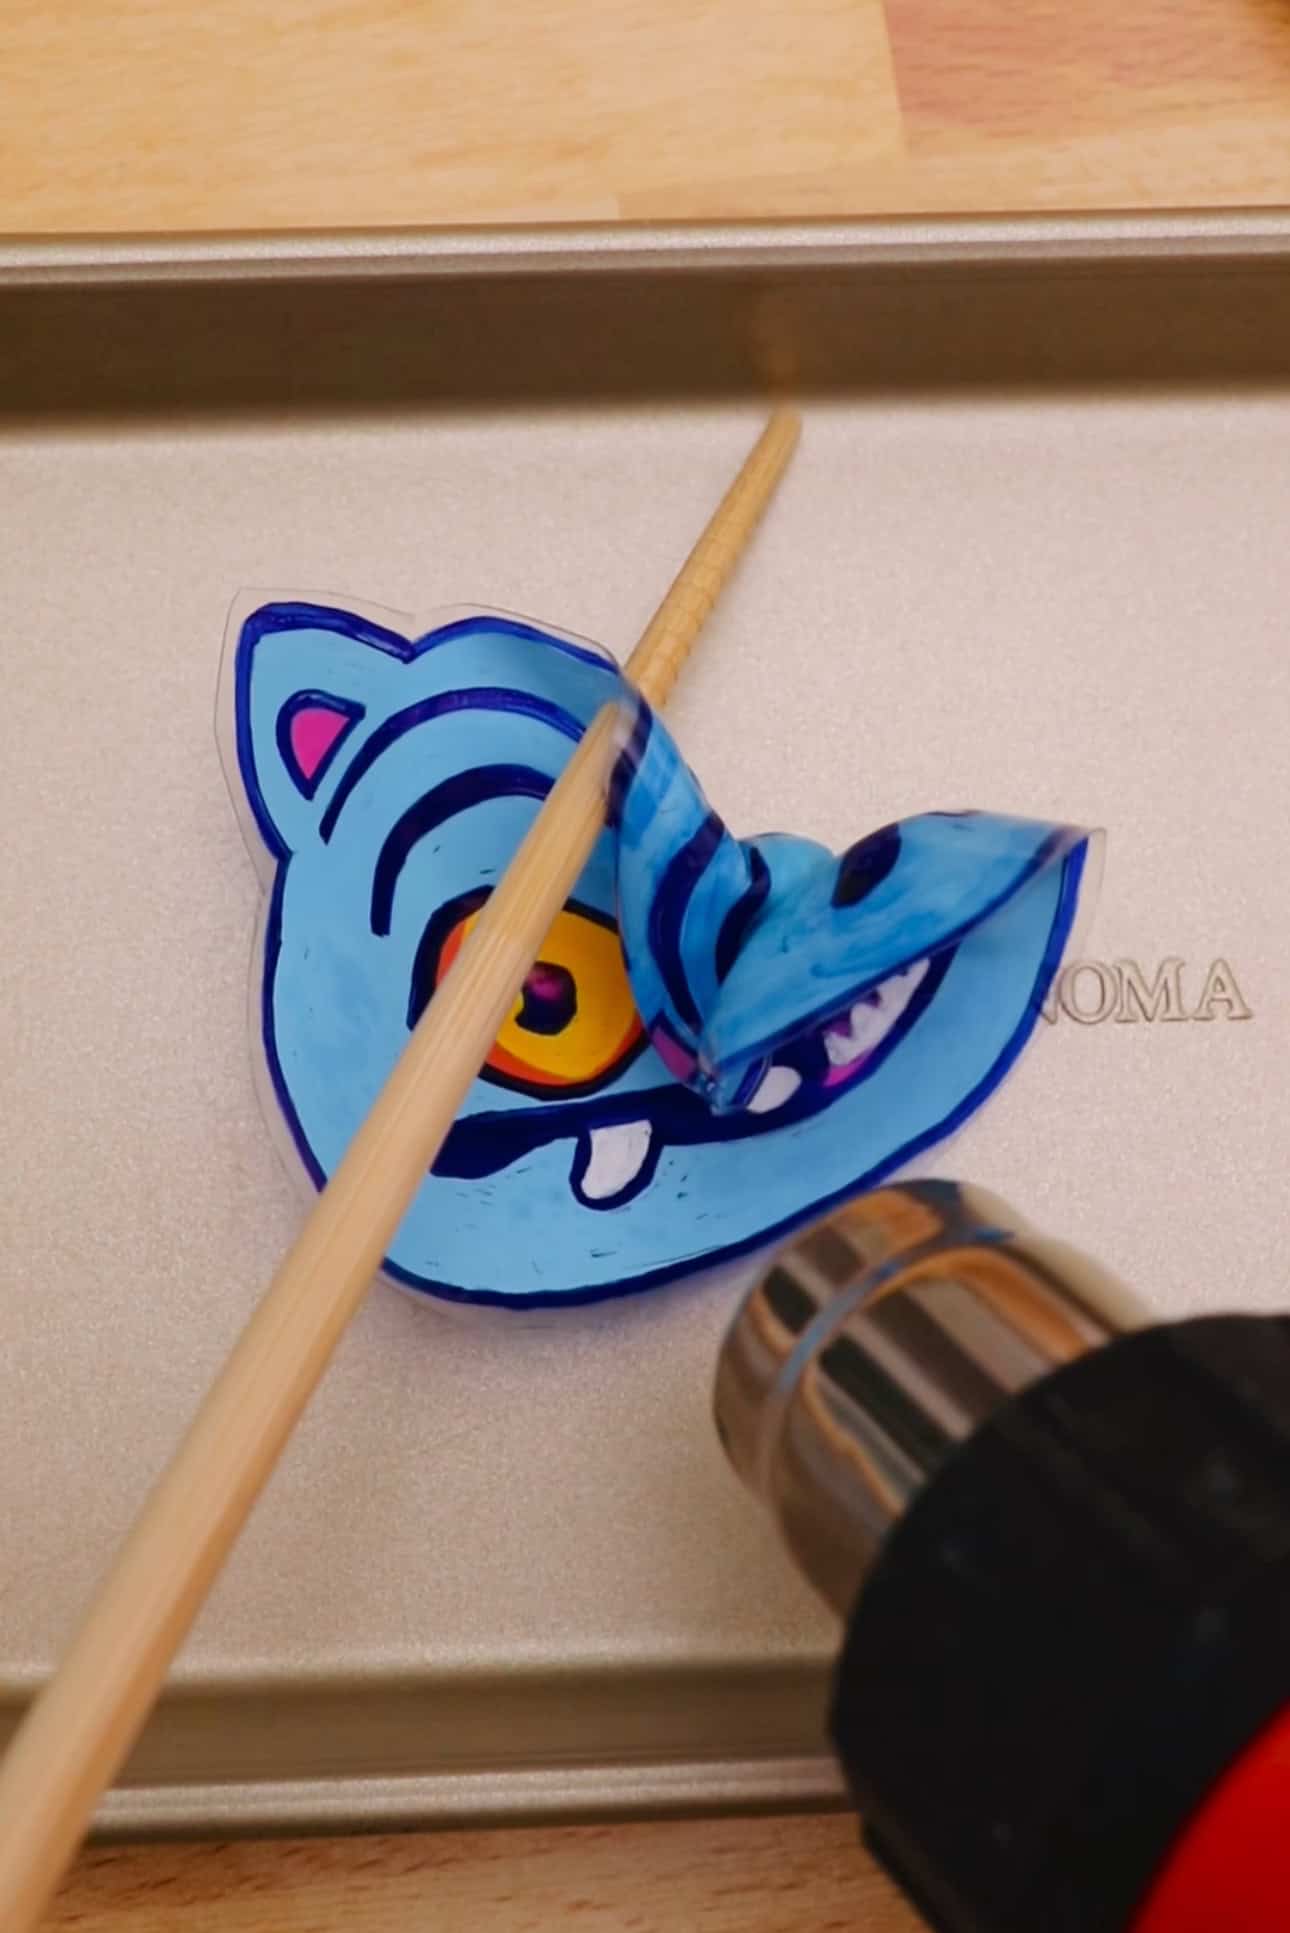
3. Melt the Plastic
Have a small baking dish ready. Using a heat gun, warm the plastic while stabilizing it with a chopstick or wooden dowel. The plastic will curl before flattening again. Gently guide it so it does not fold onto itself. The paint markers will create a chipped, textured pattern on the front as it shrinks, while the back will stay smooth and bright.
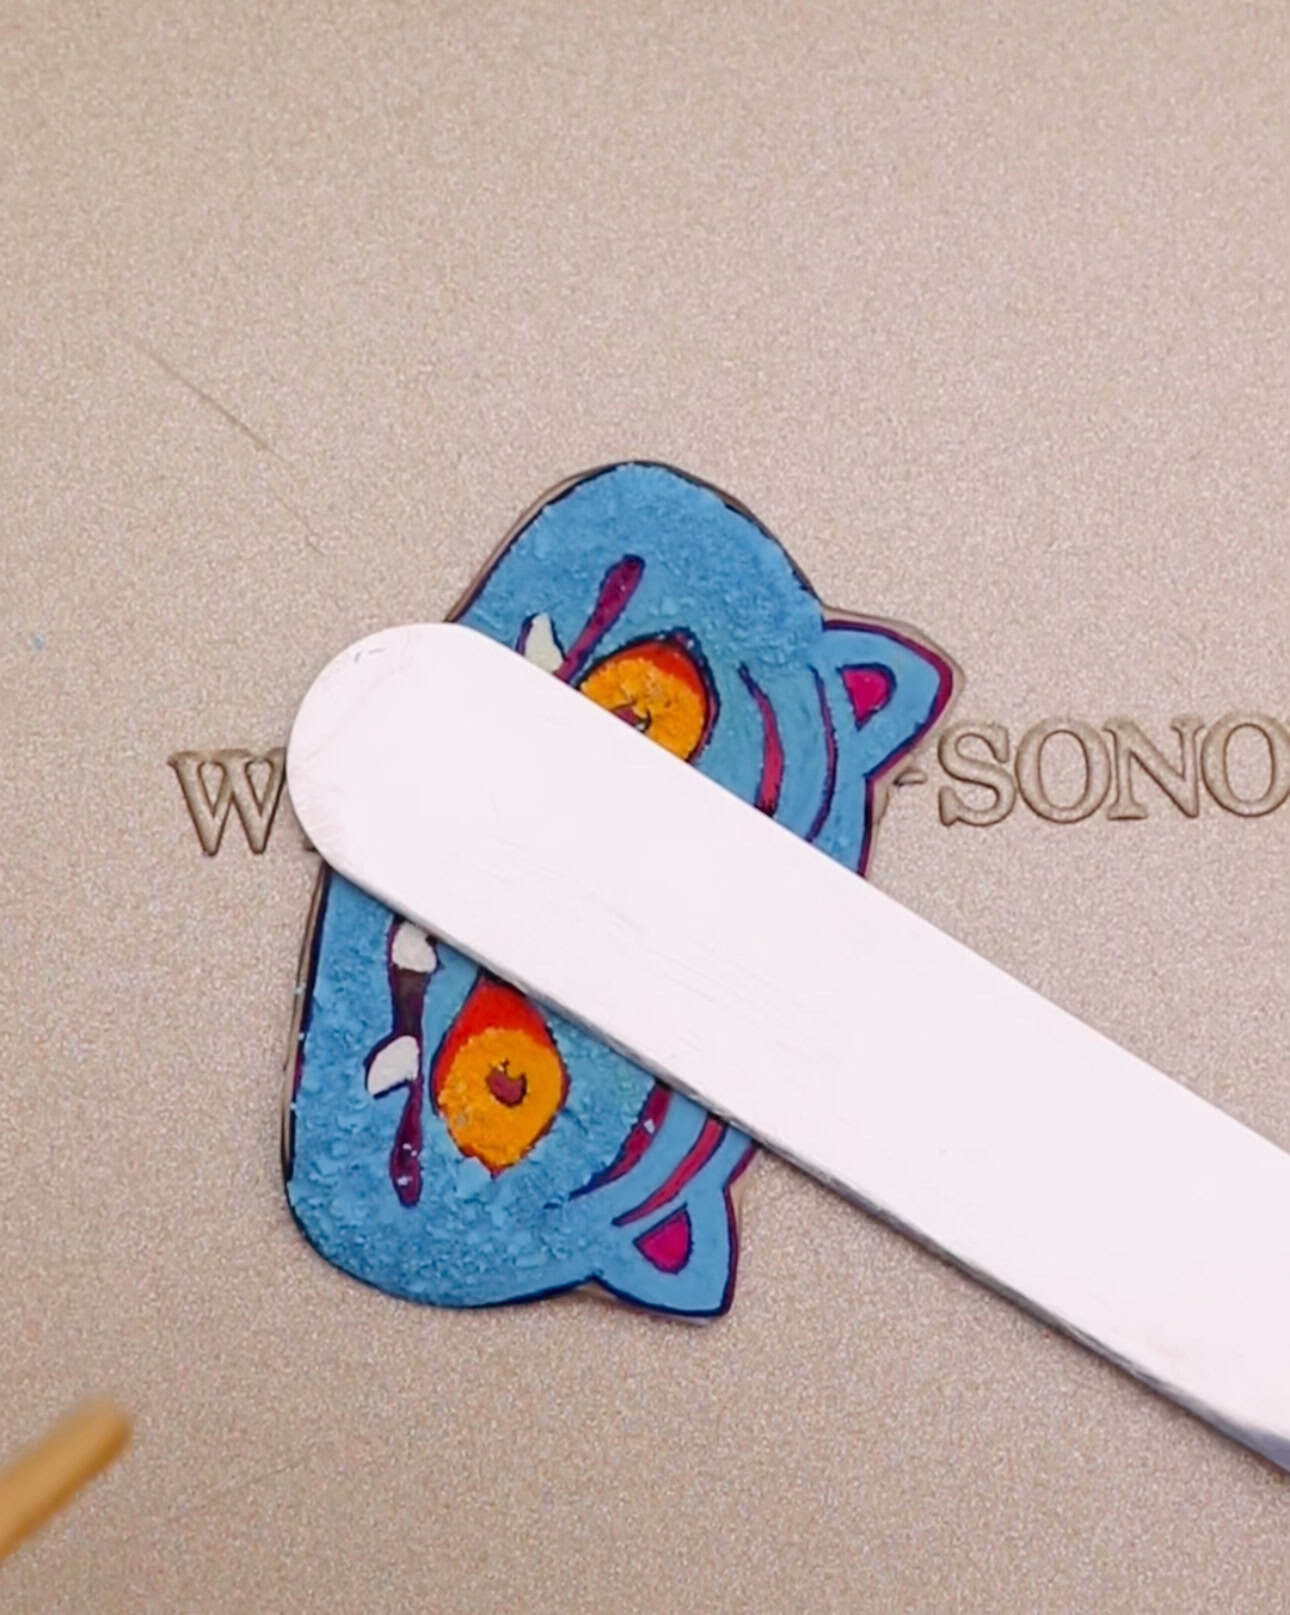
4. Press Flat and Cool
Once fully shrunk, press it lightly with an offset spatula to flatten. Allow it to cool.
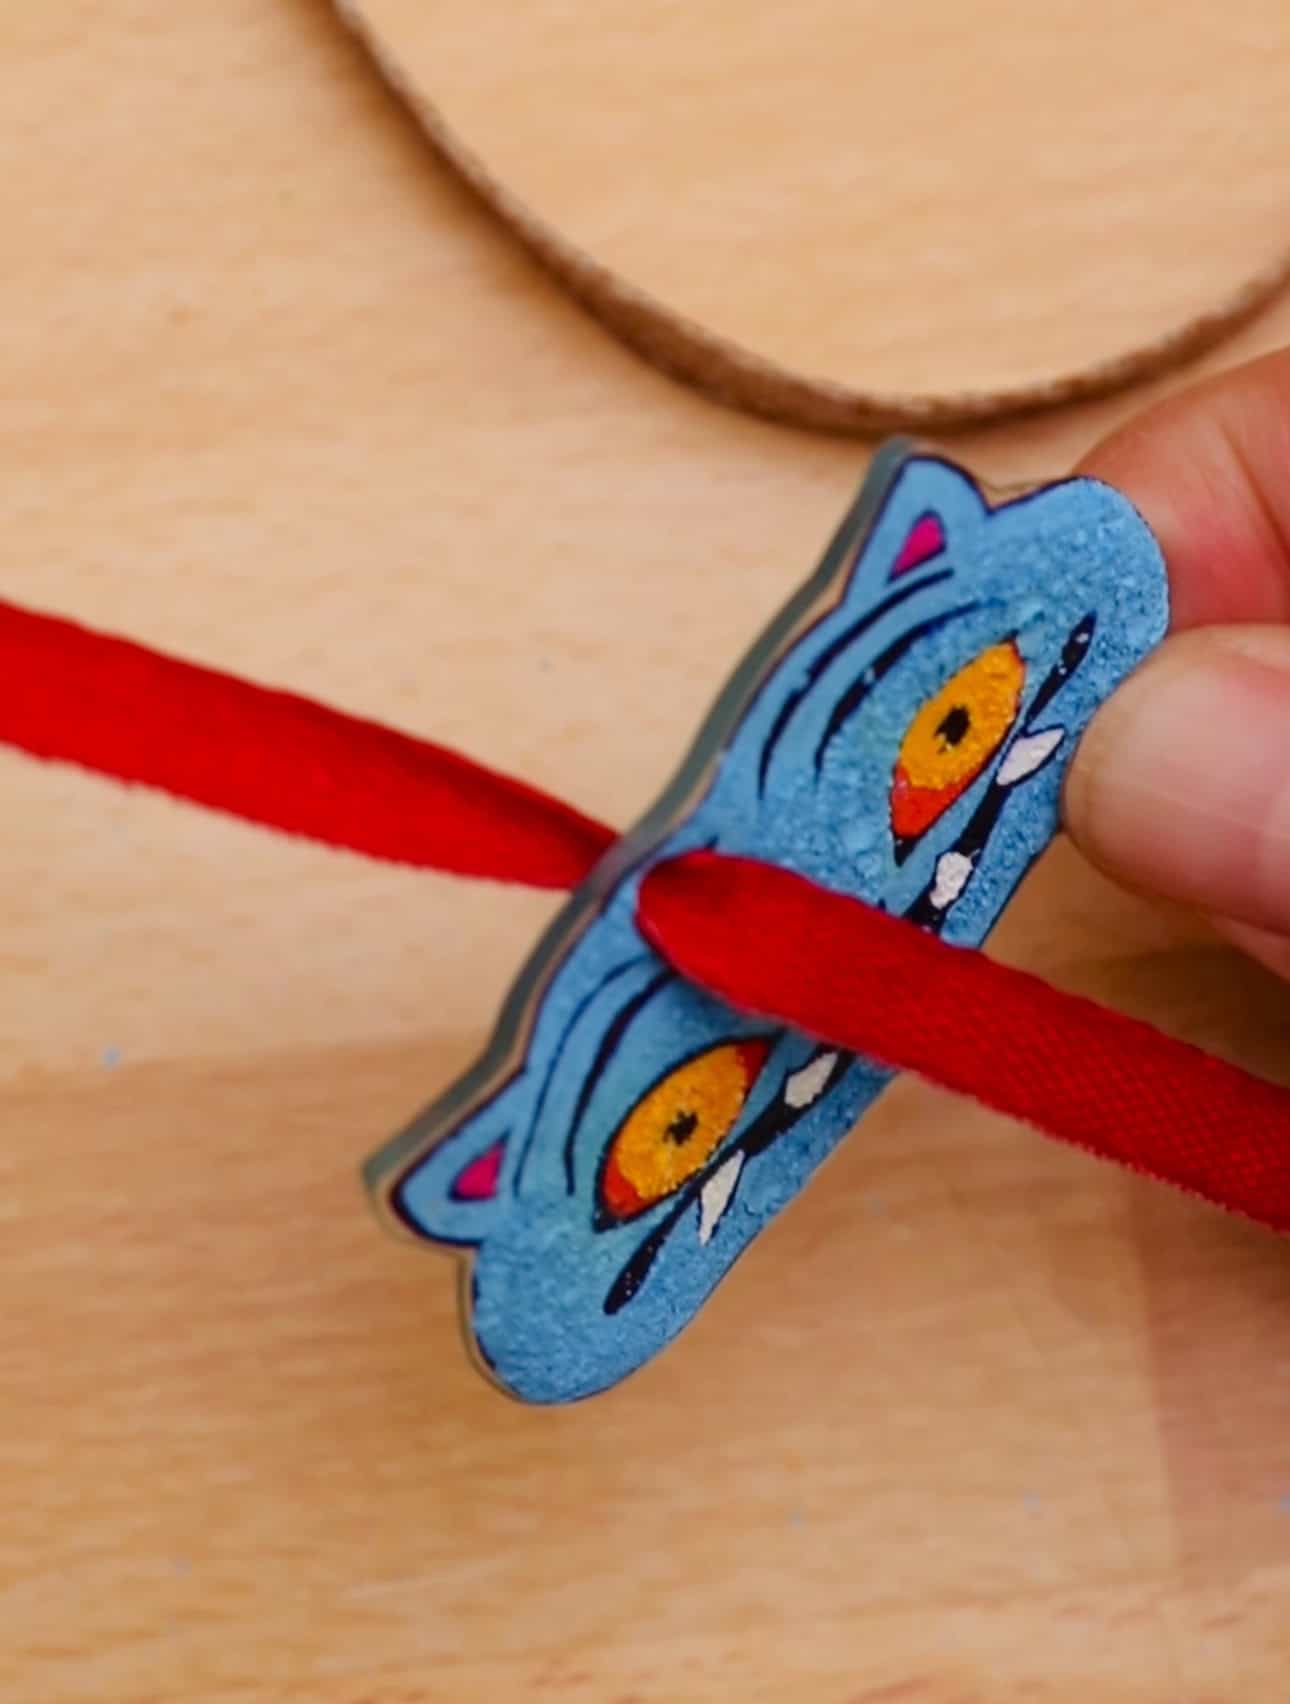
5. Add Ribbon or Cord
Thread ribbon through the hole to finish your KPop Demon Hunter ornament.
Tips
Only polystyrene labeled with the #6 recycling symbol will shrink correctly. Paint markers create a cracked texture during shrinking. Permanent markers stay smooth. Your artwork will shrink significantly, so start with a large drawing.
Final Thoughts
These Demon Hunter ornaments combine recycled materials with vivid artwork to create bold charms that are fun for kids to make and even more fun to watch as they shrink. Each piece takes on its own personality during the melting process, which makes the final set feel special and handmade. The textured front and smooth glossy back give the ornaments a polished look that makes them perfect for holiday decorating, gifting, or adding a playful KPop fantasy touch to your tree.

Agnes Hsu is a mom of three and has been inspiring parents and kids to get creative with easy activities and family friendly recipes for over 10 years. She shares her love for creative play and kids food to her 2MM+ followers online. Agnes' commitment to playful learning and kindness has not only raised funds for charity but also earned features in prestigious nationwide publications.