Get Crafty This Spring With Easter Popsicle Stick Crafts
By using this site, you agree to our Terms of Use. This post may contain affiliate links. Read our disclosure policy.
Follow us on Instagram for more fun ideas for kids!
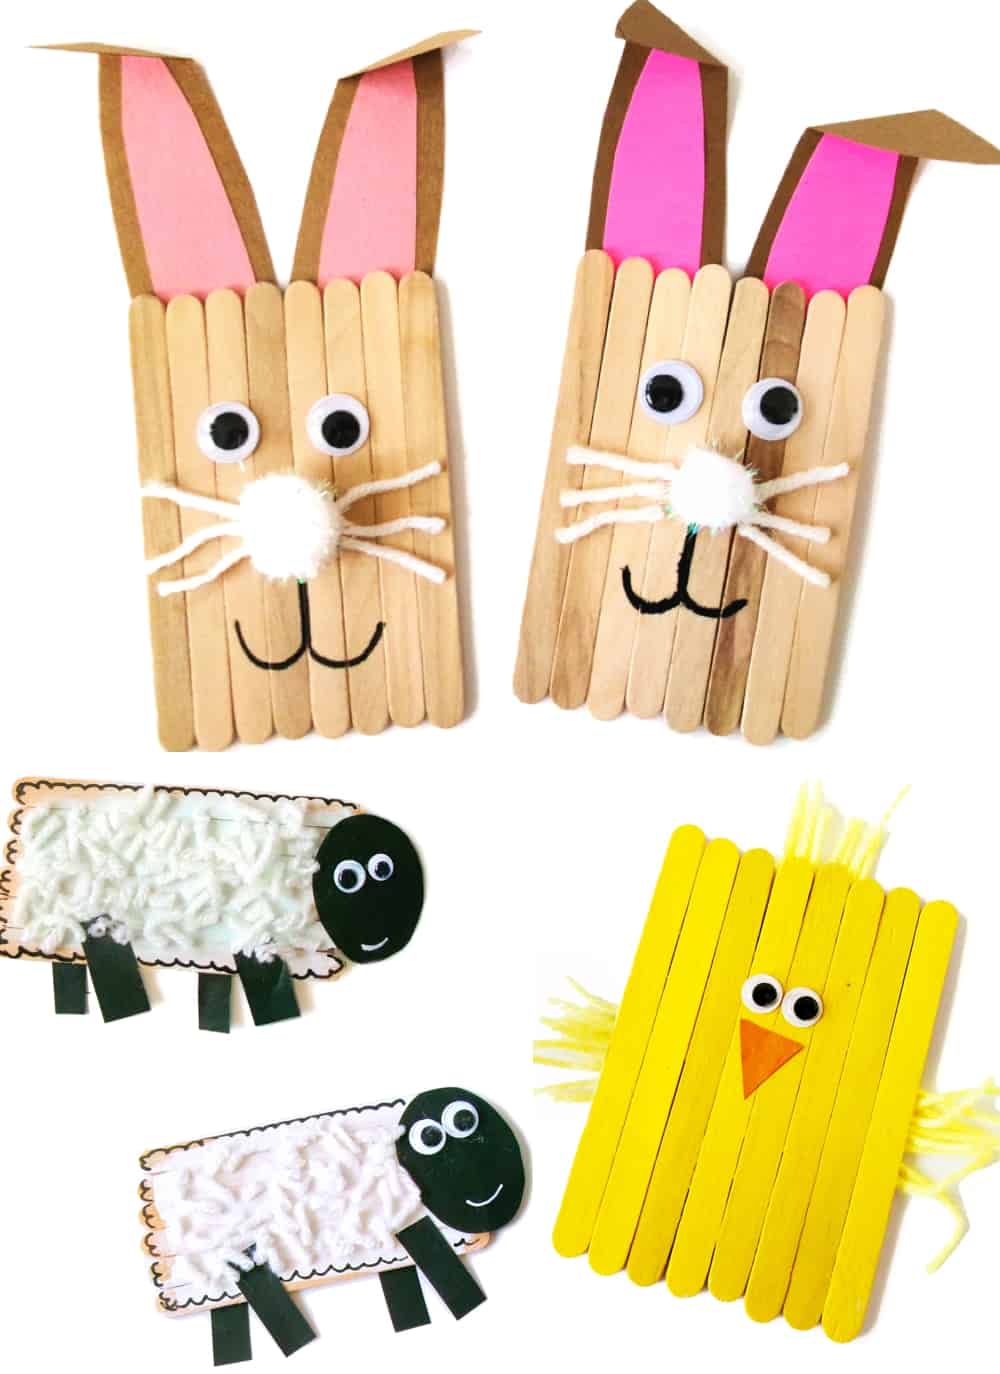
Popsicle crafts are a super fun way to show the kids that Easter crafting can be unique and creative. All you need are a few simple supplies, and you can make a Popsicle Bunny, Popsicle Chick, and Popsicle Sheep in no time at all!
When it comes to creating with the kids, I try to find new things that are fun and simple to do. I know for a fact that popsicle crafts are always going to be welcomed because that means that the kids will want to eat popsicles first! This is a fun recycled craft as well.
The great thing about letting the kids create all the time at home is that I get to be a part of the process. Seeing them take simple craft supplies and turn them into something amazing is inspiring time and time again.
Can I buy popsicles online?
Even though the kids probably won't think that this is quite as fun, you can buy popsicle sticks online. This is a great way to get them in bulk so that you can use them over and over again.
You can buy colored popsicle sticks a swell for other fun, creative activities, and crafts. (and if you still want the kids to have popsicles to eat, go for it! It's part of the fun!)
The colored popsicle sticks are nice because they save an extra step if you want to make lots of popsicle stick creations.
Would this be fun for an Easter activity?
It sure would! If you need some fun to do during the family Easter celebration, check out how easy these popsicle crafts are! You will love that the kids can craft and pass the time and do so together! Make sure to check out our paper bunny, chick and sheep as well.
Add these to the Easter planning so that the kids will have a lot of fun! There's nothing better than family, food, and crafts for Easter.
Easter Popsicle Stick Crafts
What you'll find below are tutorials for three different popsicle crafts for the kids. Each one is simple to do and unique from one another.
Start with one, and then work your way through them all. This is a great way to give the kids plenty of experience crafting with popsicle sticks.
Bunny Popsicle Craft Supplies
Craft sticks
Cardstock - brown, pink
White pom, medium-sized
White yarn
Black marker
Googly eyes, small
Scissors
Glue
Bunny ear template (download in craft card below - scroll all the way down)
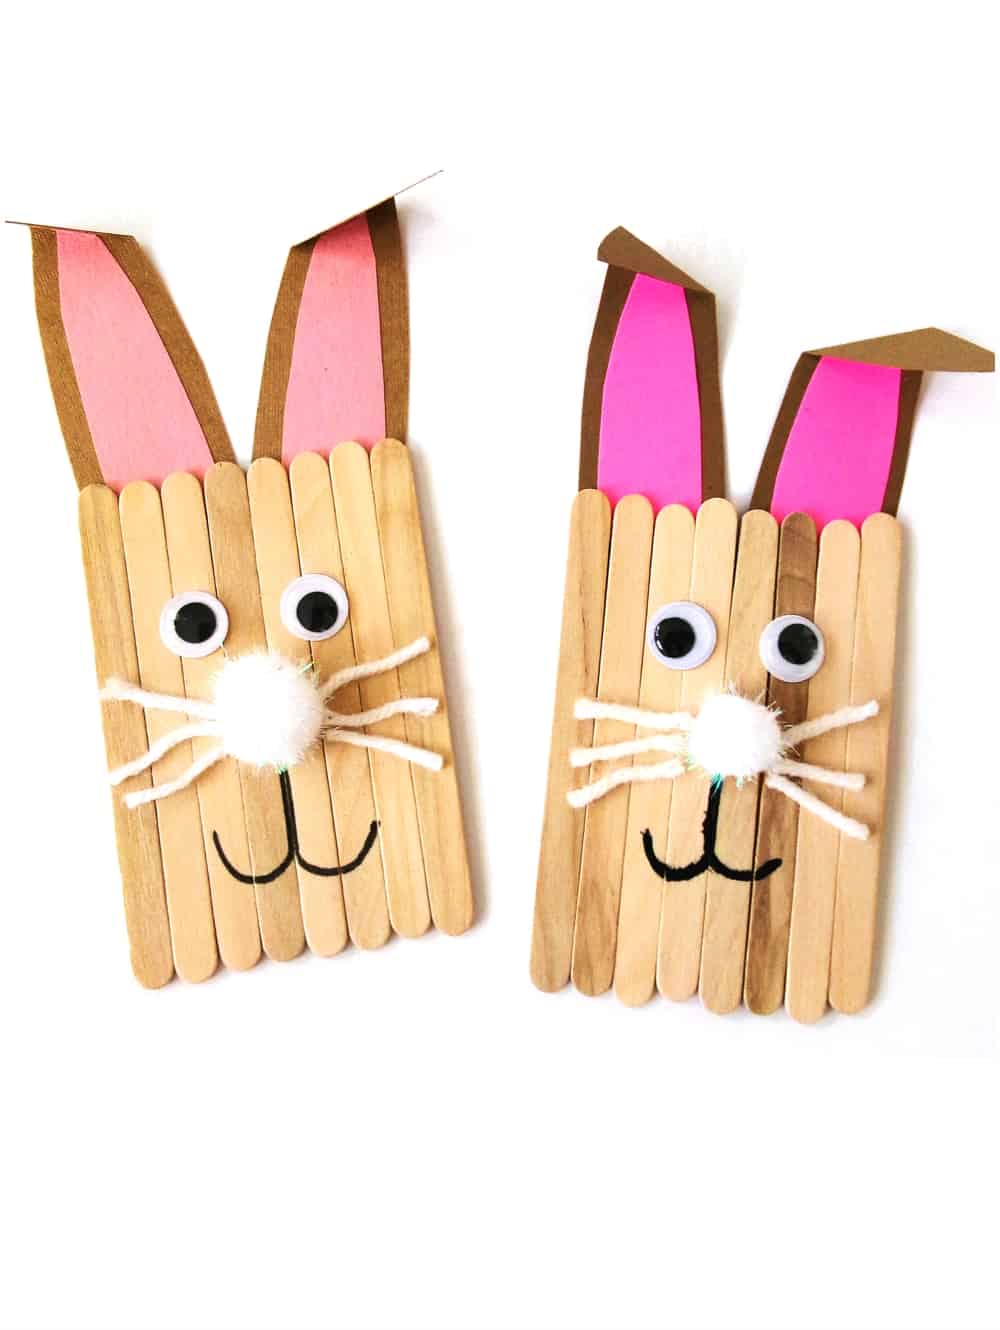
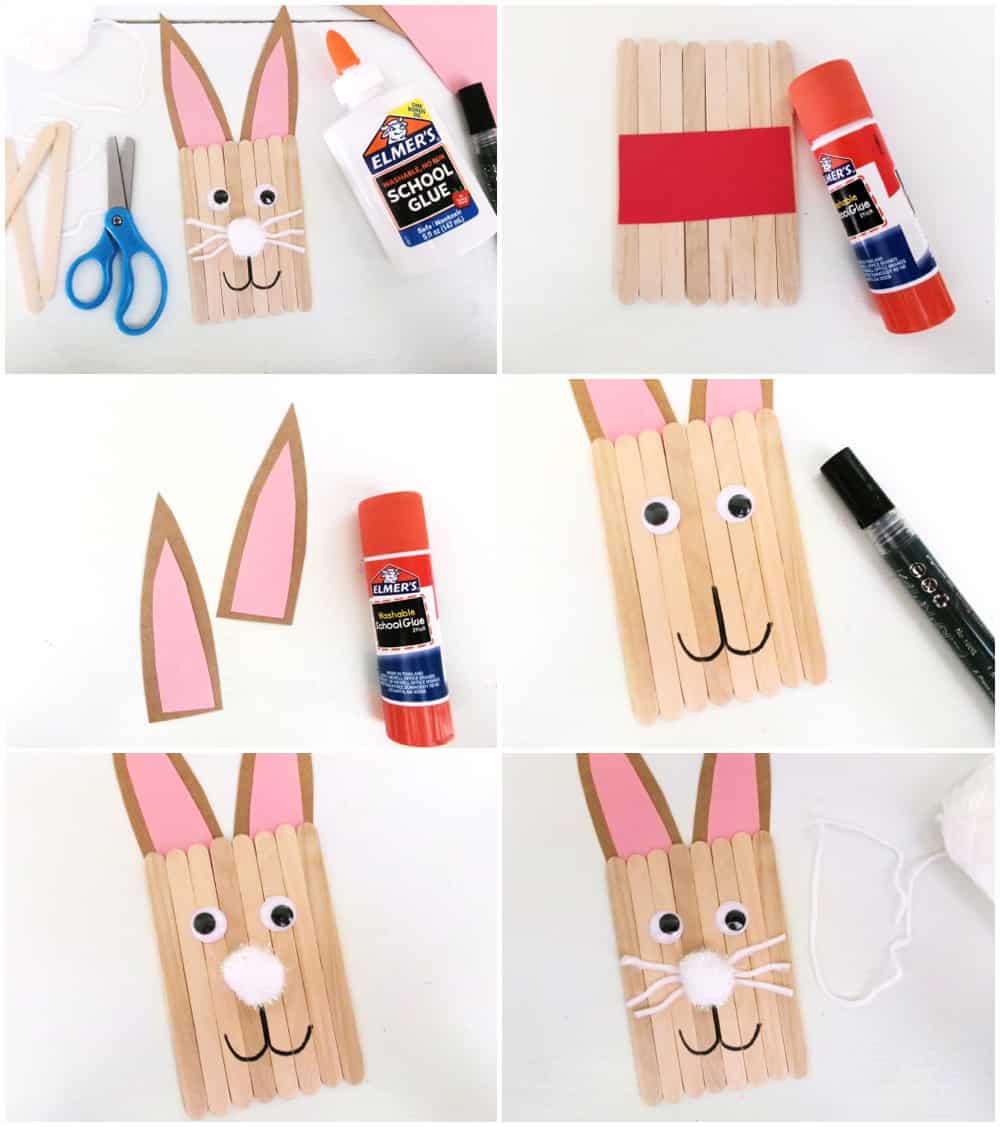
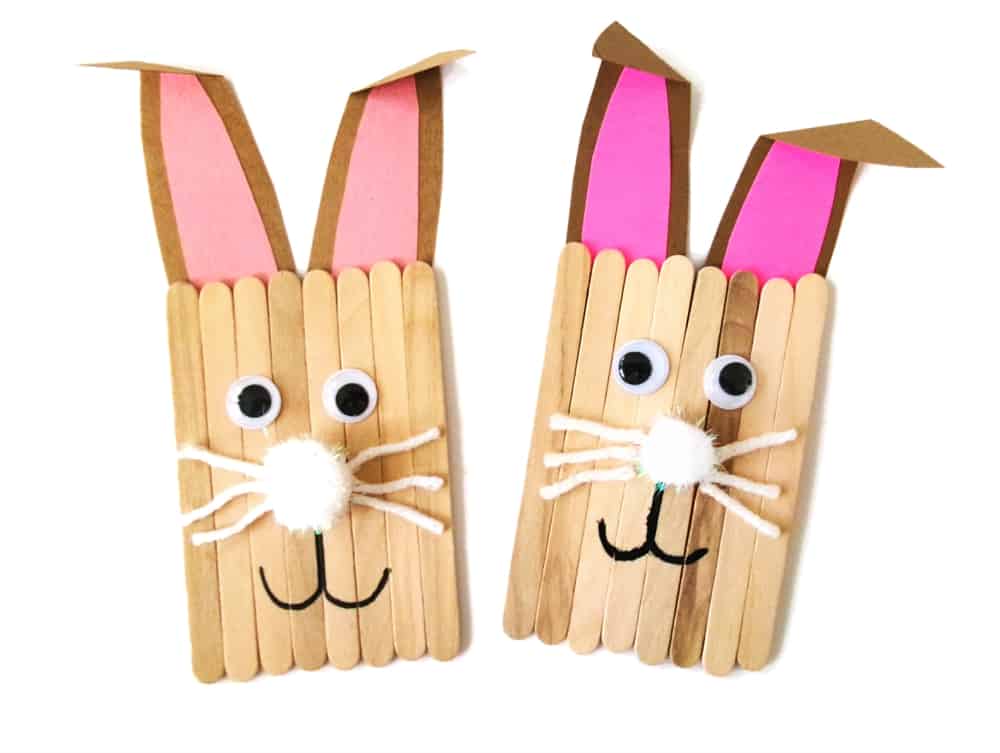
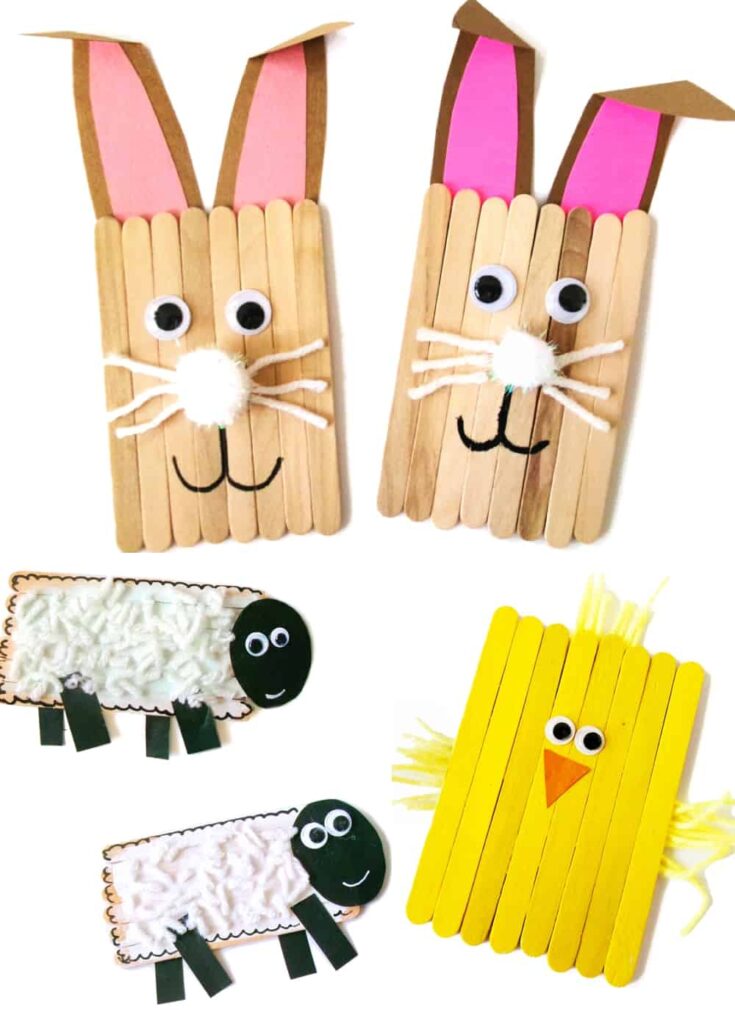
How to make a bunny out of popsicle sticks
Gather eight of the craft wood sticks. Glue them together.
The easiest way to do this is to cut a piece of paper and then glue the craft sticks on top of the paper. This will hold the sticks in place.
Print out the template for the bunny ears and cut them out.
Trace the larger pieces of the ear on brown cardstock and the smaller pieces on pink cardstock. Cut out the traced portions.
Glue the pink inside the brown and then glue the ears on the top of the glued craft sticks.
Glue the google eyes in place, and then use a marker and draw a mouth for the bunny.
Add a white pom above the mouth and glue it into place.
Cut out six strands of white yarn and then add lines of glue coming from the nose of the bunny. Add three lines on each side. Glue the yarn pieces in place.
How long does it take to dry?
Since you're using Elmer's glue, it is going to take about an hour or so to dry completely. This might be hard for the kids to wait that long, but this is where the popsicles can come into play!
Have a popsicle break, and go for a walk. When you come back inside, the glue is going to be dry!
Now that you know how simple and easy it is to make a bunny popsicle craft, it's time to make a chick! The following steps are easy to get started on!
Chick Popsicle Craft Supplies
Craft sticks
Yellow acrylic paint
Yellow yarn
Orange cardstock
Small googly eyes
Glue
Scissors
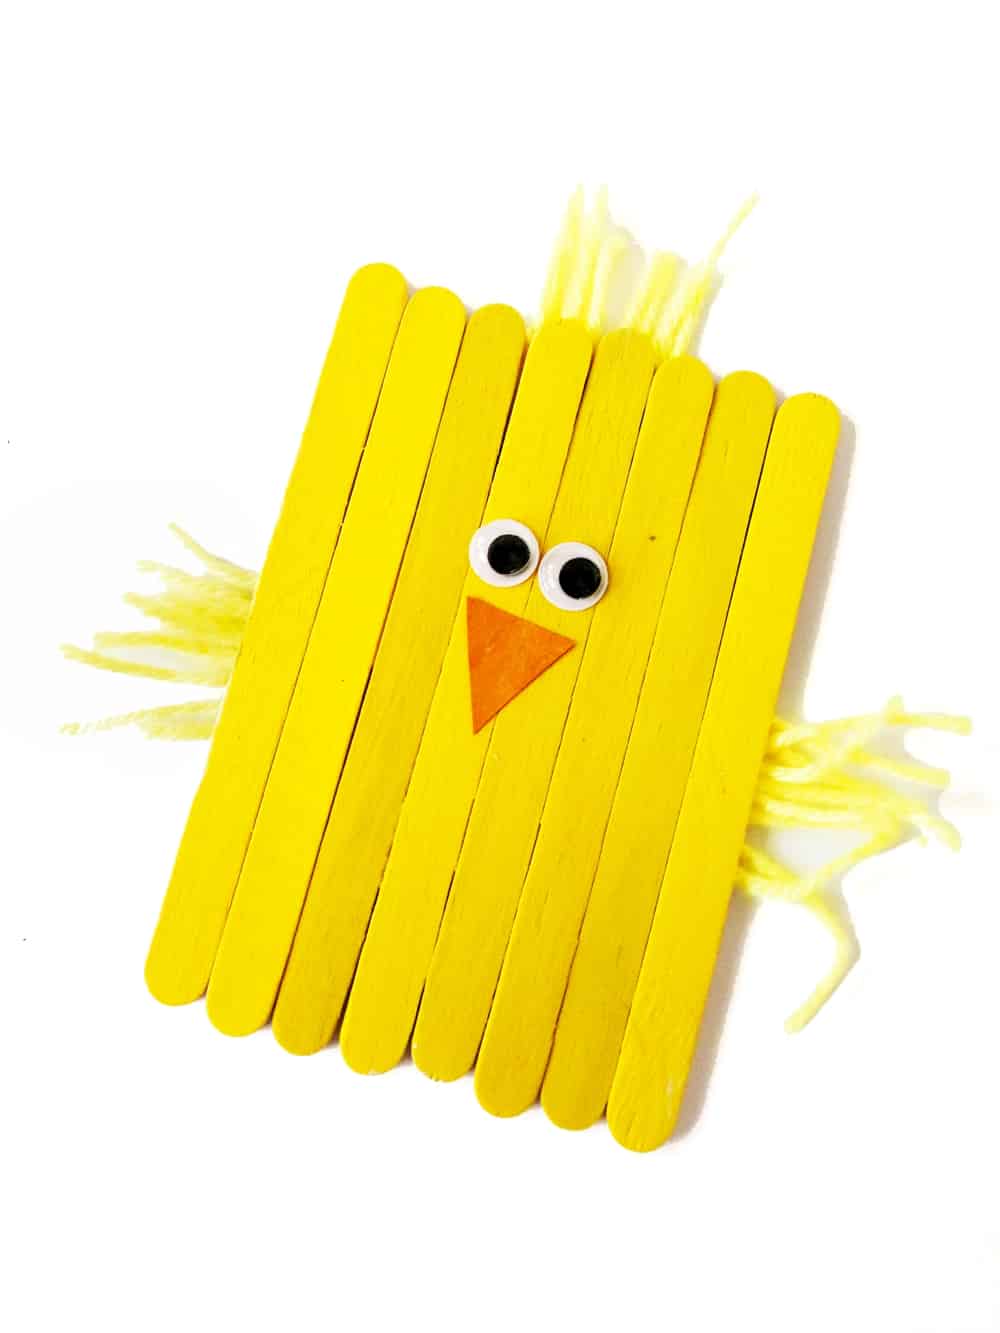
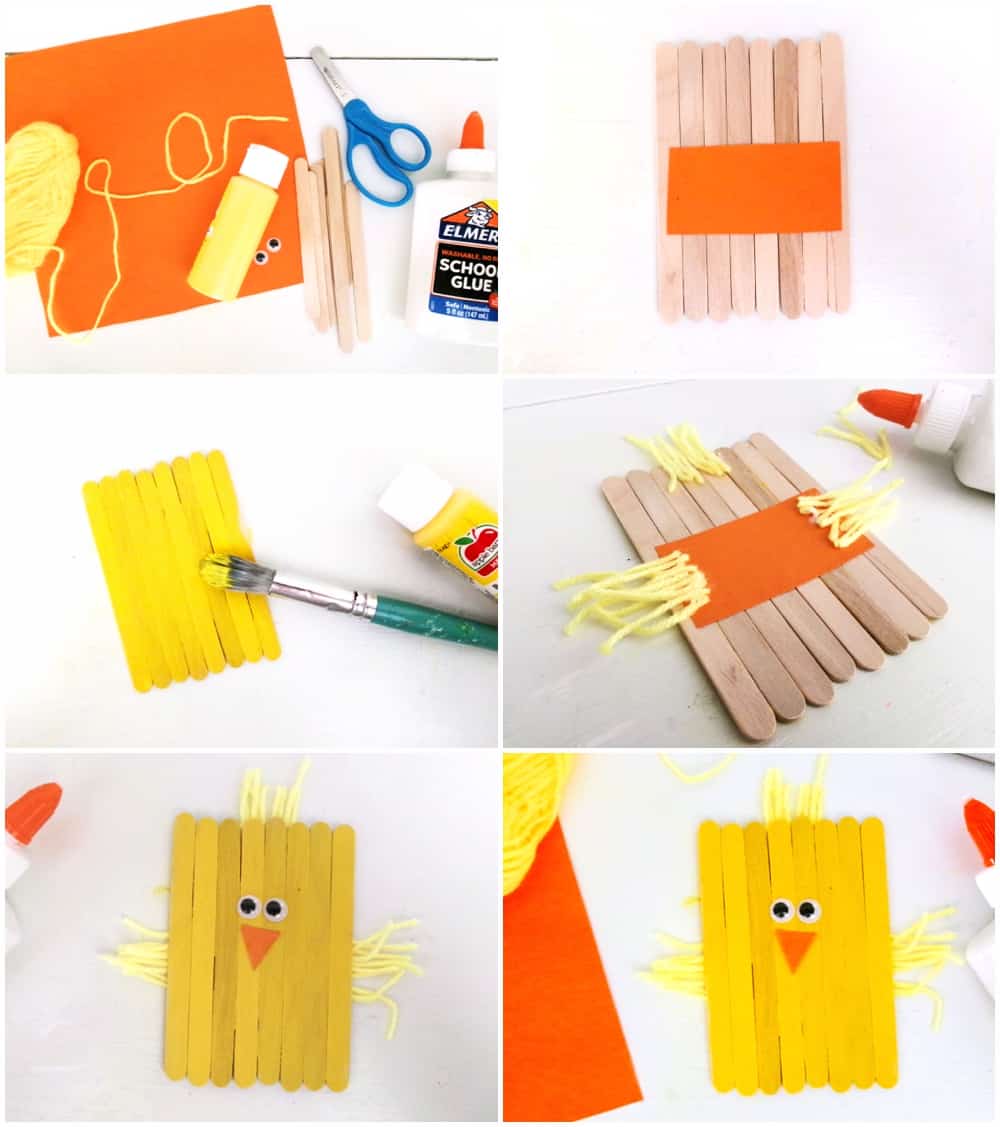
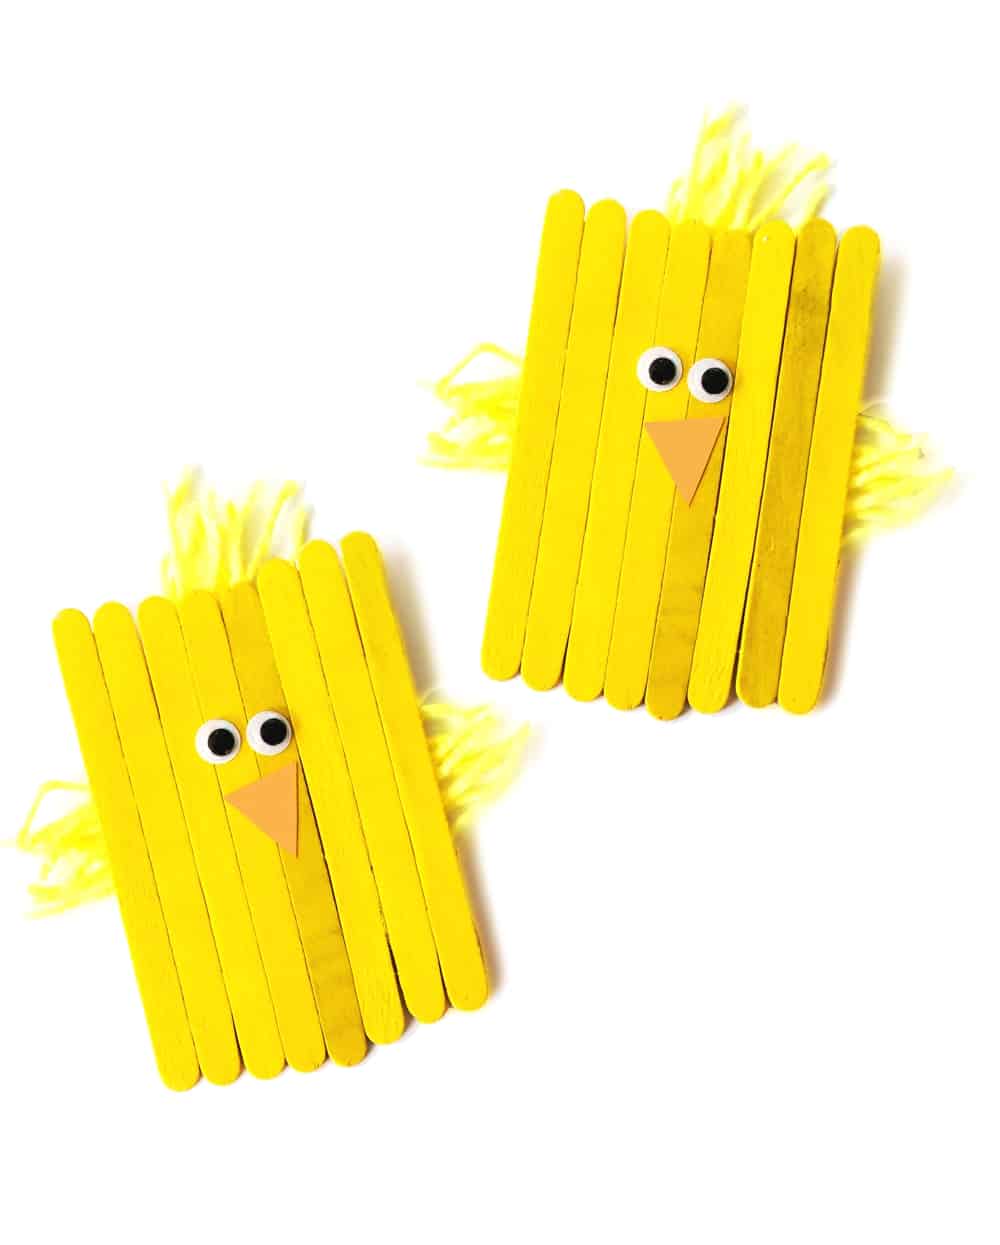
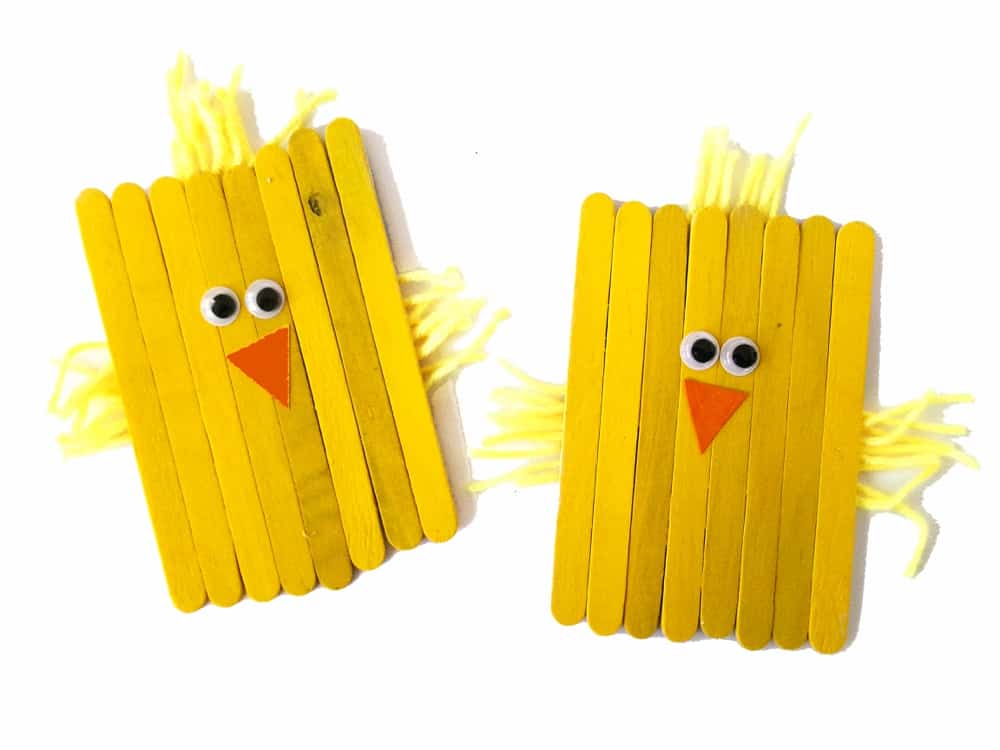
How to make a chick out of popsicle sticks
Gather eight wood craft sticks and glue them together. (You can again glue them to a piece of cardstock or paper and then glue the sticks to that)
Once glued, paint the sticks yellow. This is a super fun portion of the craft for the kids to take charge of! Make sure to let the paint dry.
While the paint is drying, cut out a small triangle from the orange cardstock.
Cut yellow yarn strands that are about 1 ½ inches long.
If you're sure that the paint is dry, flip the painted sticks over and glue some of the yellow yarn strands to the top of the craft sticks.
Glue the rest of the yellow yarn strands to the sides.
Glue on the eyes and the beak.
What is the best kind of paint to use on popsicle sticks?
Acrylic paint is going to be the best type of paint to use on wood sticks. This will coat the sticks well, dry evenly, and give the sticks a bright yellow color.
If you want to add more than one coat of paint to the sticks, you can. This is a great way for the kids to have even more painting fun!
There are also a lot of different colors of yellow that you can choose to use. We like using brighter yellow coloring, but that is really up to you.
If you're going to make more than one of these chick crafts, you can play with the various yellow colors and see what you like best.
And if you have a little one that just doesn't want a yellow chick, let them pick whatever color that they want to use.
Now that we've gone over how to make the funny and the chick, let's dive into how to make a popsicle sheep!
Sheep Popsicle Craft Supplies
Craft sticks
Black cardstock
White yarn
White acrylic paint
White paint pen
Black marker
Small googly eyes
Scissors
Glue
Sheep face and feet template (download below in craft instruction card - scroll all the way down)
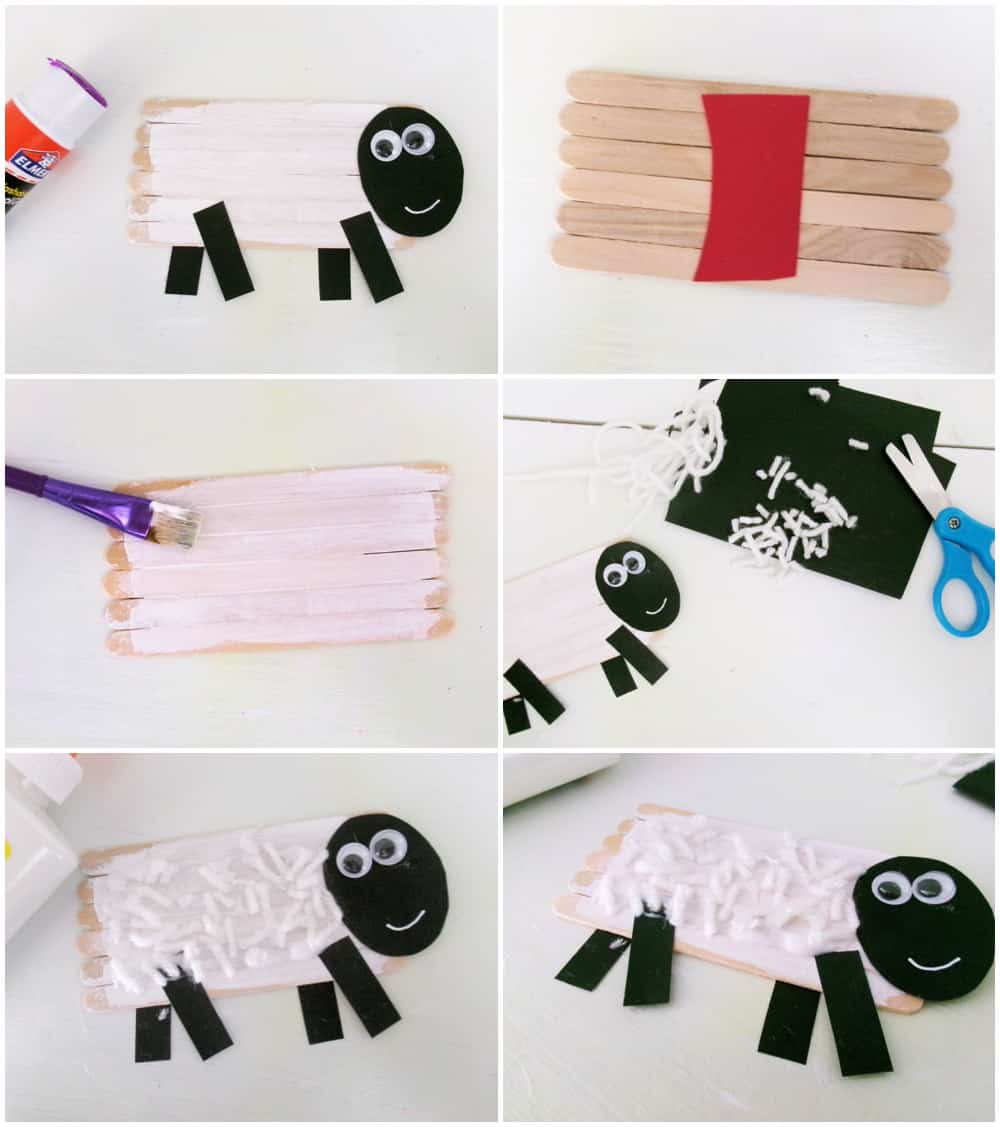
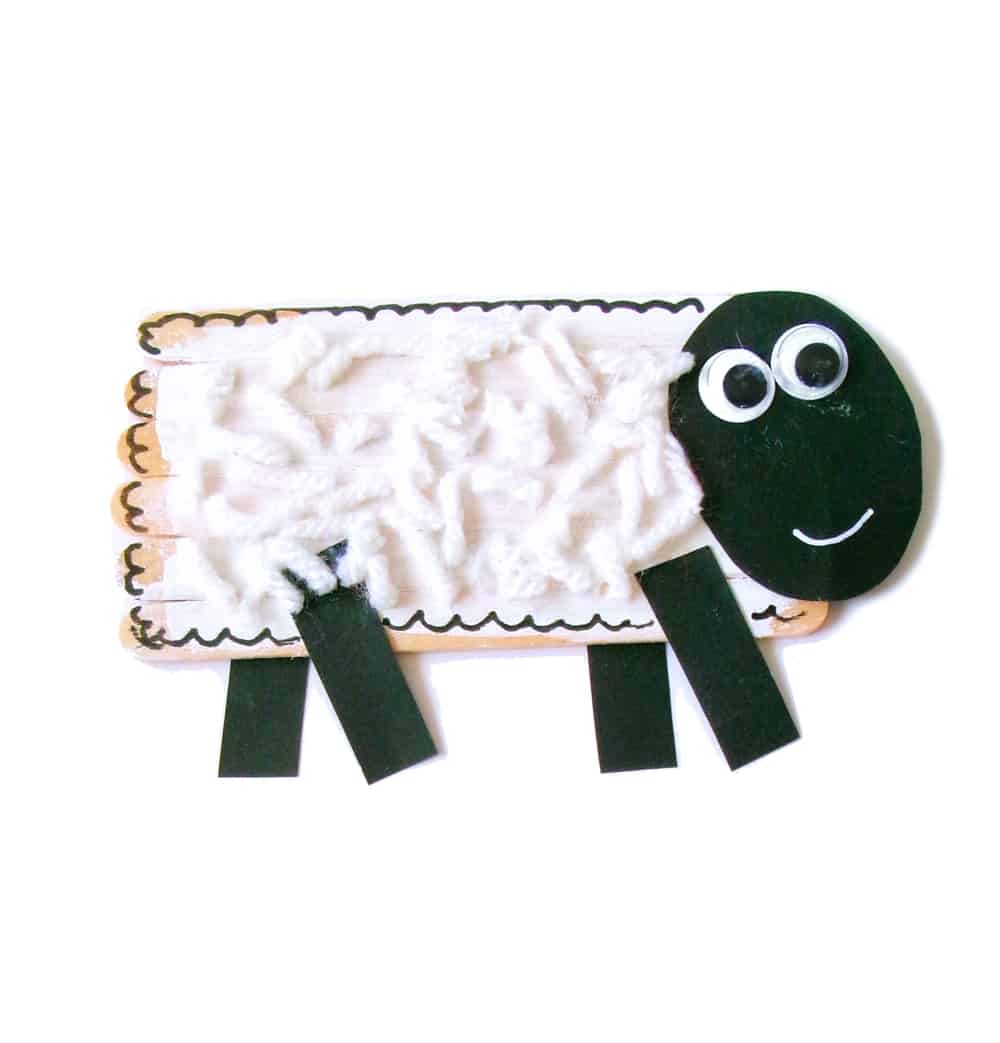
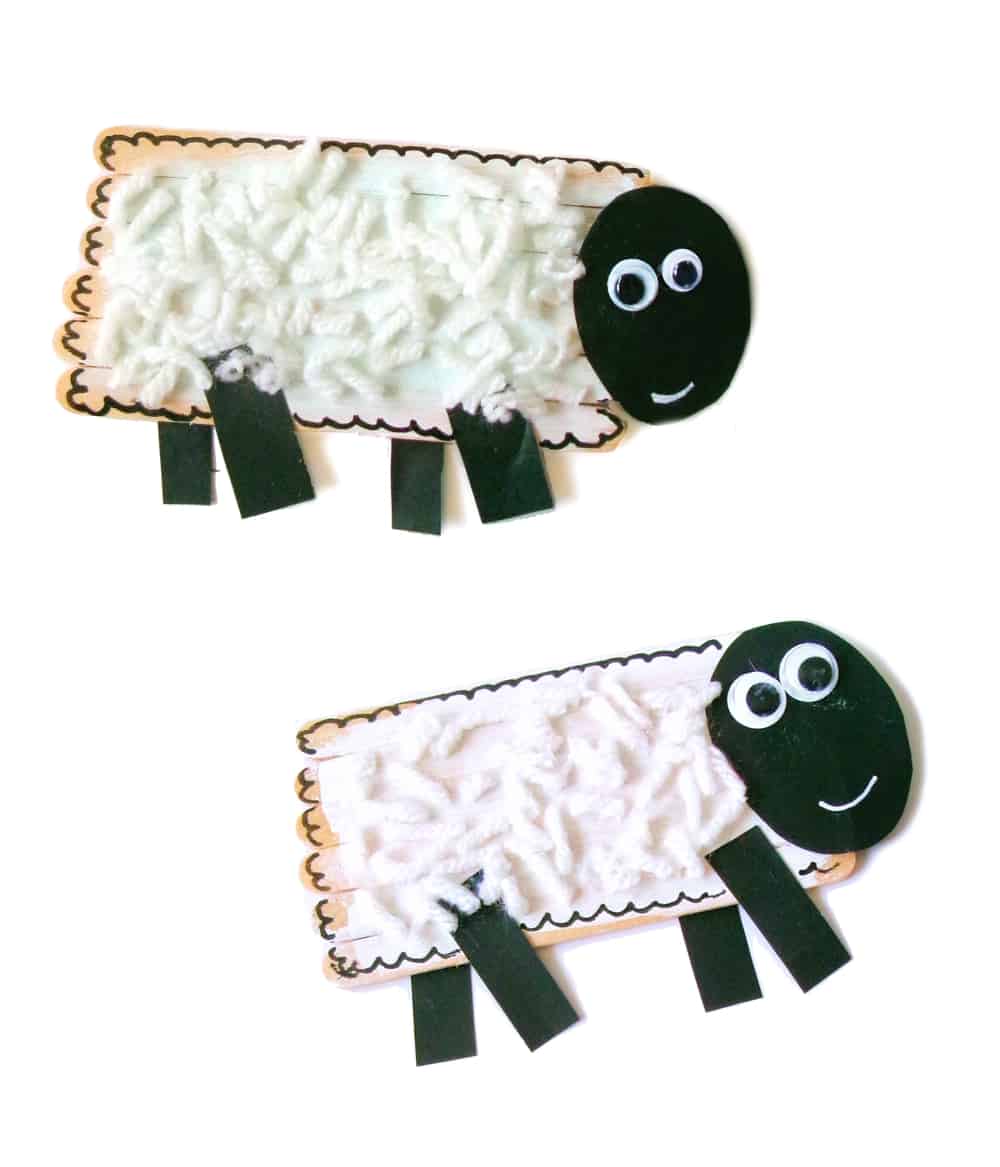
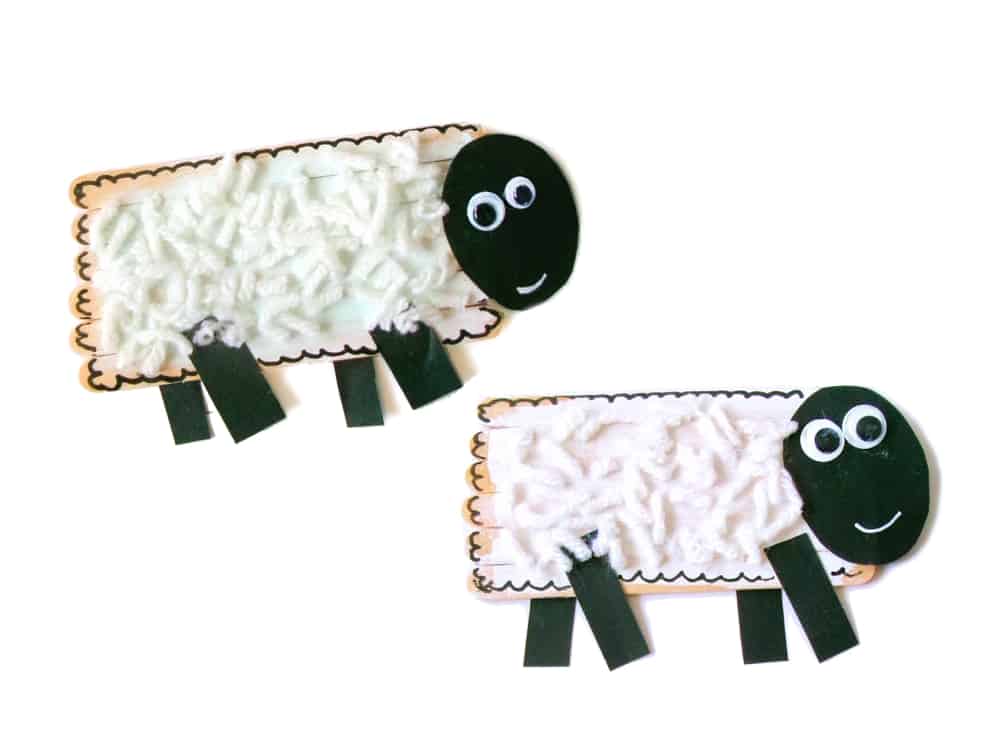
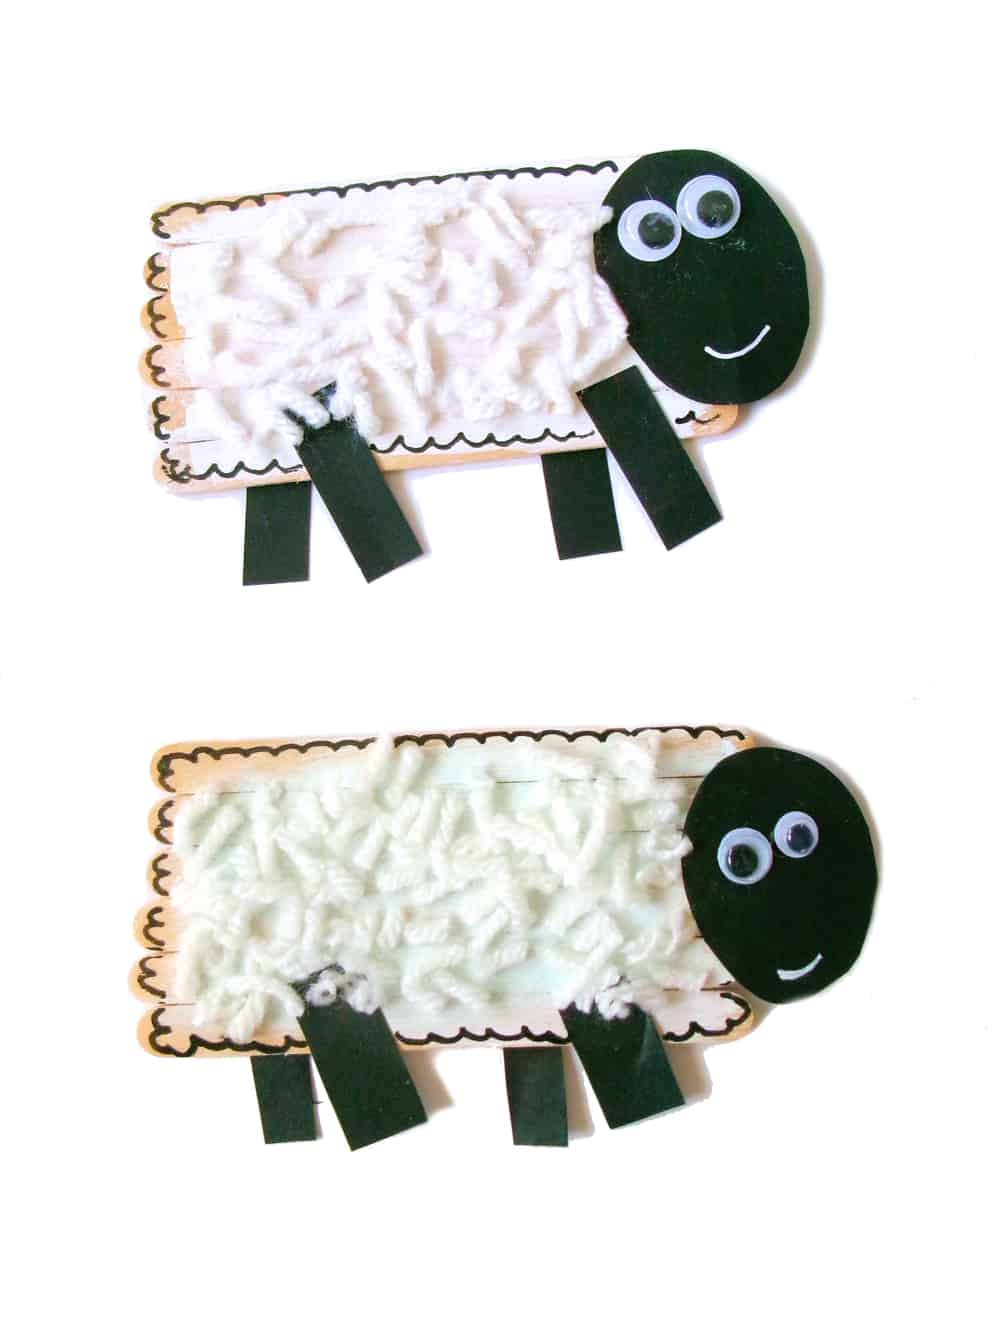
How to make a sheep out of popsicle sticks
Gather six popsicle sticks and glue them together. (Use the tips above on how to glue the sticks together easily)
Turn the glued sticks over and then paint them white. Let the paint dry.
While the paint is drying, print out the template for the sheep and cut out all the pieces.
Trace the pieces onto black cardstock and then cut the pieces out.
Add googly eyes to the oval cut-out and then draw a mouth using the white paint pen.
As long as the paint is dry, glue the heat onto the front of the sticks. Glue the legs onto the bottom.
Grab the scissors and cut off a lot of little pieces from the white yarn, and then add a layer of glue to the craft sticks.
Drop the white yarn bits on top to give the sheep a fluffy look.
You can draw edges on the sheep with a black marker if you want, but this is optional.
What else can I use instead of white yarn?
If you don't have yarn or don't want to use yarn, you can use cotton balls or tear up a cotton ball and glue the pieces. Anything white and soft will work.
Sheep Variations
Use different colors - If the kids want to be creative, let them be creative. Just because the directions say that a chick is yellow, it doesn't have to be. Encourage their creativity and let them have fun.
Why are popsicle crafts important?
Crafting, in general, is important, but I really love crafting with popsicle crafts. They're a great way to work on hand-eye coordination, fine motor skills, and more!
They also show kids that it's a great way to use items that you have at home. If they're able to look at popsicle sticks and craft something amazing, the sky is the limit for their crafting abilities.
Would these be good for younger kids?
Yes, they would! As long as you're there with them to help, all of these popsicle crafts would be great for kids. This is because they'll be gluing, cutting, painting, and assembling, all in one craft.
This is the perfect way for them to start and finish a craft and gain some crafting confidence.
I love these crafts because they're good for a wide range of ages. Younger kids can make them, and older kids will have fun with them, too.
What is the best way to cut out templates?
Since these popsicle crafts have several templates to cut out, it's important to cut them out correctly. This would be a great way to have the kids hop in and help and learn how to use scissors correctly.
The biggest thing to keep in mind is to take it slow so that the edges are cut out in the best way possible.
What are fun ways to share crafts with others?
If your house is anything like my house, there's a strong possibility that it's overflowing with crafts! While I would love to keep everything that the kids have made, it's just not possible to do.
This is why we've made it a practice to share crafts with other people. We like to send them to them in the mail as fun surprises or wrap them up as presents to gift to them also.
This not only makes the kids super happy to be sharing with someone, but it also helps to spread their artwork out throughout the world, too!
Final Thoughts
If you're looking for a cute Easter craft for the kids that won't break the bank, these are some of the best! They're all very similar to one another, so once you gather up the supplies for one, you might as well make them all!
More Easter Crafts
- Easter Paper Tube Craft
- Crochet Easter Patterns That Are Too Adorable For Spring
- POP-UP BUNNY EASTER CARD CRAFT
- FEED THE BUNNY EASTER GAME
- EASTER BUNNY CHICK AND SHEEP CRAFT
Easter Popsicle Stick Crafts
Easter Popsicle Stick Crafts
Materials
Bunny Popsicle Craft Supplies
- Craft sticks
- Cardstock - brown, pink
- White pom, medium-sized
- White yarn
- Black marker
- Googly eyes, small
- Scissors
- Glue
- Bunny Ear Template
Chick Popsicle Craft Supplies
- Craft sticks
- Yellow acrylic paint
- Yellow yarn
- Orange cardstock
- Small googly eyes
- Glue
- Scissors
Sheep Popsicle Craft Supplies
- Craft sticks
- Black cardstock
- White yarn
- White acrylic paint
- White paint pen
- Black marker
- Small googly eyes
- Scissors
- Glue
- Sheep face and ear template
Instructions
How to make a bunny out of popsicle sticks
Gather eight of the craft wood sticks. Glue them together.
The easiest way to do this is to cut a piece of paper and then glue the craft sticks on top of the paper. This will hold the sticks in place.
Print out the template for the bunny ears and cut them out.
Trace the larger pieces of the ear on brown cardstock and the smaller pieces on pink cardstock. Cut out the traced portions.
Glue the pink inside the brown and then glue the ears on the top of the glued craft sticks.
Glue the google eyes in place, and then use a marker and draw a mouth for the bunny.
Add a white pom above the mouth and glue it into place.
Cut out six strands of white yarn and then add lines of glue coming from the nose of the bunny. Add three lines on each side. Glue the yarn pieces in place.
How to make a chick out of popsicle sticks
Gather eight wood craft sticks and glue them together. (You can again glue them to a piece of cardstock or paper and then glue the sticks to that)
Once glued, paint the sticks yellow. This is a super fun portion of the craft for the kids to take charge of! Make sure to let the paint dry.
While the paint is drying, cut out a small triangle from the orange cardstock.
Cut yellow yarn strands that are about 1 ½ inches long.
If you're sure that the paint is dry, flip the painted sticks over and glue some of the yellow yarn strands to the top of the craft sticks.
Glue the rest of the yellow yarn strands to the sides.
Glue on the eyes and the beak.
How to make a sheep out of popsicle sticks
Gather six popsicle sticks and glue them together. (Use the tips above on how to glue the sticks together easily)
Turn the glued sticks over and then paint them white. Let the paint dry.
While the paint is drying, print out the template for the sheep and cut out all the pieces.
Trace the pieces onto black cardstock and then cut the pieces out.
Add googly eyes to the oval cut-out and then draw a mouth using the white paint pen.
As long as the paint is dry, glue the heat onto the front of the sticks. Glue the legs onto the bottom.
Grab the scissors and cut off a lot of little pieces from the white yarn, and then add a layer of glue to the craft sticks.
Drop the white yarn bits on top to give the sheep a fluffy look.
You can draw edges on the sheep with a black marker if you want, but this is optional.