How To Make An Easy DIY Lego Puzzle
By using this site, you agree to our Terms of Use. This post may contain affiliate links. Read our disclosure policy.
Follow us on Instagram for more fun ideas for kids!
A DIY Lego puzzle is a fun way for kids to explore their imagination and problem-solving skills with something they already love - Legos! We've broken down the steps in this easy-to-make puzzle tutorial.
If you're looking for a fun way to get your children engaged, a DIY Lego puzzle is a great option to consider. This puzzle is easy to assemble and can be enjoyed by both kids and adults alike. I don't know about you but my kids LOVE anything Lego and my husband and I are huge fans as well.
Legos are a great way to encourage problem-solving skills and creativity. Kids will love trying to solve a Lego puzzle featuring a sentimental photo that's meaningful for them.
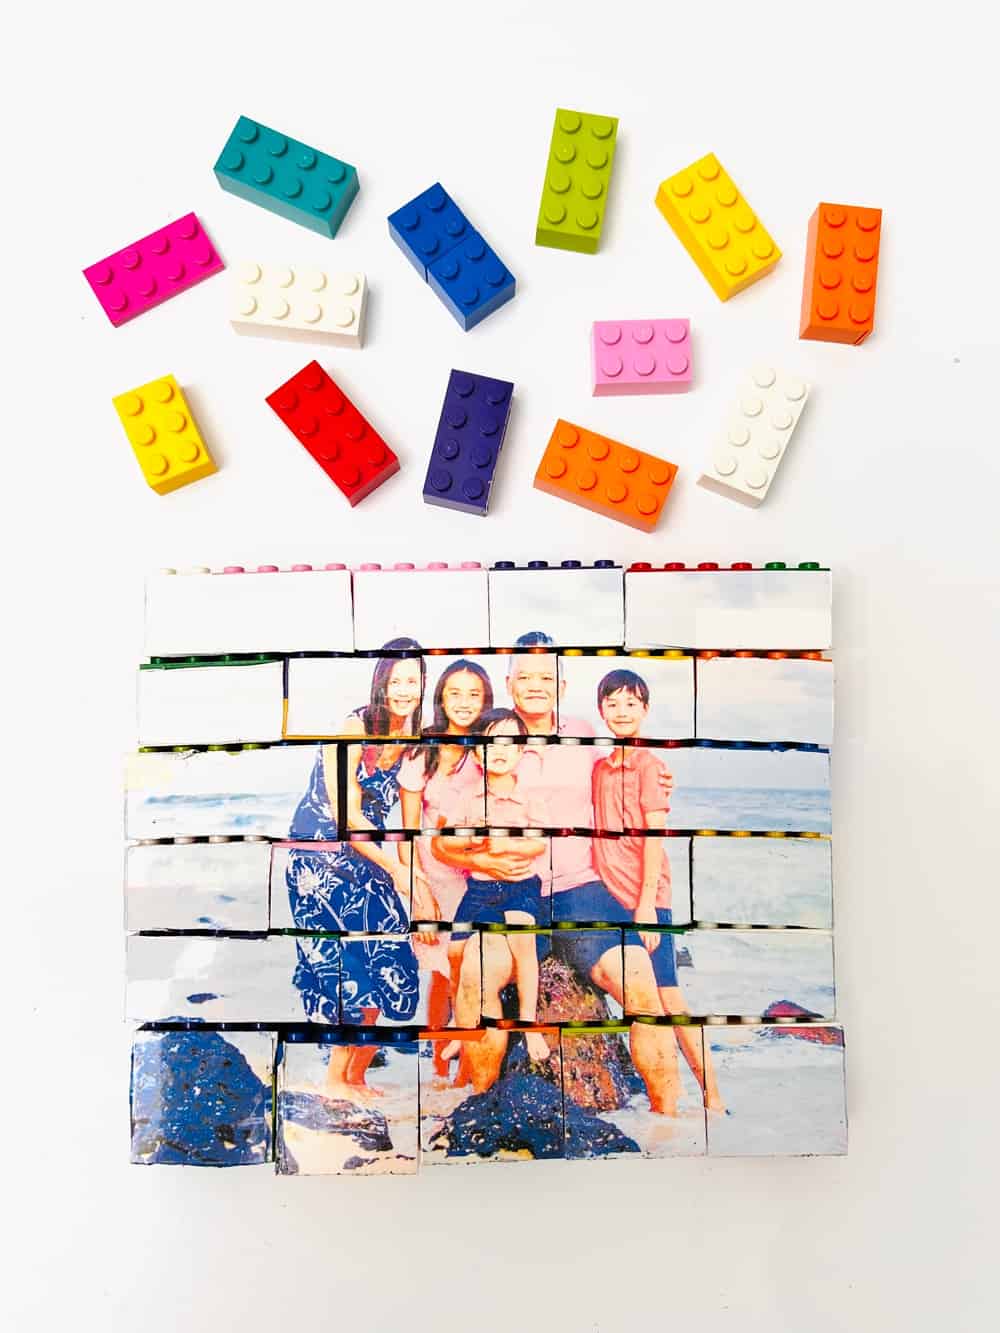
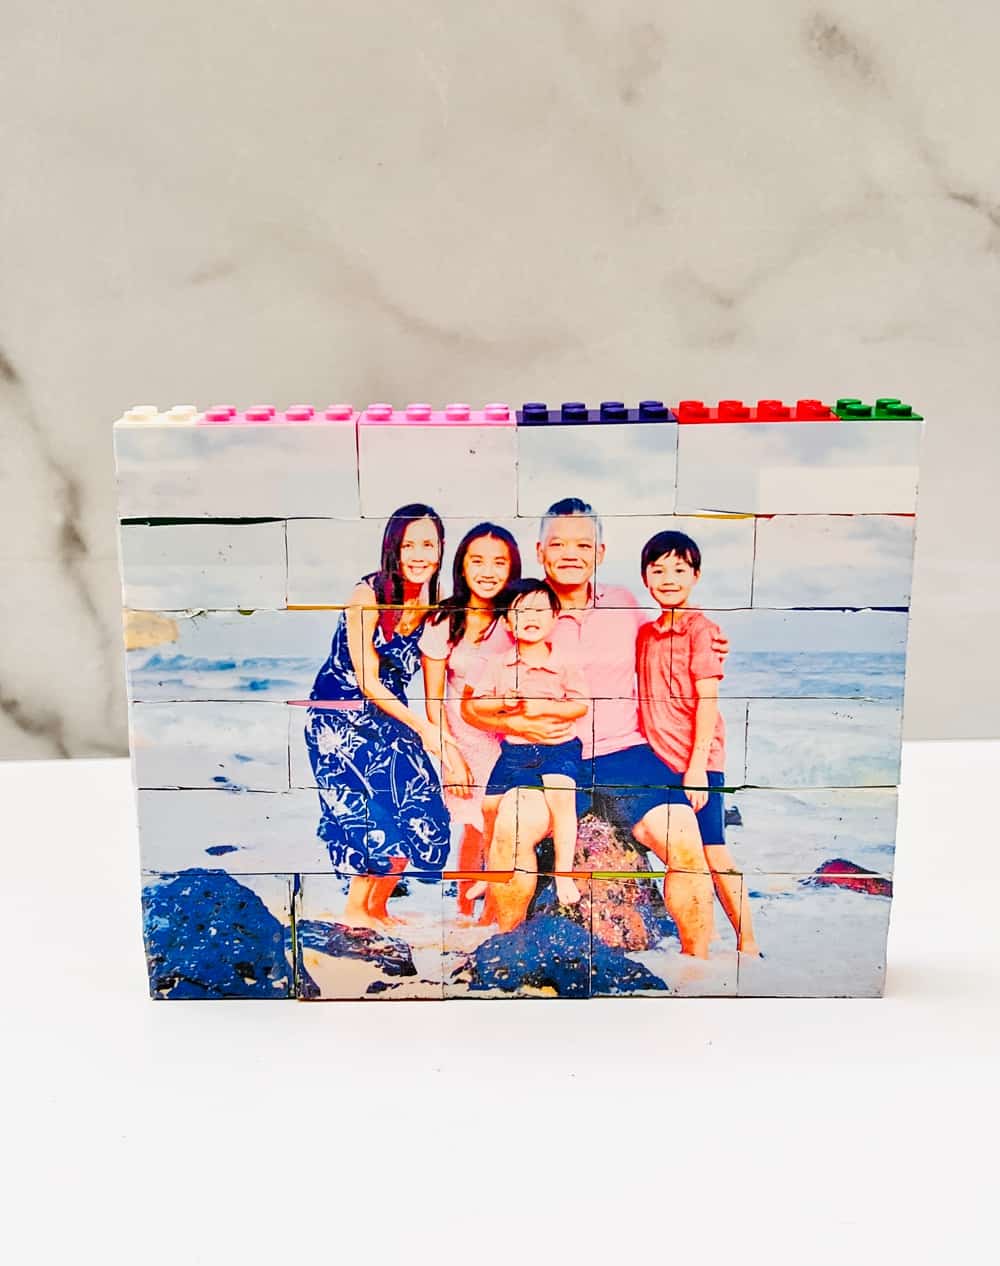
Not only is this DIY puzzle a fun way to spend time together, but when finished, it also makes fun decor for the home! It's like a frame for your favorite family photos, except in puzzle form.
If you're looking for an interesting and engaging toy, consider building a DIY Lego puzzle. Let's dive into the easy step below.

DIY Lego Puzzle - Materials:
- Lego bricks
- Xacto knife
- Cutting mat
- Viny sticker paper
- A printer
Building the Lego Puzzle: Useful Strategies & Tips
Try to Avoid Spaces in Between the Legos
This is important to keep in mind when building your puzzle. If there are any gaps, it can be difficult to match up the pieces and line up the images properly.
Try to make sure all of the bricks are pressed firmly against each other when trimming the paper. This will help to ensure a strong image on the sticker when the puzzle is put together!
Select the Right Lego Bricks for Your Puzzle
The size of the Lego bricks you use will affect how easy it is to assemble and disassemble the puzzle. Smaller bricks may be more challenging to put back together.
On the contrary, larger bricks will be easier to put back together, making it better for younger children. We recommend DUPLO Lego for kids under 5 years old which will be much easier to assemble.
Use Colored Pieces to Differentiate Sections
Color-coding the pieces of the puzzle can help kids identify which pieces are for which sections. This can help make the assembly process easier.
Creative Ways to Display The Completed Puzzle
Use a Canvas
Another creative way to display the puzzle is to use a canvas. Place the puzzle pieces directly onto the canvas and then glue them down to keep them in place.
This gives the puzzle an interesting 3D effect, and the canvas can be hung on a wall or propped up on a shelf. This is a great way to display a puzzle for everyone in the family to enjoy.
Place them in Shadow Box
If you want to display the completed puzzle without using a canvas, use a shadow box. This will provide a “window” into the puzzle, allowing you to see the puzzle from multiple angles.
You can also add decorative touches such as twinkle lights, decorative paper, and other embellishments to make the shadow box unique.
Making the Most of Your Lego Puzzle
Make a Photo Collage
You can use your LEGO pieces to create a photo collage of your favorite memories from the puzzle journey. So, instead of using just one image, print out an entire collage!
This is an opportunity for you and your family to share laughter, excitement, and accomplishment together as you build the puzzle together.
Make a unique Lego shape
Make a scene with the pieces, such as a castle or city. This is a great way to use the LEGO puzzle as a fun toy!
Point out Family Members
For younger kids ,this is a great way to point out loved family members and remember their faces and names.
Make Your Own Lego Puzzle - Step-by-Step Guide
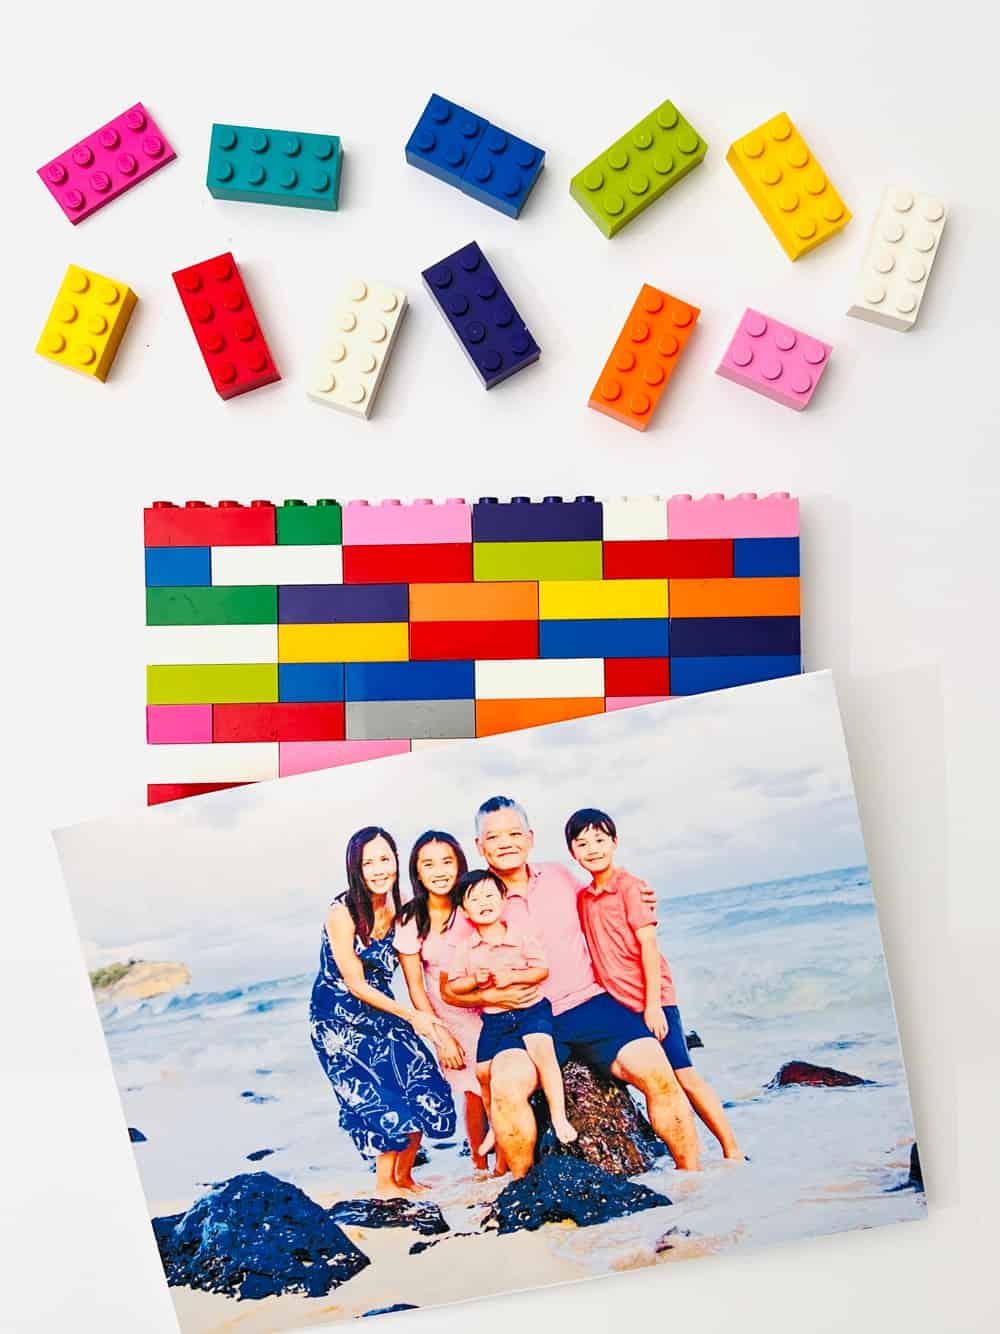
Step One: Print the Vinyl Sticker Paper
First, start by selecting the vinyl sticker paper you’d like to use. Make sure it's VINYL sticker paper, and not just regular paper with a sticky backing because you want your puzzle to be durable without having to think of adding Mod Podge, or a finishing varnish on the sticker paper.
Little hands will be handling this puzzle over and again so you want to make sure the paper will stand up to several uses. If you use matte paper, the photo ink will rub off quickly.
Next, you’ll need to print out the design with the vinyl sticker paper. The paper will be likely letter size which is what most printers print out (8.5" x 11") so decide what dimensions your photo will be that will fit within those limits. Our puzzle was roughly half the size of the paper.
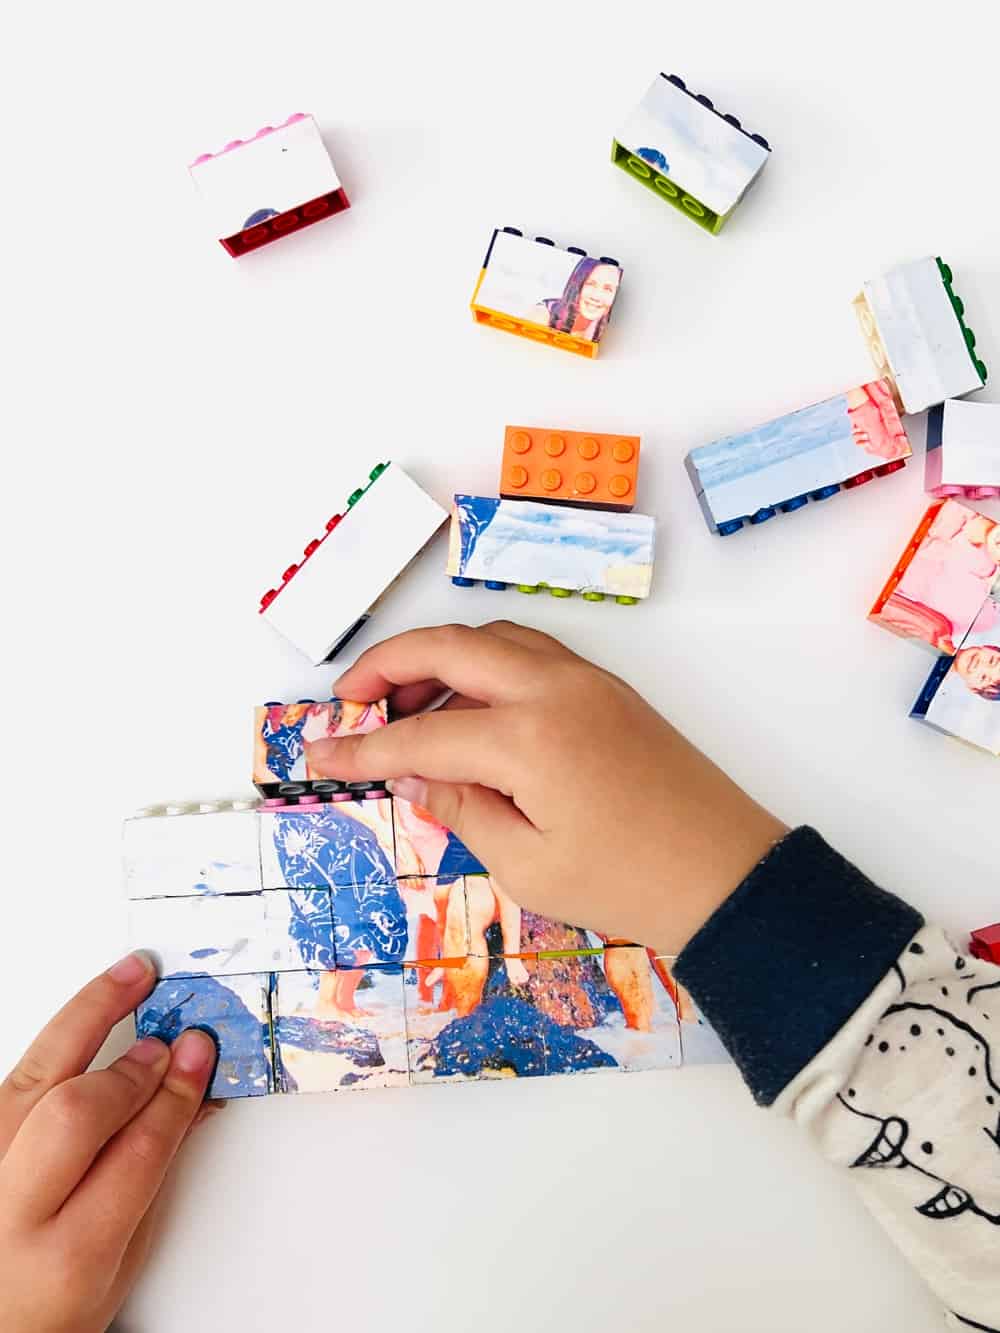
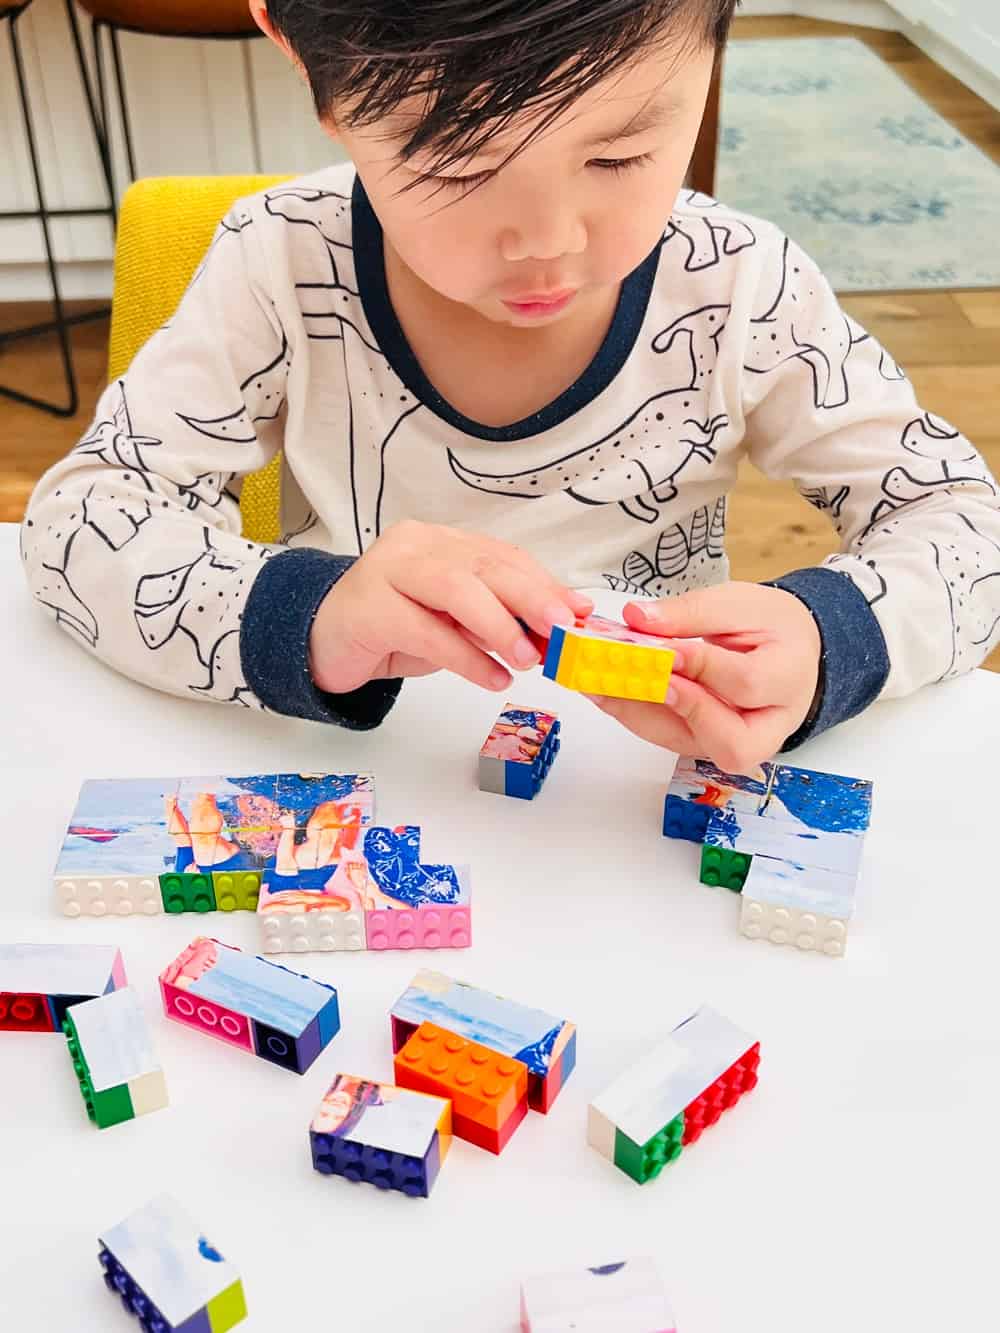
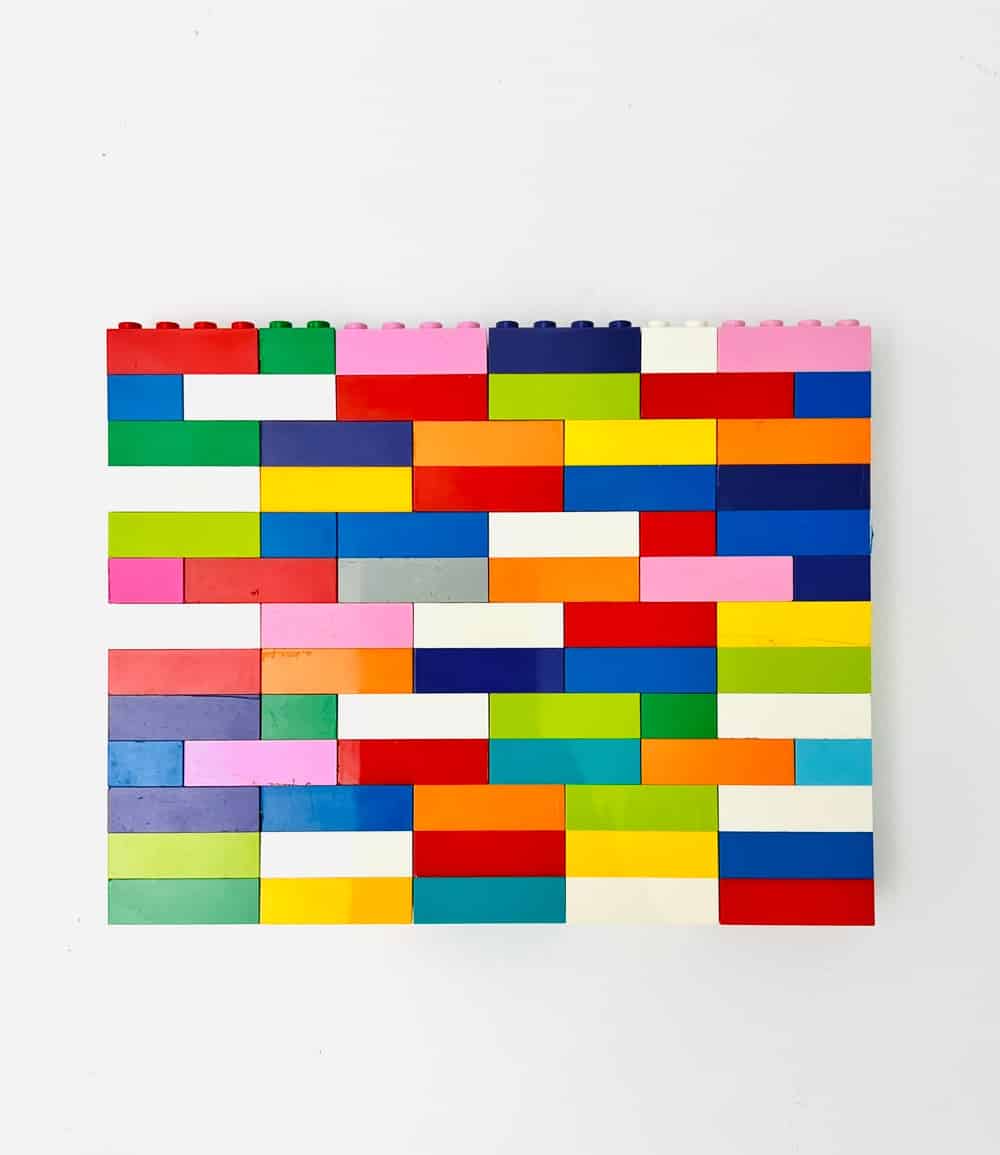
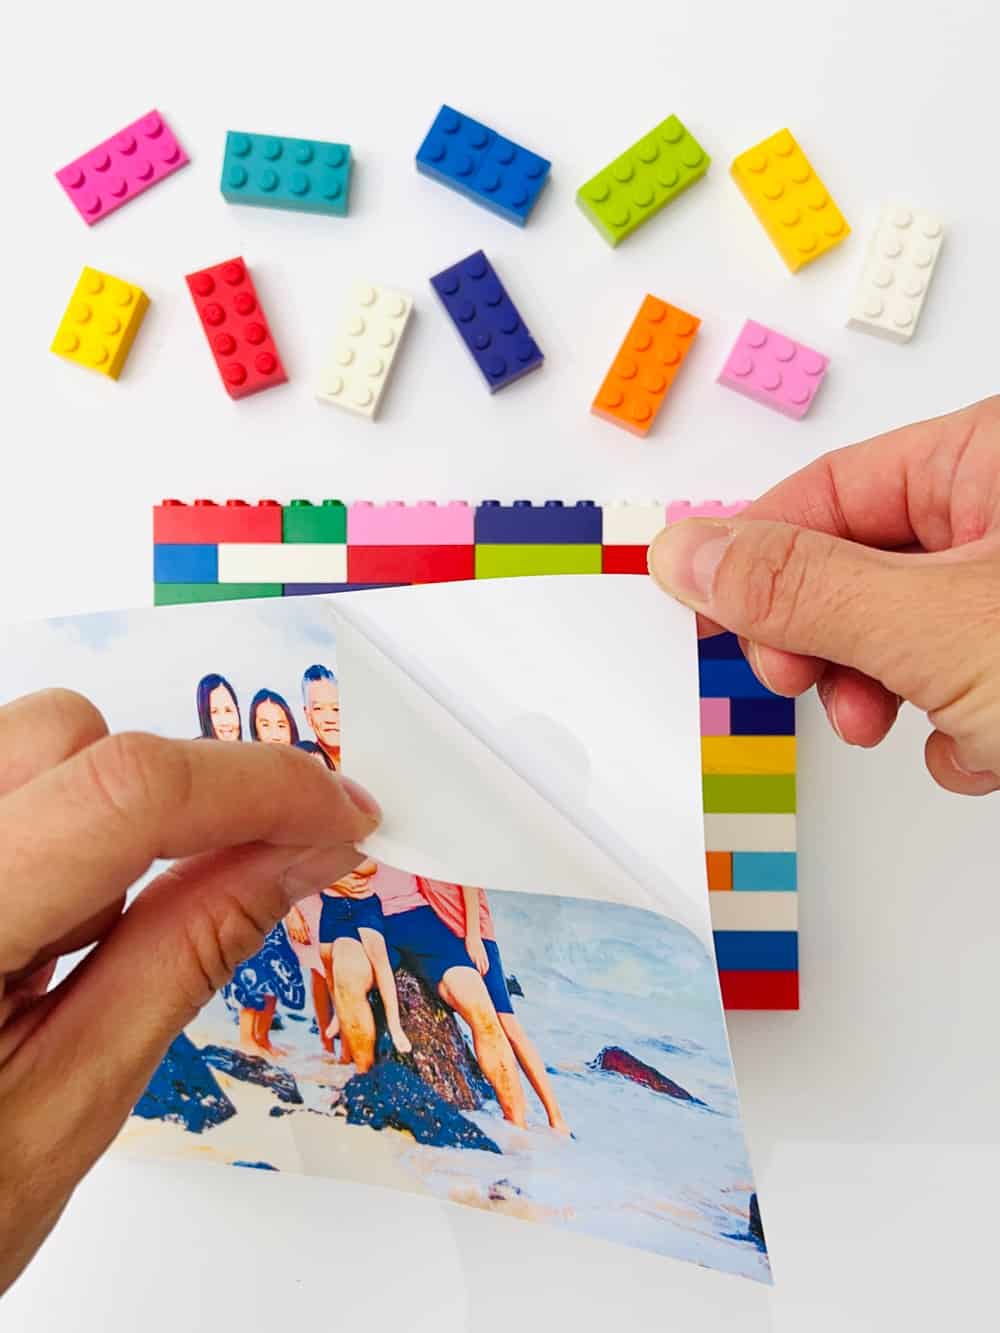
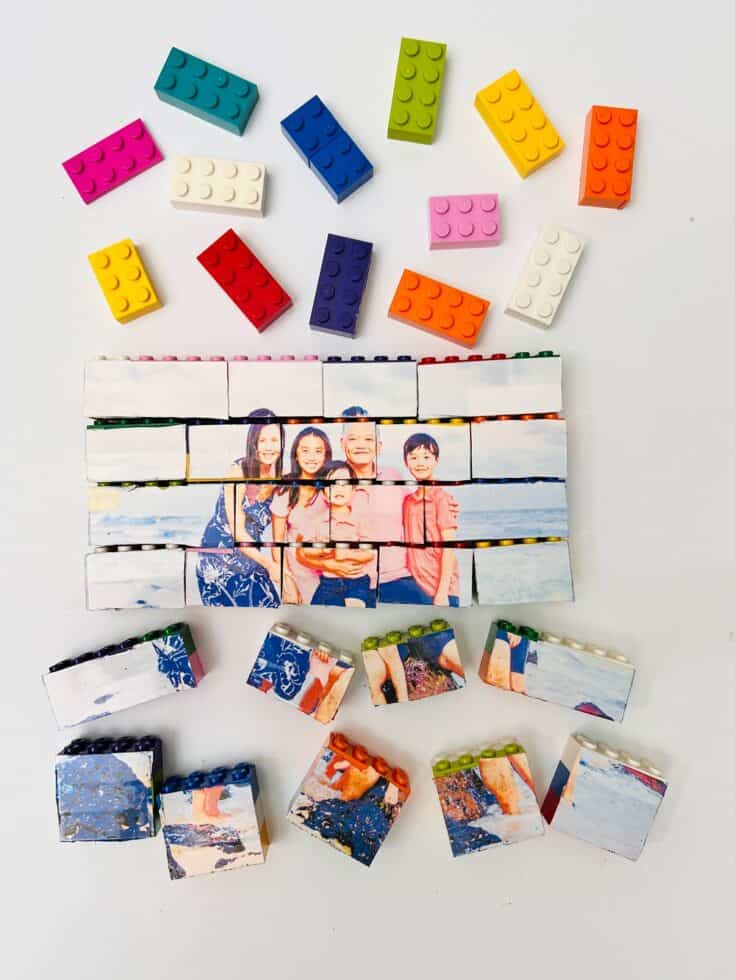
Step Two: Place the Paper onto the Legos
For step two, build the design you wish with the legos. Then, place the sticker paper onto the Legos. Be sure to press lightly to ensure the paper is firmly attached.
You'll want to make sure your photo has a slight overhang that you can cut away neatly with an X-acto knife.
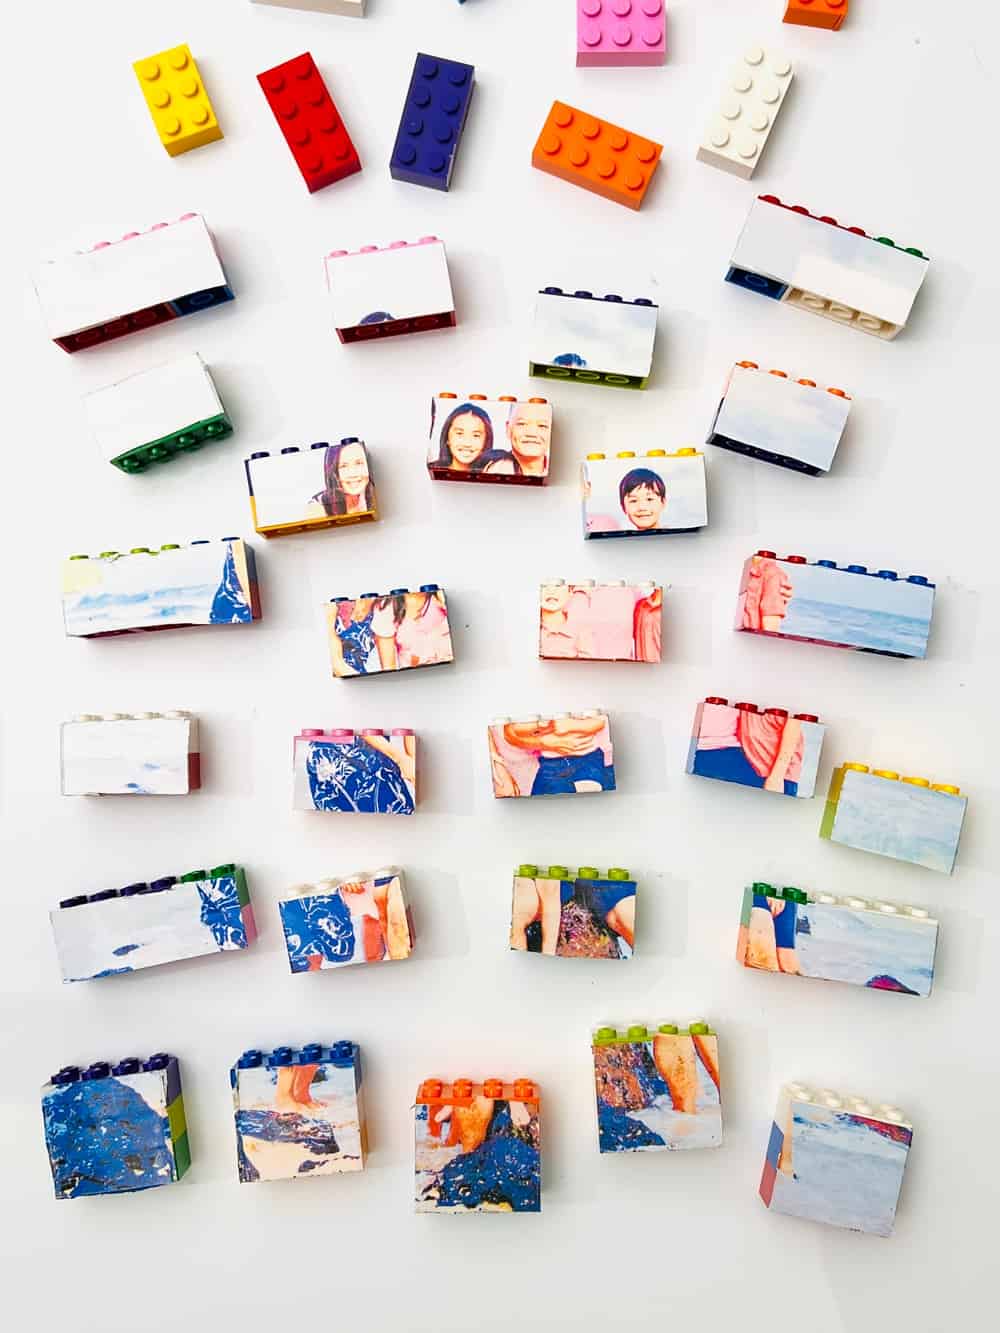
Step Three: Trim the Sticker Paper
Next, carefully cut away the paper on the outer edges of the Legos cutting any overlapping.
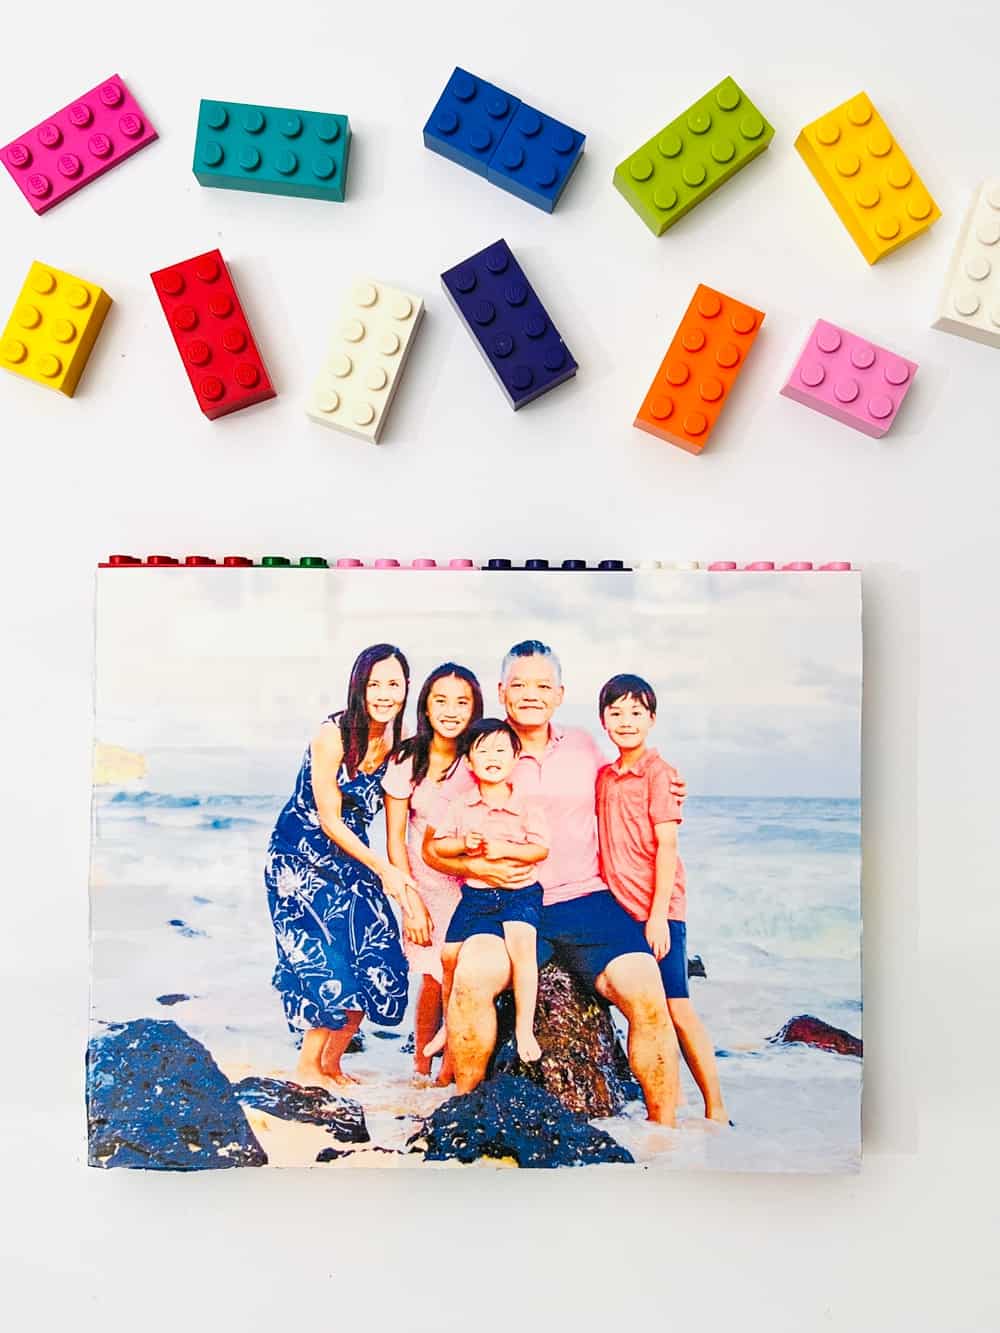
Once you do this, you’ll then need to trim in-between each lego so they’re each separated.
This will allow each brick to have its own image on its sticker. Once this is done, simply disassemble the puzzle, and try to put it back together!

Takeaway
Kids and adults love Legos and you likely already have a ton of Lego bricks around the home. Turning them into a puzzle is a fun extension of play and gives kids an exciting challenge to figure out. The Lego puzzle also makes a cute frame featuring your kids' favorite people.
How To Make An Easy DIY Lego Puzzle
Materials
- Lego bricks
- Xacto knife
- Cutting mat
- Viny sticker paper
- A printer
Instructions
- Step One: Print the Vinyl Sticker Paper
- First, start by selecting the vinyl sticker paper you’d like to use. Make sure it's VINYL sticker paper, and not just regular paper with a sticky backing because you want your puzzle to be durable without having to think of adding Mod Podge, or a finishing varnish on the sticker paper.
- Little hands will be handling this puzzle over and again so you want to make sure the paper will stand up to several uses. If you use matte paper, the photo ink will rub off quickly.
- Next, you’ll need to print out the design with the vinyl sticker paper. The paper will be likely letter size which is what most printers print out (8.5" x 11") so decide what dimensions your photo will be that will fit within those limits. Our puzzle was roughly half the size of the paper.
Step Two: Place the Paper onto the Legos
- For step two, build the design you wish with the legos. Then, place the sticker paper onto the Legos. Be sure to press lightly to ensure the paper is firmly attached.
- You'll want to make sure your photo has a slight overhang that you can cut away neatly with an X-acto knife.
Step Three: Trim the Sticker Paper
- Next, carefully cut away the paper on the outer edges of the Legos cutting any overlapping.
- Once you do this, you’ll then need to trim in-between each lego so they’re each separated.
- This will allow each brick to have its own image on its sticker. Once this is done, simply disassemble the puzzle, and try to put it back together!