

By using this site, you agree to our Terms of Use. This post may contain affiliate links. Read our disclosure policy.
Follow us on Etsy for more fun ideas for kids!
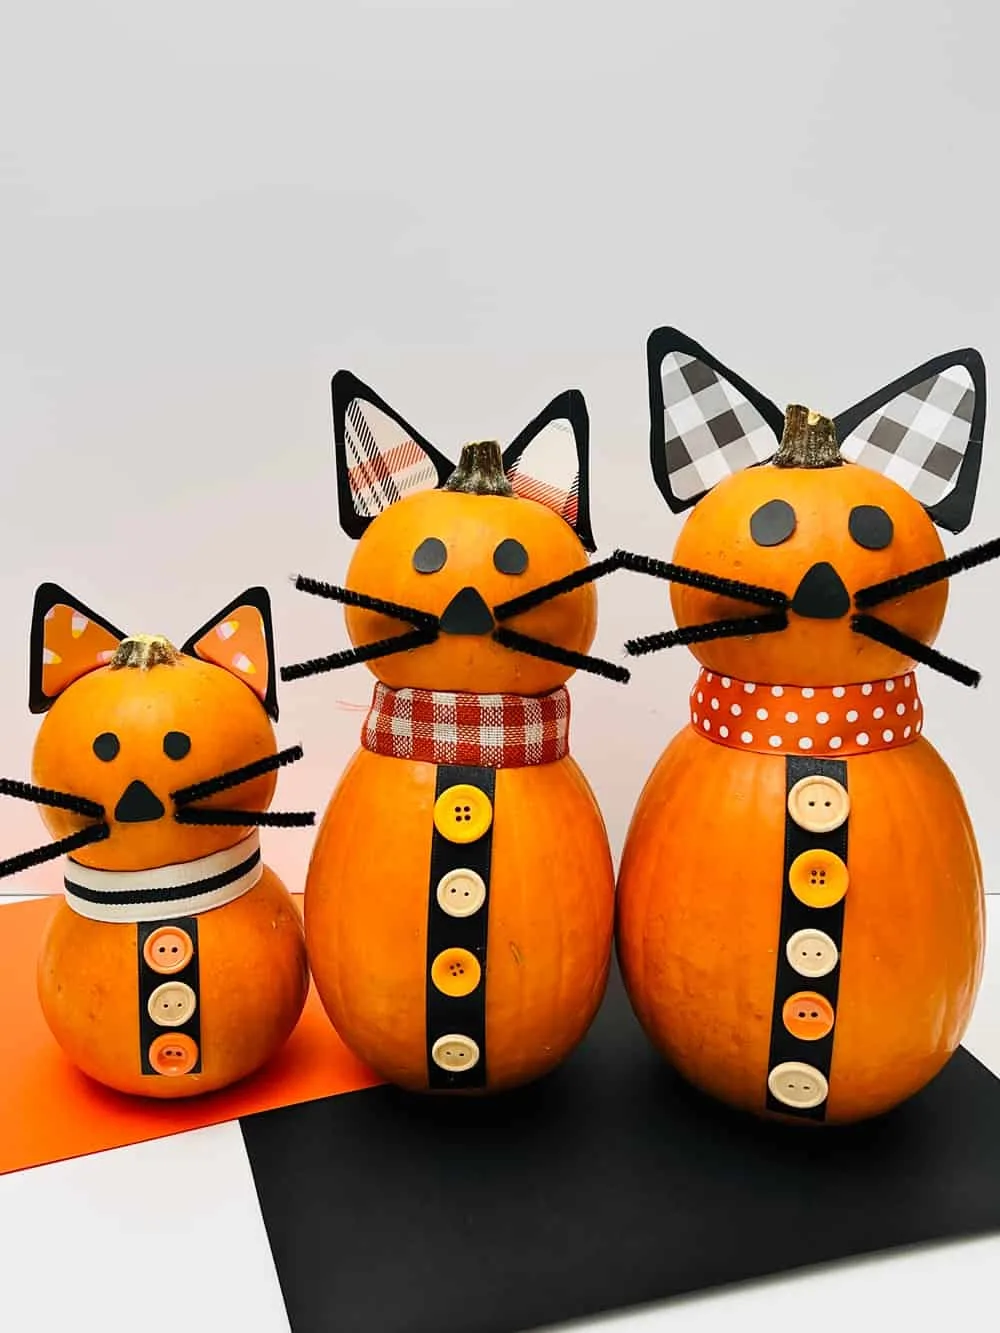
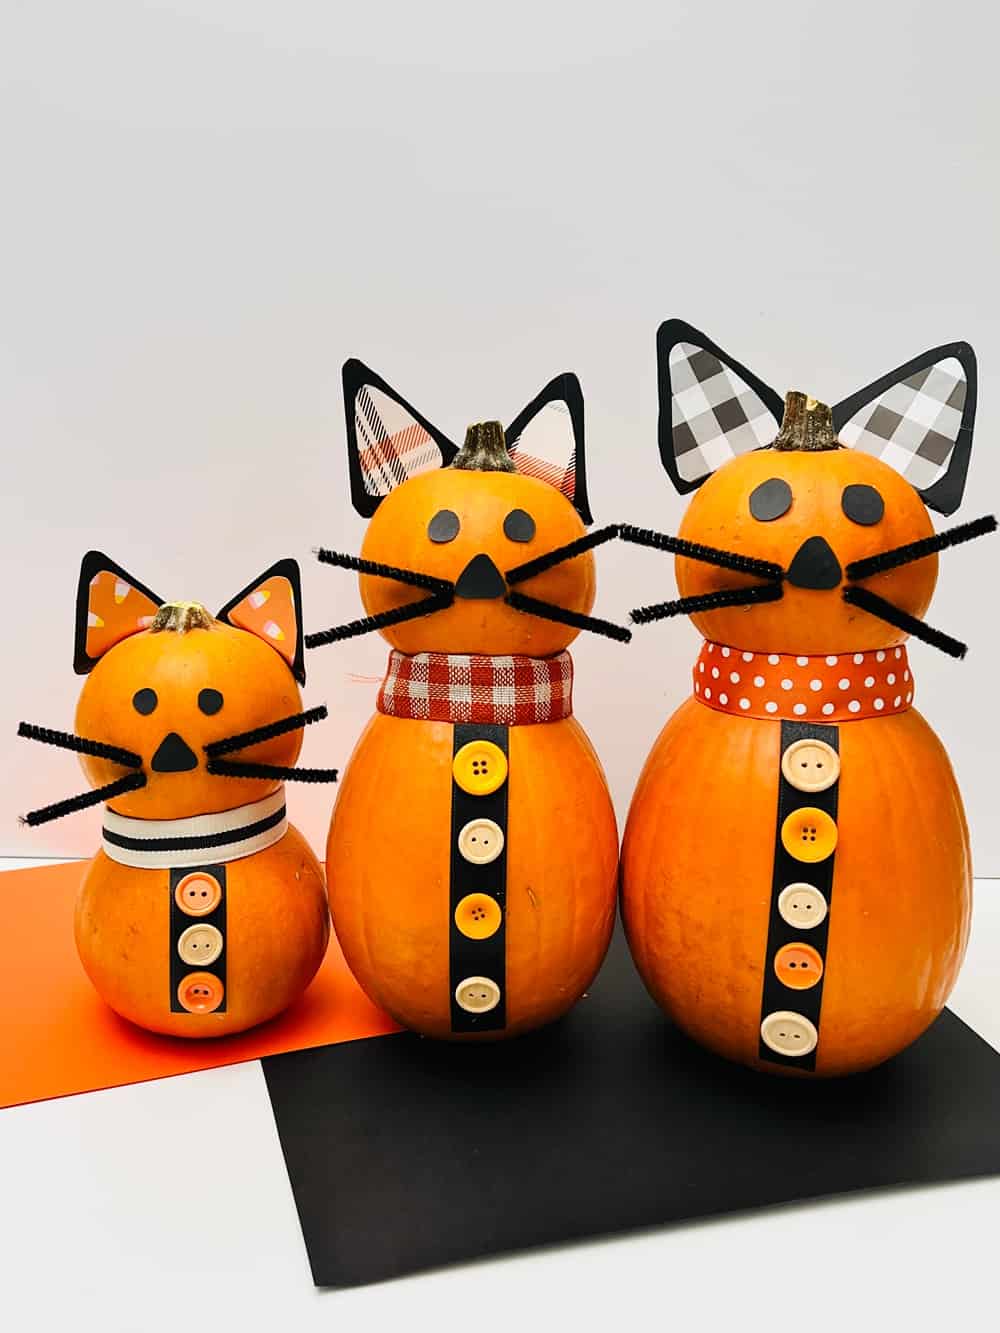
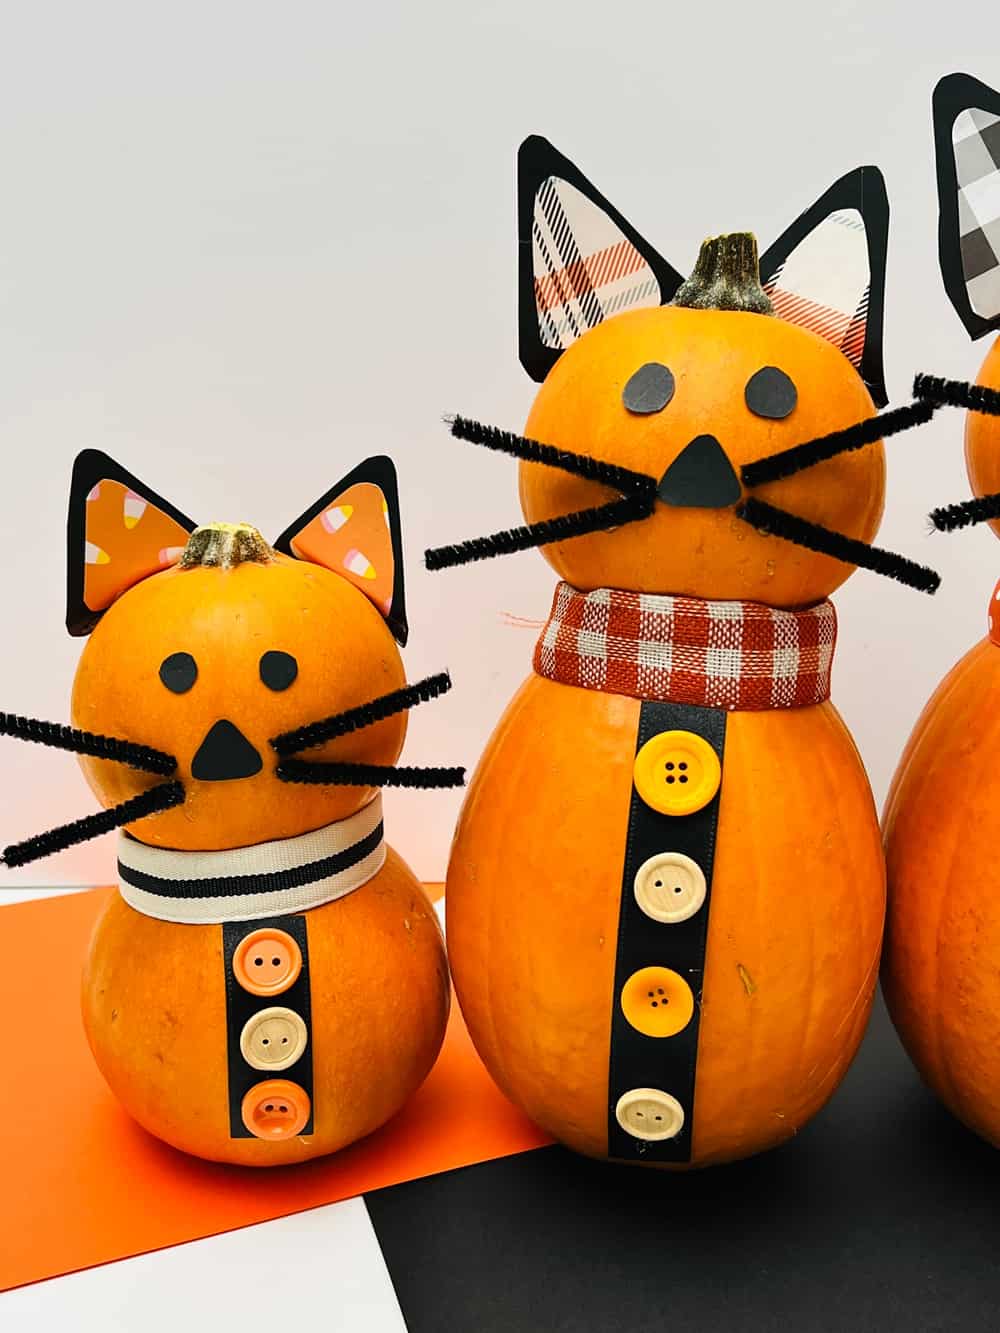
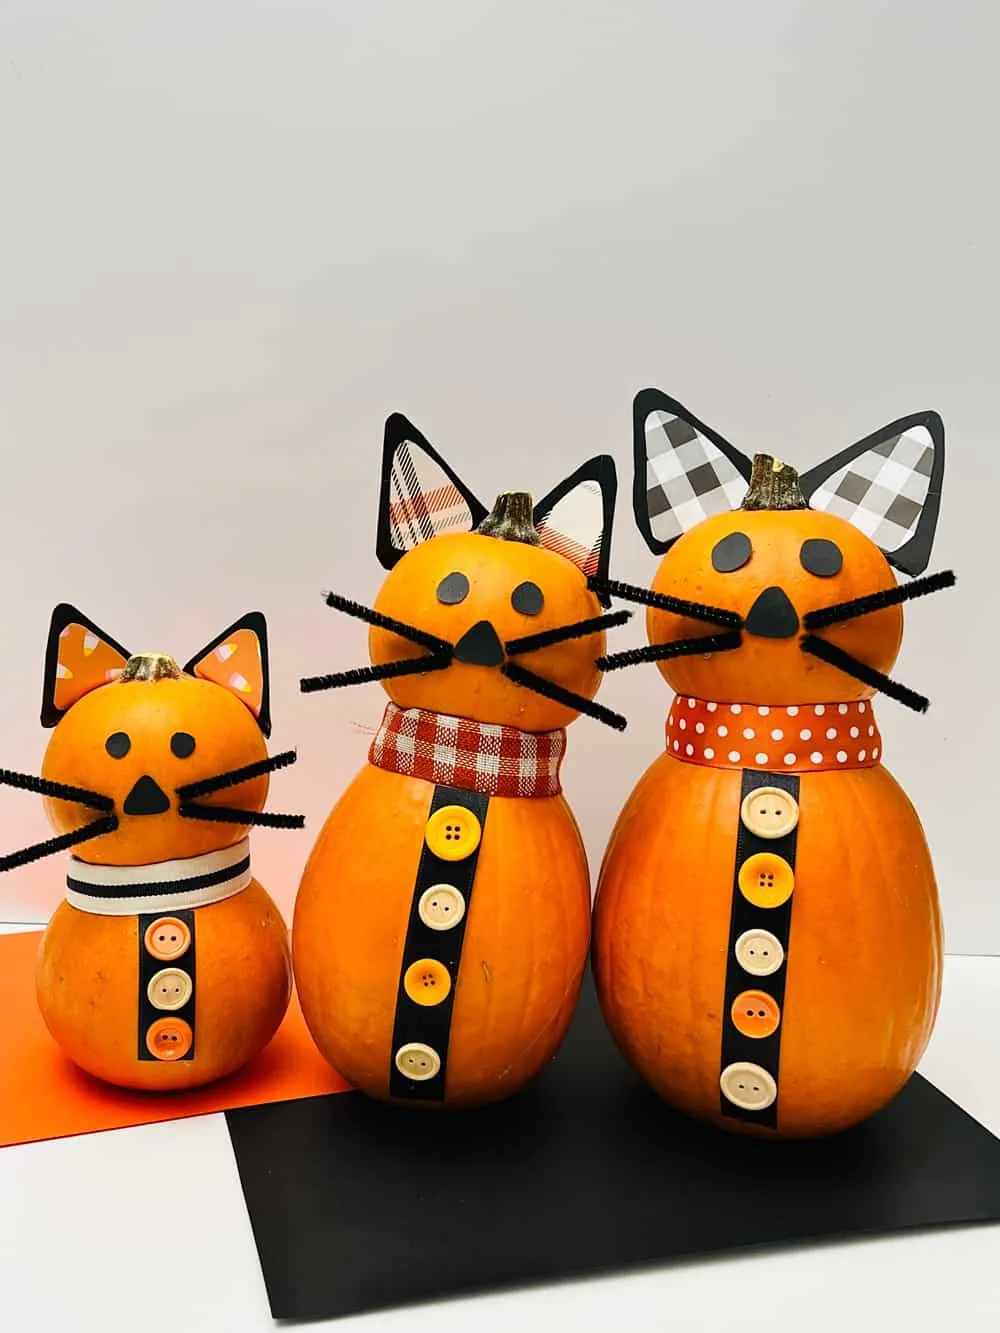
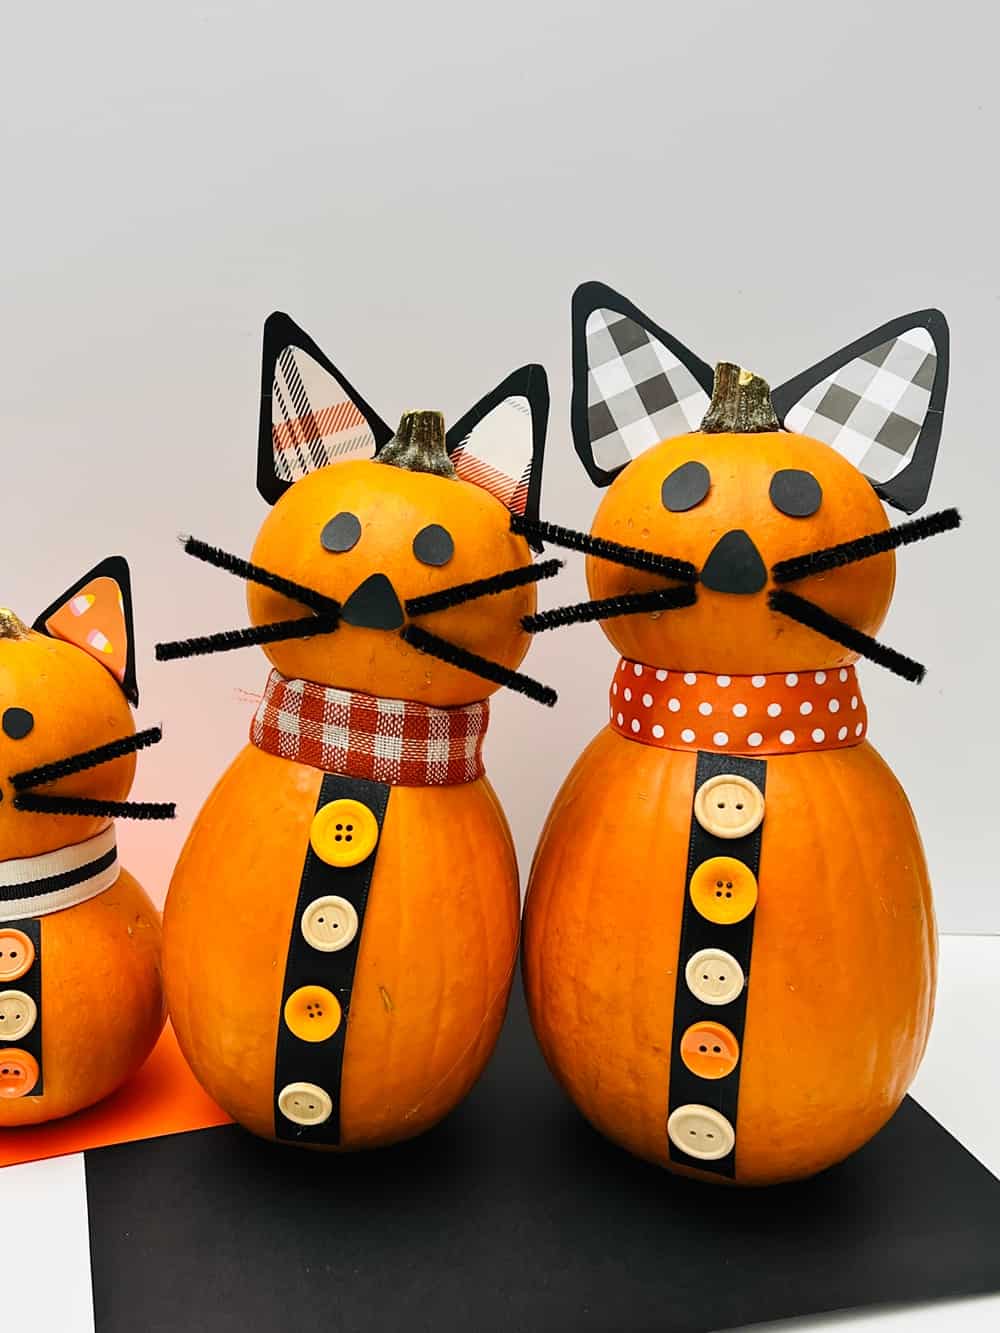
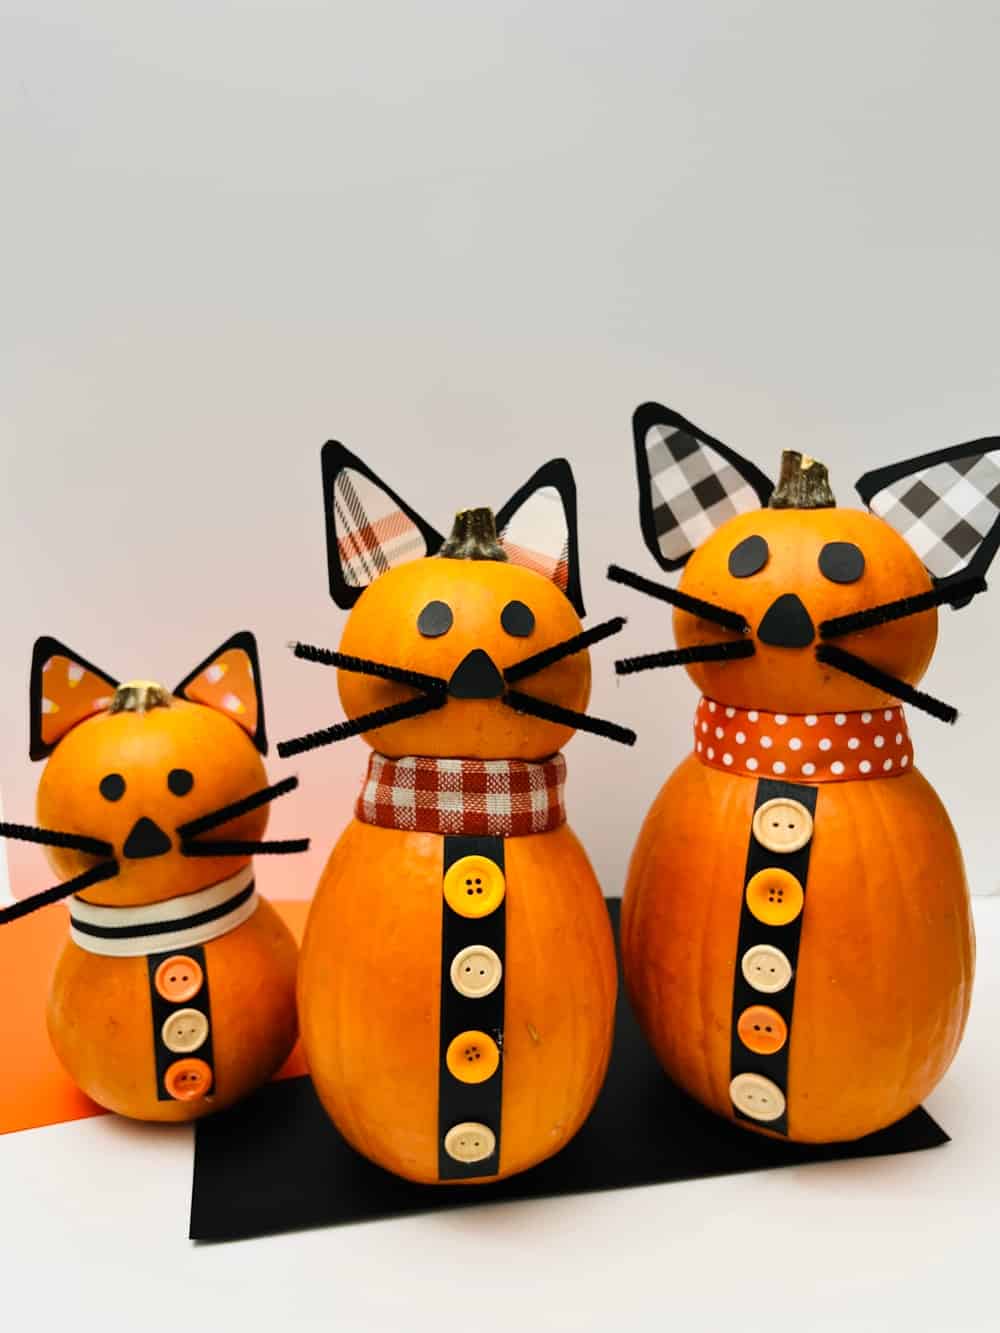
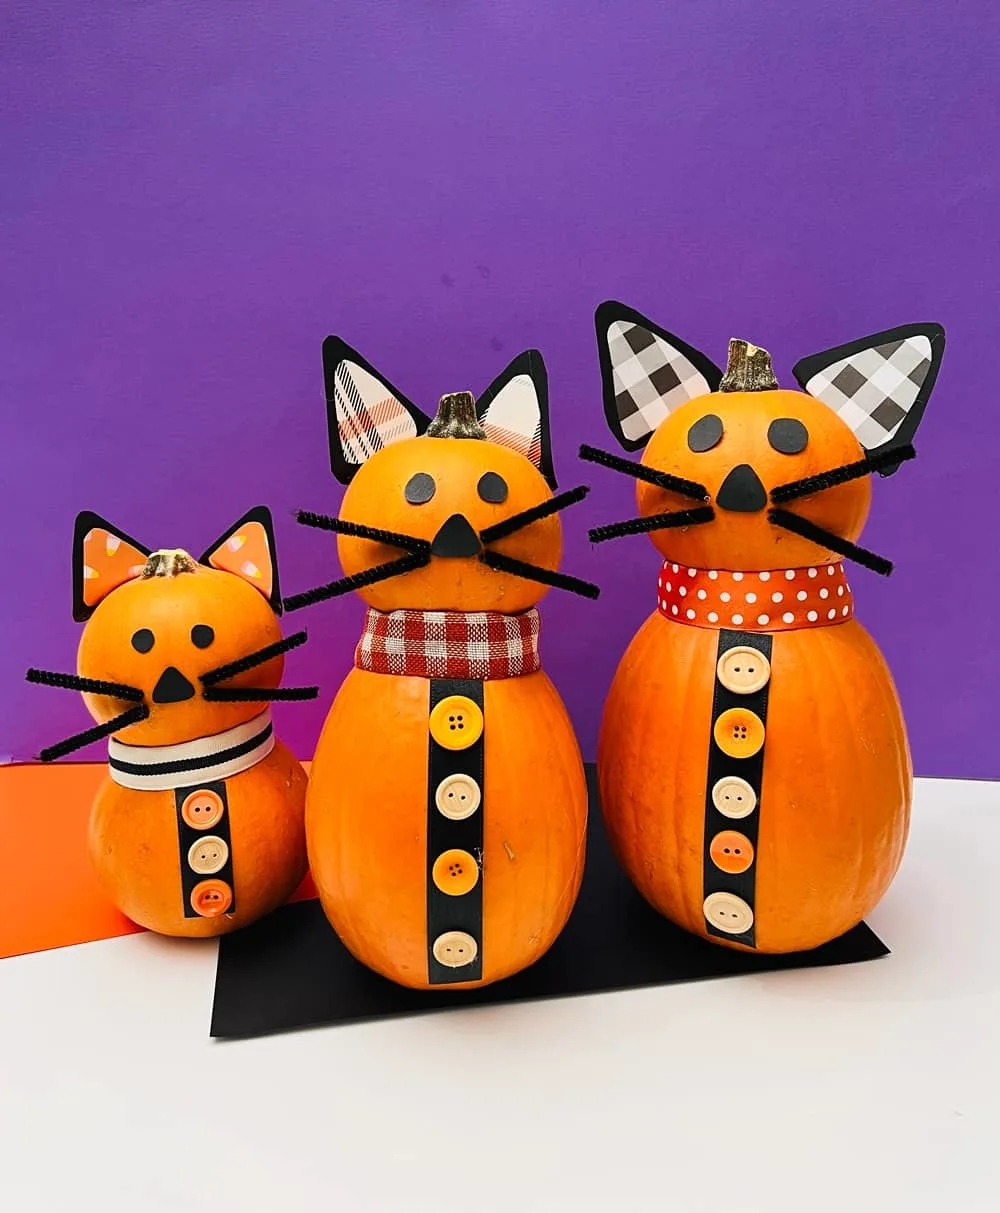
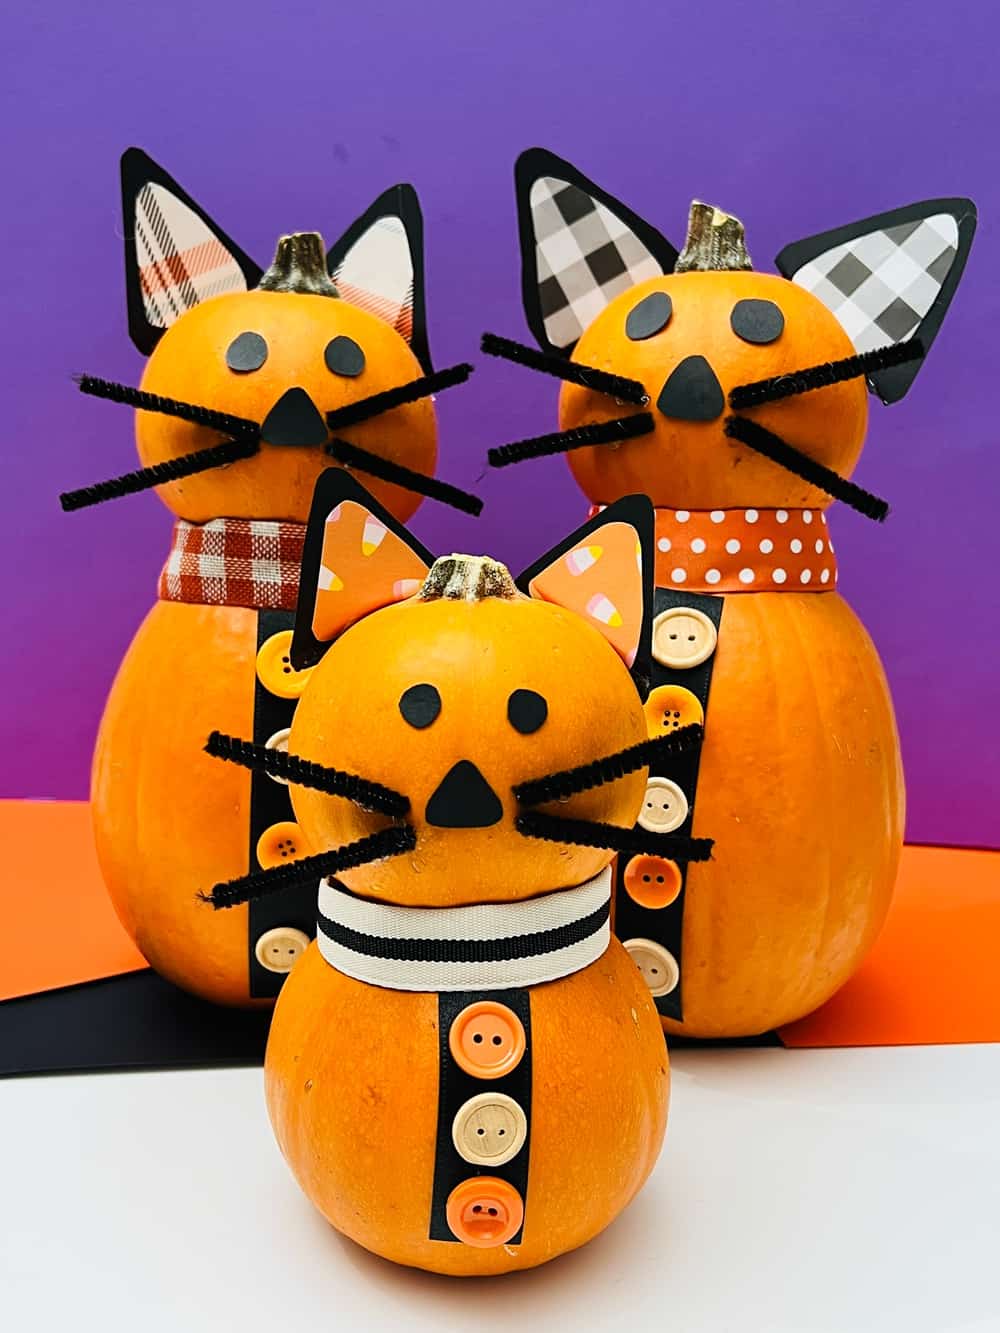
This adorable cat pumpkin makes an adorable no-carve pumpkin that kids will love designing and decorating for Halloween!
Halloween is just around the corner, and that means it’s time to start thinking about decorations!
Traditionally, people carve pumpkins, but this year we’re going to skip the carving and make a no-carve cat pumpkin instead! Cats make adorable crafts that kids love and they also look quite cute as pumpkins!
Unlike traditional pumpkin crafts, this no-carve pumpkin is pretty easy to make and only requires a few supplies.
This one in particular is designed to look like a cat, so you can really take your Halloween decorating to the next level!
Plus, kids can help you put it all together and even get creative in designing the cat’s face. We’ll also offer tips for making the most of your pumpkin decorating efforts. Let’s get started!
We were inspired to make these from an old Southern Living magazine article we saw one year.
The kids can help you put it all together and even get creative in designing the cat’s face. We’ll also offer tips for making the most of your pumpkin decorating efforts. Let’s get started!


Pumpkin Cat – Materials:
- Small pumpkins (one round for the head and one longer for the body)
- Buttons
- Ribbons
- Black pipe cleaners
- Black paper
- Patterned papers
- Hot glue gun
Easy Steps to Craft a DIY Halloween No Carve Cat Pumpkin
Step One: Glue your pumpkins
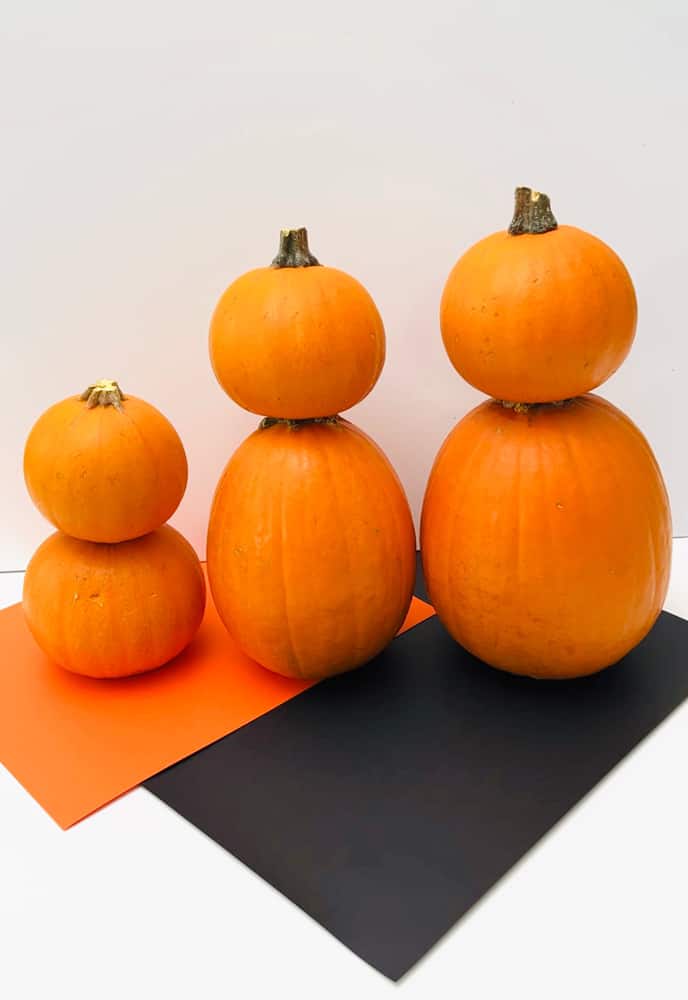
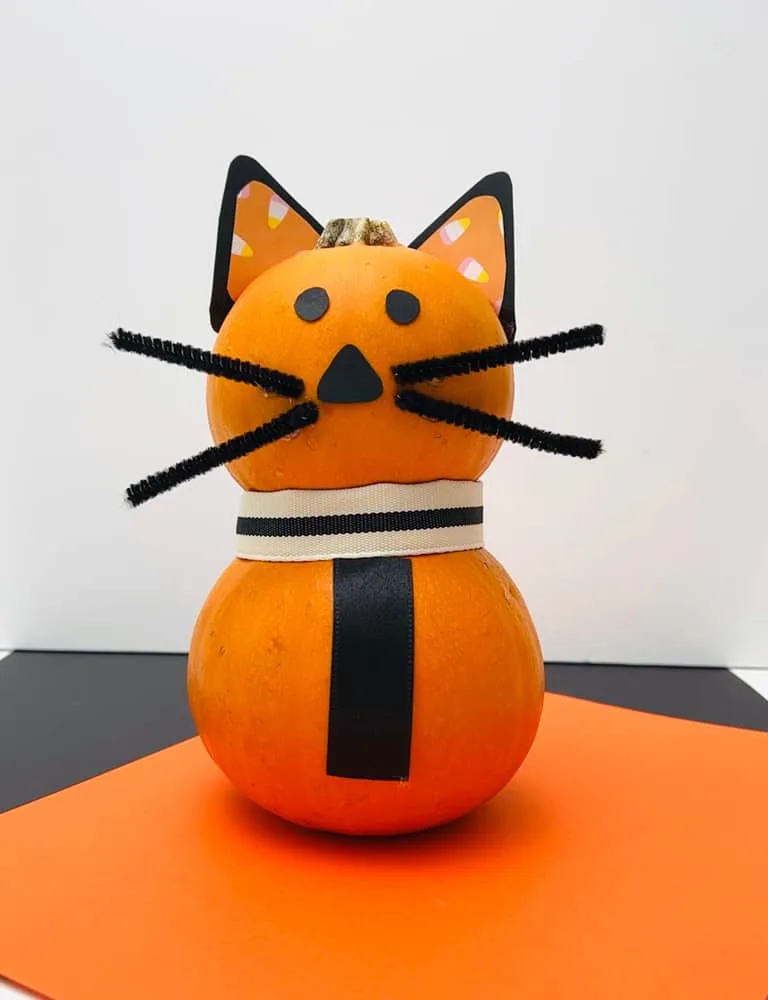
Find two pumpkins that would make a good cat shape. We used small pie pumpkins and mini pumpkins, one longer for the body and one rounder for the head.
You’ll first need to carve the stem off the body so that you can hot glue the head pumpkin to it.
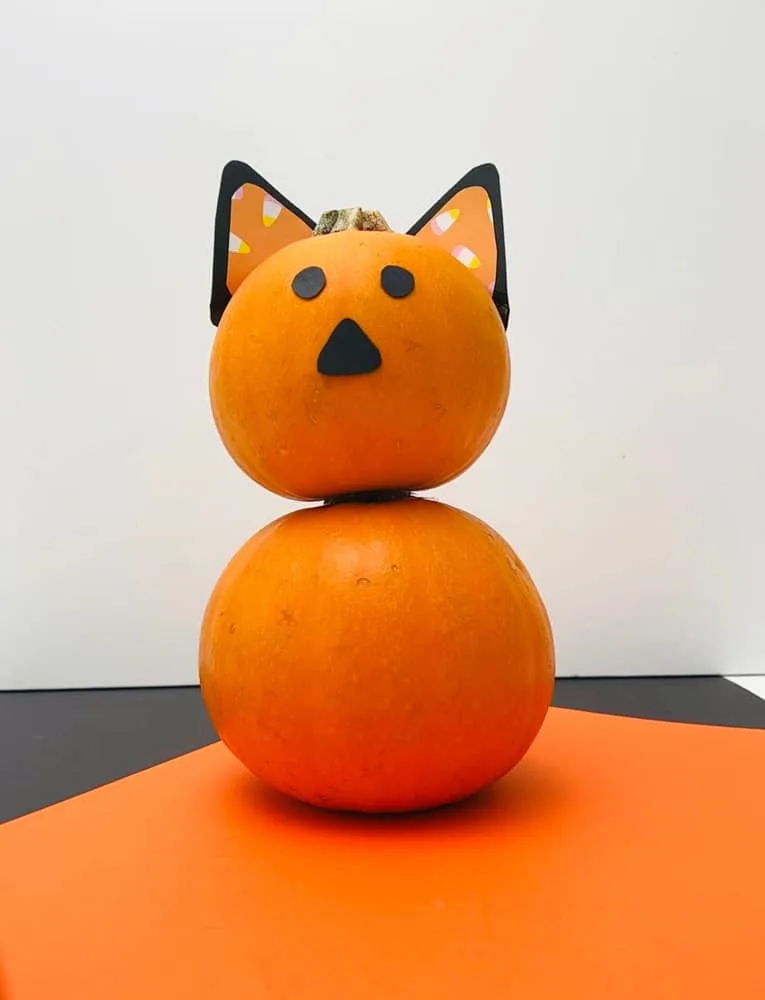
Step Two: Create The Face
Cut out the eyes and nose from black paper. Glue these onto the face of the top pumpkin using a hot glue gun, or double-sided tape or glue dots if you don’t have a hot glue gun around the house.
Step Three: Add the Facial features
For this next step, cut out ears from black paper and add another layer overtop for good contrast by using colorful patterned paper. Feel free to add some design to the white area of the ears!
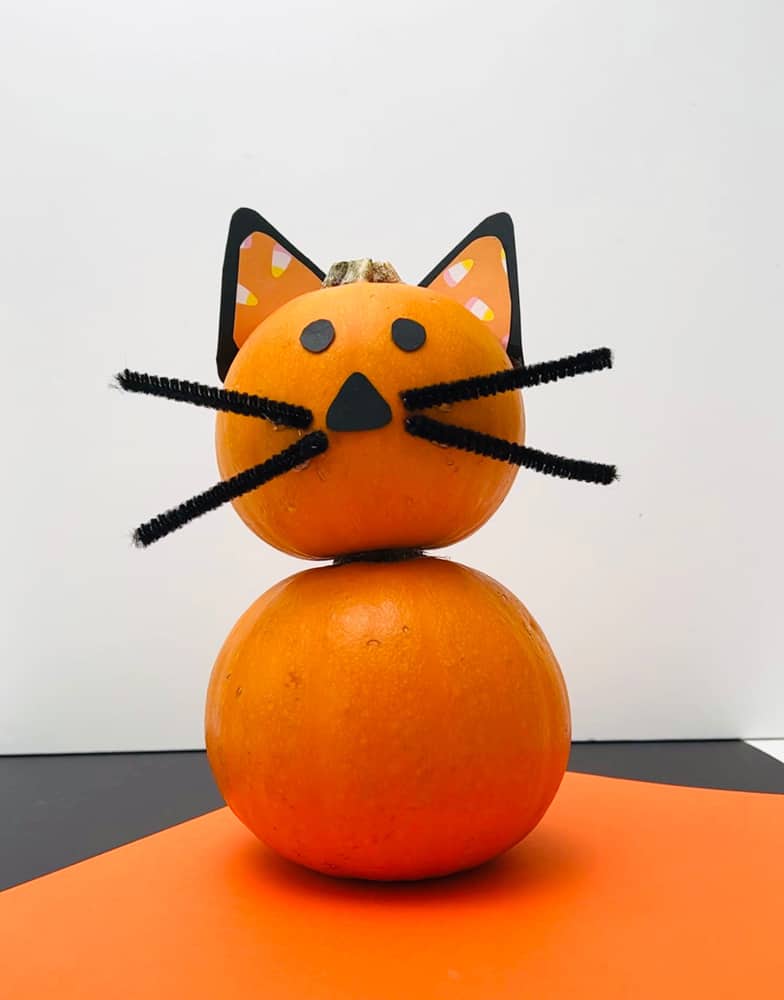
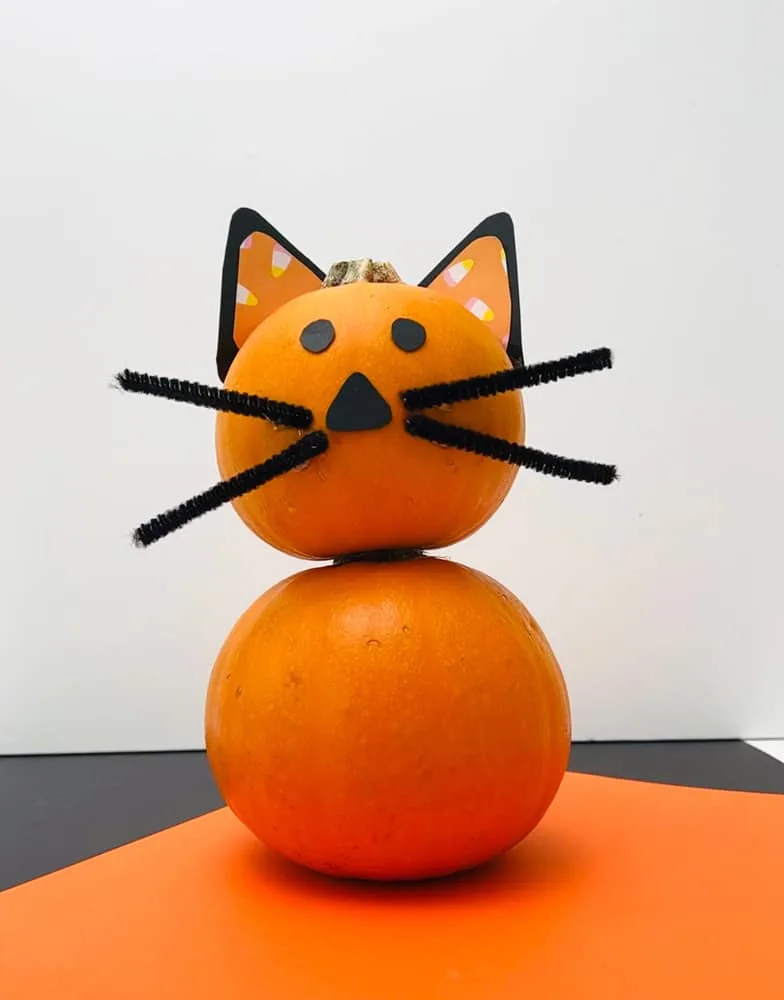
You can make whiskers by gluing cut black pipe cleaners on each side of the nose. Have fun and make them as long as ou want. Remember, cats have whiskers that can span upwards of five inches!
Step Four: Tie it All Together
Last but not least, put a simple little scarf surrounding the stem of the bottom pumpkin near where it joins the bottom of the top pumpkin. We simply used ribbon and glued the two ends on the back.
Then, add another ribbon vertical to the body, add a few cute buttons, and you’re done!


How to Make Your DIY No-Carve Cat Pumpkin Even Scarier
Add red goo dripping down from the cat pumpkins’ mouths
This year they’ll be even more terrifying when they drip blood down from their mouths! To achieve this effect, you can use red puffy paint!
Be sure to watch it as it happens so that you can create an even more realistic effect.
Hang spiderwebs over each eye
Use spiderweb (the kind you can pull out like string) and drape over the cat’s eyes or head.
You can even add toy mini spiders to create an even spookier feel!
Use an all-black pumpkin to create an eerie effect
By painting your cat pumpkin all black, you’ll create an eerie and spooky effect that will make your guests (and family) scream! To get started, start by choosing sturdy pumpkins.
Then, apply a layer of black acrylic paint using a brush. Make sure to cover the entire pumpkin in order to create the darkest effect possible. Let the paint dry completely. You may need to add two layers.
You can also spray paint your pumpkin black but make sure to use a drop cloth and do this outside for ventilation.
Dress up your cat pumpkin with some spooky accessories
This is a great way to add some extra personality and flavor to your pumpkin. Start by choosing something simple like a witch’s hat or a skeleton mask.
Then, get creative and add anything you think will make the costume more interesting (like green onion bulbs).
You can use fake teeth and claws to create a more realistic effect, or you can use a hairdryer to create a fierce appearance by adding a burn affect to the pumpkin.
Add some faux bones to the scene
If you’re looking to get your DIY no-carve pumpkin even scarier this year, then you need to add some faux bones to the scene.
Faux bones can be made from anything that’s sturdy enough – like small pieces of wood or plastic. You can attach them using a variety of methods, but the simplest is just using hot glue.
This will create a realistic appearance that will really creep out your friends and family!


Where to Place your No-Carve Halloween Cat Pumpkin
Place the Cat Pumpkin on Your Front Porch
The best place to place your no-carve Halloween pumpkin is on your front porch so other people can see all of the spookiness.
If you want to add a little extra creepiness to your pumpkin, you can also place some fake bones on your front porch around the pumpkin.
This will really add to the overall effect and will scare your guests senseless!
Place It on a Porch Swing
If you have a porch swing, then placing your no-carve Halloween pumpkin on it is ideal.
Not only will this location be very popular with children (and their parents), but it also gives adults an opportunity to get up close and personal with their pumpkins!
This is a great way to get a lot of photo opportunities for your Halloween decoration, and it will definitely be the talk of the neighborhood!
Place it on a Tree
If you don’t have room for your pumpkin on the front porch, or you want to give it an even more sinister appearance, then you can place it on a tree in your yard.
You can also hang fake bones to the scene if desired – just make sure that they’re sturdy enough so that they don’t break off during Halloween festivities.
Put it in Your Garden
This is a great option if you have a large yard or if you’re able to suspend the pumpkin from something else (like a wire fence).
If you choose this option, be sure to place something to protect the pumpkins so that animals don’t get to them.
Many gardeners choose to place squash or pumpkin vines around the perimeter of their pumpkins in order to add some extra contrast and life.
Place it in a Window
To place your pumpkin in a window, make sure it’s facing towards the outside so it can greet visitors or passer-byes!
Some people also like to hang fake spiders or bats in and around their window to add an extra layer of creepiness and terror to your no-carve pumpkin!
Good Places to Find Healthy Pumpkins
If you’re looking for a healthy pumpkin, then check out some local farmers’ markets or pumpkin patches. These farms usually have fresh produce available all year round, so you can’t go wrong.
Grocery stores also oftentimes carry organic pumpkins, which generally look better than regular ones, making them perfect for your cat pumpkin.
Organic farms not only will offer these pumpkins to be free from pesticides and other chemicals, but they also tend to last longer because they’re grown without GMO crops or artificial additives.
Oftentimes, organic pumpkins are also more expensive than their conventional counterparts.
If you’re on a tight budget, you can also try looking for locally-grown pumpkins in small regional homesteads or farms.


Takeaway
Now that you know how to easily make your very own Halloween cat pumpkin, get started today and see the spookiness in all of its glory!
By following one of these easy methods, you’ll be able to keep your pumpkin looking as good as new and enjoy all the benefits that come with fresh produce.
Kids will love getting their hands on a healthy pumpkin, and you’ll be able to savor it all year long. So, don’t wait to start showcasing your menacing pumpkins!
How to Make an Easy No Carve Cat Pumpkin


Materials
- Small pumpkins (one round for the head and one longer for the body)
- Buttons
- Ribbons
- Black pipe cleaners
- Black paper
- Patterned papers
- Hot glue gun
Instructions
Step One: Glue your pumpkins
Find two pumpkins that would make a good cat shape. We used small pie pumpkins and mini pumpkins, one longer for the body and one rounder for the head.
You'll first need to carve the stem off the body so that you can hot glue the head pumpkin to it.
Step Two: Create The Face
Cut out the eyes and nose from black paper. Glue these onto the face of the top pumpkin using a hot glue gun, or double-sided tape or glue dots if you don't have a hot glue gun around the house.
Step Three: Add the Facial features
For this next step, cut out ears from black paper and add another layer overtop for good contrast by using colorful patterned paper. Feel free to add some design to the white area of the ears!
You can make whiskers by gluing cut black pipe cleaners on each side of the nose. Have fun and make them as long as ou want. Remember, cats have whiskers that can span upwards of five inches!
Step Four: Tie it All Together
Last but not least, put a simple little scarf surrounding the stem of the bottom pumpkin near where it joins the bottom of the top pumpkin. We simply used ribbon and glued the two ends on the back.
Then, add another ribbon vertical to the body, add a few cute buttons, and you’re done!


Agnes Hsu is a mom of three and has been inspiring parents and kids to get creative with easy activities and family friendly recipes for over 10 years. She shares her love for creative play and kids food to her 2MM+ followers online. Agnes' commitment to playful learning and kindness has not only raised funds for charity but also earned features in prestigious nationwide publications.