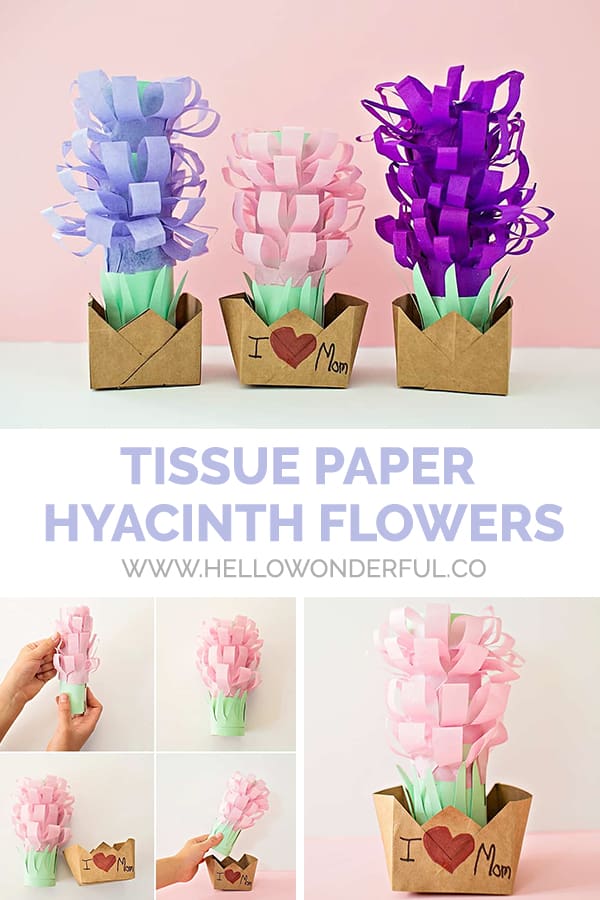
PAPER TISSUE HYACINTH FLOWER POTS

Scroll down to watch the video below to see how easy it is make these pretty tissue paper Hyacinth Flower Pots and make sure to subscribe to our YouTube channel for more fun videos!


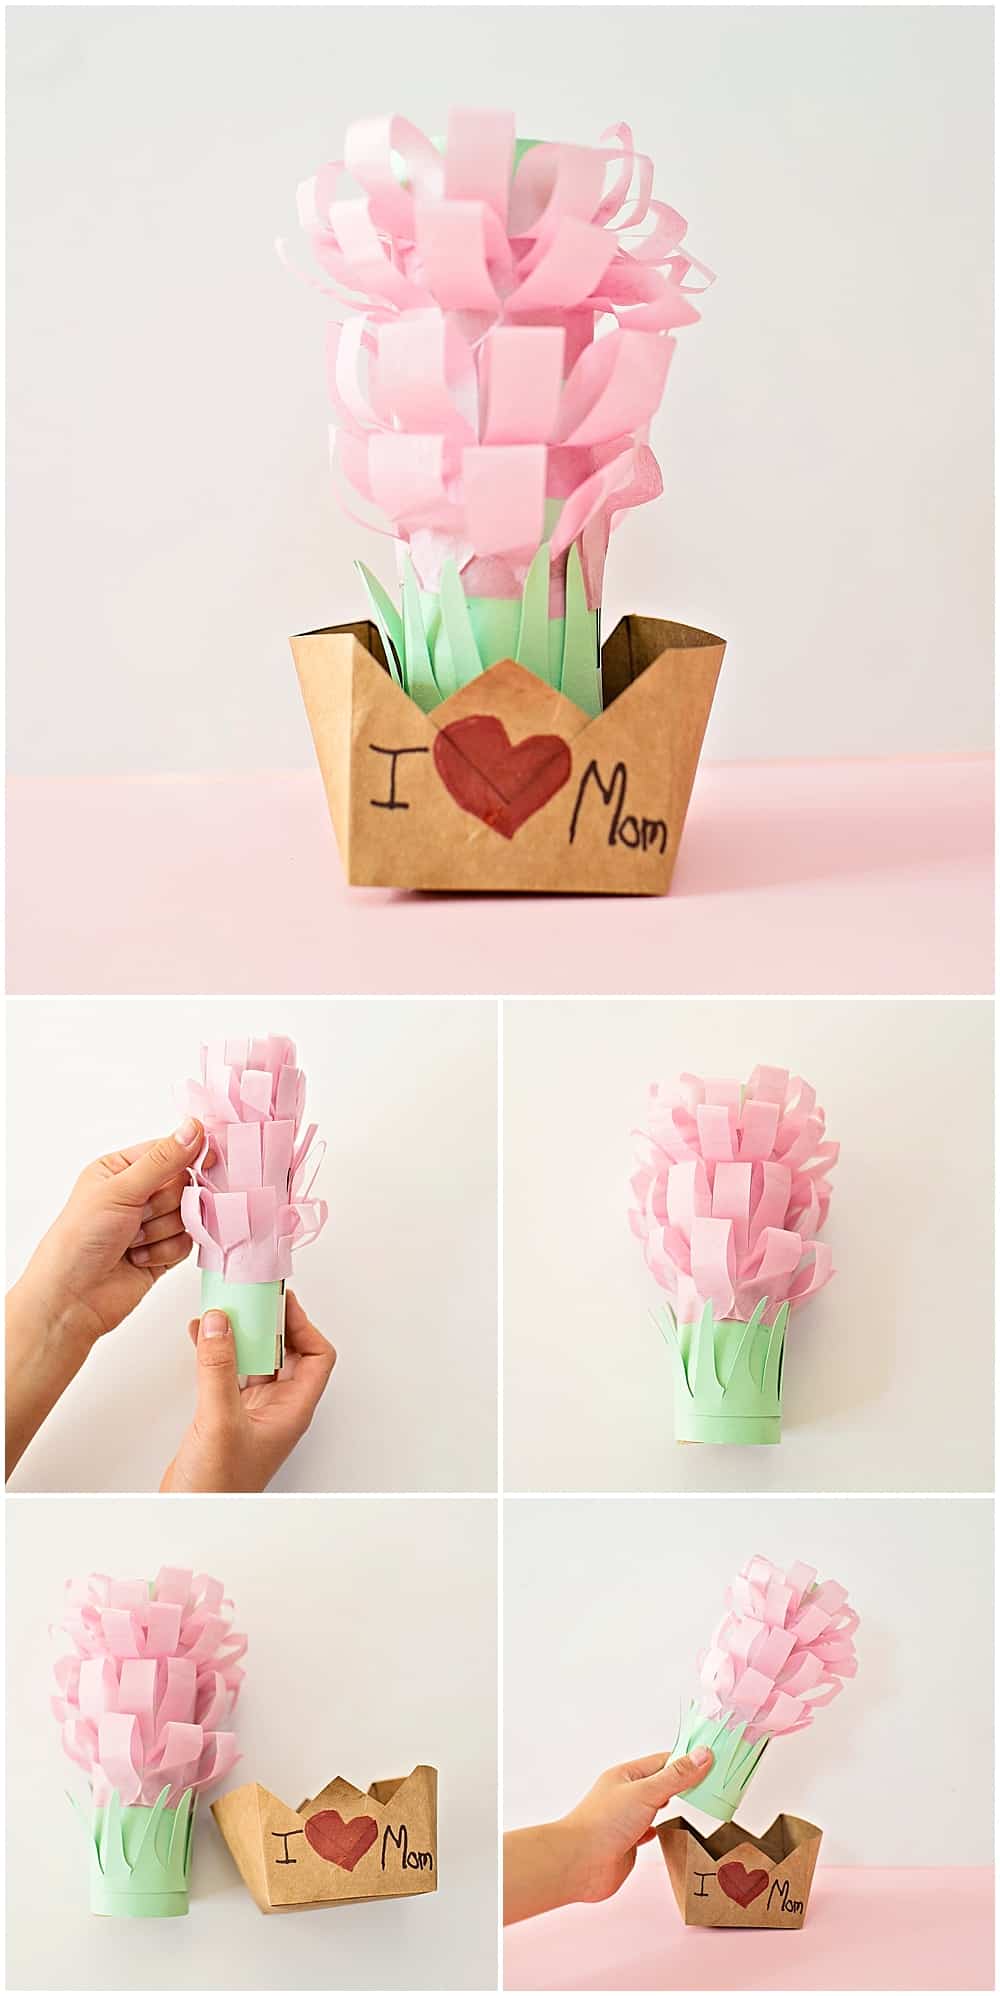
Give mom a potted Hyacinth plant that will stay in bloom all year long this year for Mother's Day. We love paper flowers or non-traditional flower bouquets that won't wilt. Kids will have fun rolling tissue paper and fluffing the petals on these gorgeous yet super simple paper flowers on a roll. The flower pot along with paper roll stems are fun ways to recycle!


Get the free printable template to make the easy flower pots and follow the instructions below and video to make these sweet blooms for Mother's Day or a cute spring time craft with the kids.

Tissue Paper Hyacinth - Materials:
-
- Paper Towel Roll
- Tissue Paper
- Glue
- Green cardstock
- Tape
- Scissors
- Grocery paper bag
- Free printable flower pot template (download right below)
Click Here to Get Your Free Printable
INSTRUCTIONS:
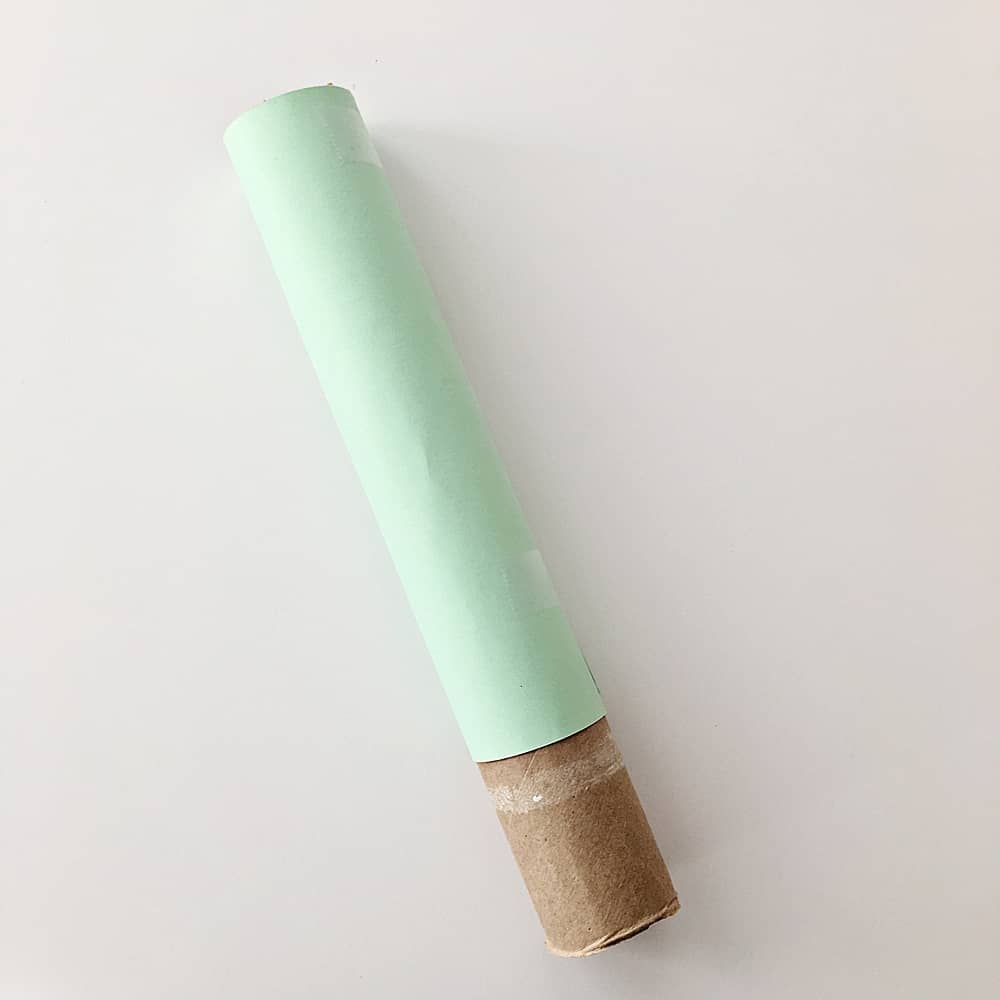
Step 1: Gather a paper towel roll, green craft paper and any color craft tissue paper you want.
Step 2. Cover the tissue paper roll with green craft paper - use tape or glue. Cut down the roll to the size you want. Ours were around 6-7 inches long.
Step 3. Take a long strip of colored craft tissue paper. Fold the tissue paper into half along the width. Cut small and even fringes along the closed side of the folded tissue paper.
Step 4. Apply glue along the intact open side of the fringed tissue paper.
Step 5. Hold any one end of the glued tissue paper at the top side of the green paper covered tissue paper roll. Start to roll the fringed tissue paper around the tissue paper roll, keeping the fringes upwards and moving downwards while rolling the paper. Repeat to the length you want covered on the paper towel roll.
Step 6. Fluff your petals by carefully twisting the fringed parts to separate the 2 sides of the folded fringes and give the flower a filled look.
Step 7. Use scissors to cut grass (leaf) pattern from the green craft paper.
Step 8. Glue the grass pattern around the bottom end of the tissue paper roll (below the flower).
FLOWER POT
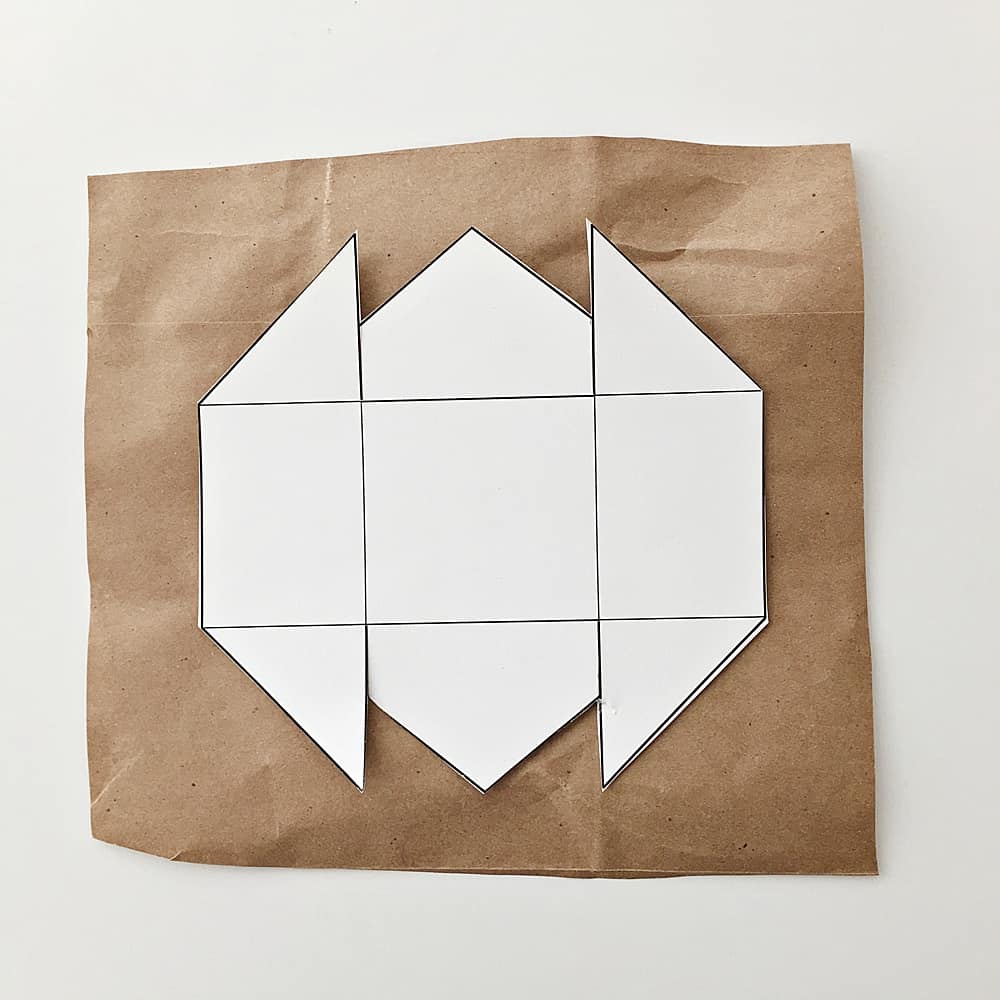
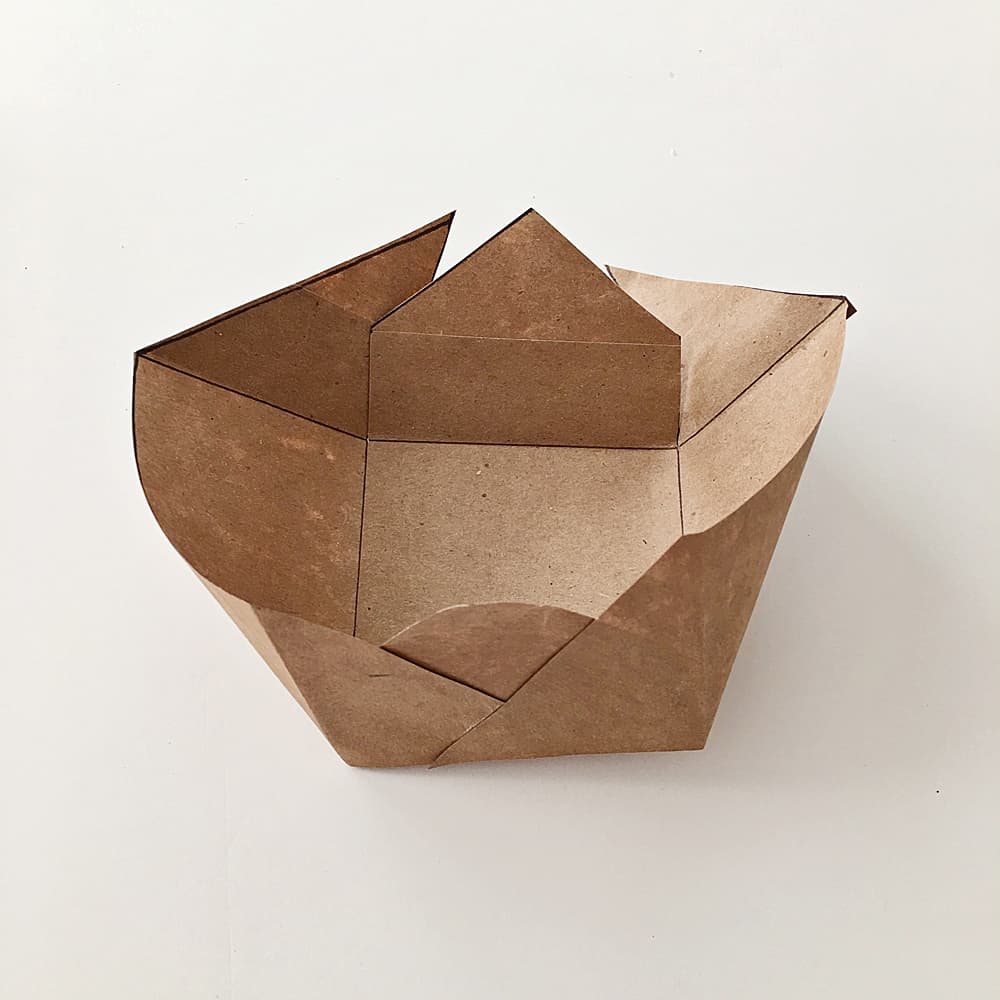
Step 1. Trace the template on your brown grocery bag and cut along the traced pattern.
Step 2. Cut slits along the 4 lines. Fold the front and the back side up. Now fold the sides up. Fold the extra parts at the front part of the sides aligned with the front side of the pattern and glue to join them. Similarly fold and glue the 3 other extra parts, 2 at the front and 2 at the back side, to complete the flower pot. (It's actually pretty simple if you watch the video for this portion).
Step 3. Have your child write a special message on the flower pot.
You're done! Now just place your pretty Hyacinth flowers into your pot and surprise mom with her flowers.


How are you celebrating mom this year? Check out more Mother's Day Flower Art and Unicorn Flower Art, as well as these adorable flower cards and paper bouquets you can make.
Check out the video below to see how to make these pretty paper tissue Hyacinth Flower Pots.
Kids will have fun rolling tissue paper and fluffing the petals on these gorgeous yet super simple paper flowers on a roll. The flower pot along with paper roll stems are fun ways to recycle! Give mom a potted Hyacinth plant that will stay in bloom all year long this year for Mother’s Day. FLOWERS Step 1: Gather a paper towel roll, green craft paper and any color craft tissue paper you want. Step 2. Cover the tissue paper roll with green craft paper – use tape or glue. Cut down the roll to the size you want. Ours were around 6-7 inches long. Step 3. Take a long strip of colored craft tissue paper. Fold the tissue paper into half along the width. Cut small and even fringes along the closed side of the folded tissue paper. Step 4. Apply glue along the intact open side of the fringed tissue paper. Step 5. Hold any one end of the glued tissue paper at the top side of the green paper covered tissue paper roll. Start to roll the fringed tissue paper around the tissue paper roll, keeping the fringes upwards and moving downwards while rolling the paper. Repeat to the length you want covered on the paper towel roll. Step 6. Fluff your petals by carefully twisting the fringed parts to separate the 2 sides of the folded fringes and give the flower a filled look. Step 7. Use scissors to cut grass (leaf) pattern from the green craft paper. Step 8. Glue the grass pattern around the bottom end of the tissue paper roll (below the flower). FLOWER POT Step 1. Trace the template on your brown grocery bag and cut along the traced pattern. Step 2. Cut slits along the 4 lines. Fold the front and the back side up. Now fold the sides up. Fold the extra parts at the front part of the sides aligned with the front side of the pattern and glue to join them. Similarly fold and glue the 3 other extra parts, 2 at the front and 2 at the back side, to complete the flower pot. (It’s actually pretty simple if you watch the video for this portion). Step 3. Have your child write a special message on the flower pot. You’re done! Now just place your pretty Hyacinth flowers into your pot and surprise mom with her flowers.TISSUE PAPER HYACINTH FLOWERS

Materials
Instructions
Disclosure: Some of the links in the post above are “affiliate links.” This means if you click on the link and purchase the item, we will receive a small affiliate commission. Regardless, we give our promise that we only recommend products or services we would use personally and believe will add values to our readers